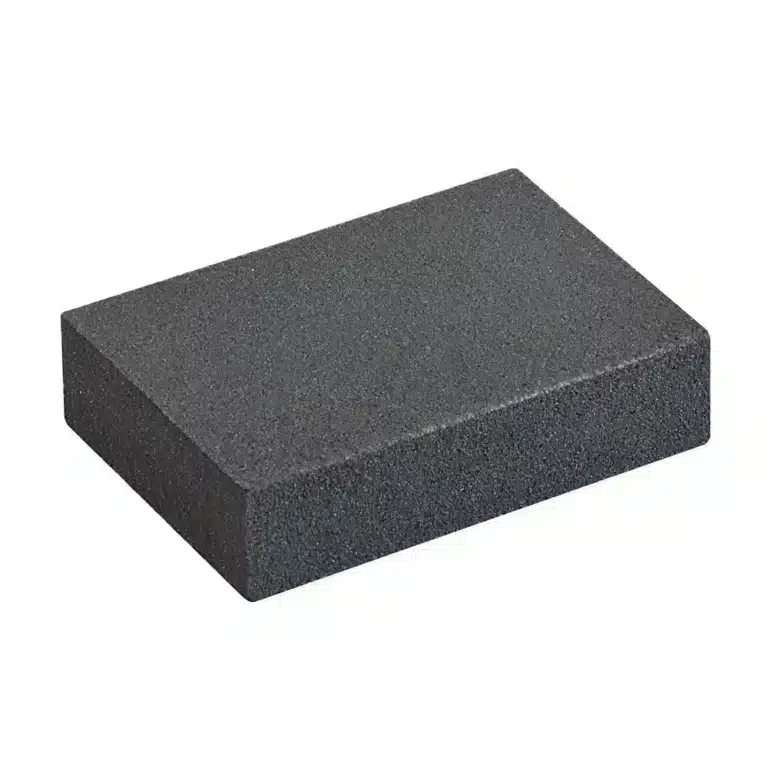
Can be used wet or dry for sanding almost any type of material, flat or contoured. 70 x 100 x 25mm. Bonded silicone carbide Bonded silicone carbide Use wet or dry For flat or contoured surfaces How to Use a Foam Sanding Block with Epoxy Resins Allow the Epoxy to Cure: Ensure that the epoxy resin has fully cured and hardened before sanding. This will prevent the resin from smearing or becoming uneven. Begin Sanding: Gently rub the foam sanding block over the epoxy surface in a back-and-forth or circular motion. Apply light, even pressure to avoid creating new scratches or uneven areas. Check Your Progress: Periodically wipe the surface with a clean, dry cloth to remove sanding dust and check the smoothness. This will help you gauge how much more sanding is needed. Clean the Surface: After achieving a smooth finish, clean the epoxy surface thoroughly to remove any remaining dust. This can be done with a damp cloth followed by a dry cloth to ensure no moisture remains. Inspect and Finish: Once the surface is clean and dry, inspect it to ensure it's free of imperfections. If needed, you can apply a new coat of resin or polish the surface for a glossy finish.
$2,51

About Chopping Board Oil: Chopping Board Oil is the perfect choice for protecting, maintaining, and restoring wooden kitchen items including chopping boards, butcher blocks, wooden spoons and more. Regular application will prevent chopping boards from becoming dry, cracked, and brittle. Forming a protective barrier, Chopping Board Oil will also prevent liquid from penetrating the surface, working to reduce the proliferation of germs and bacteria. Chopping Board Oil is food-grade, making it perfect for use on items used for food preparation. The oil will never spoil, unlike many alternative treatments. The pure mineral oil penetrates the wood, providing protection, retaining and enhancing the wood's natural colour and character, while also prolonging the lifespan of your wooden kitchen boards, blocks and utensils. 250ml will treat a chopping board roughly 50 times. Once open, use within 3 years. 💥Cutting Board Oil is Suitable For: -Chopping boards -Butcher blocks -Countertops -Kitchen Utensils [xyz-ips snippet="TRUSTPILOT-WIDGET"]
$16,49
• "Art Pro Deluxe" non-toxic ultra-high viscosity epoxy resin for artists. The best choice for Resin and Geode-art, making Coasters, Trays, Ocean-art, jewellery and casting surfaces. + gloves & detailed instruction for FREE. • Beloved by many artists around the world: ✔️ ULTRA HIGH viscosity -> easy control lines in resin and geode- art (coasters, trays, paintings) ✔️ Amazing glossy and self-levelling surface ✔️ High scratch resistance -> ideal for finish layers and use for coasters and trays ✔️ UV filter for protection against yellowing -> 10 years warranty ✔️ Safe and Certified -> Non-toxic, Solvent-free, non-flammable, and totally safe ✔️ High transparency -> a true liquid crystal ✔️ Easy to use -> fast curing time (1st stage - 10-12h; 2nd - 18h) ✔️ Trusted quality -> Thousands customers since 2015 Check and tag our social media for inspiration! We always happy to publish your art-work –Instagram Logo Icon - Download in Gradient Style 🌿Cruelty Free, Vegan Friendly🐹
$41,00
• “EPOXYTABLE 5-FIVE” - deep pour epoxy resin for tables & large projects. Free 25ml pigment* + Gloves + Detailed instruction. • The best choice for deep pouring: ✔️ Low exothermic reaction –> castings up to 5cm [1,96”] ✔️ Strong UV filters –> non-yellowing guaranteed for 5 years ✔️ Highly mechanical resistant surface, for maximum scratchproof properties ✔️ Low viscosity –> bubbles free ✔️ Long working time –> no rush in the process ✔️ Heat resistance –> up to 70°C [158 F] ✔️ Trusted quality –> We have already sold more than 26000 kits of this product, since we started in 2015 ✔️ Cruelty Free, Vegan Friendly🐹
$41,00
To prevent rust on stairs, it is recommended to follow these steps
- Thoroughly clean the stairs to remove any existing rust residues.
- Use a specific anti-rust primer for metals to create a protective barrier against the formation of new rust.
- Apply a rust-resistant coating such as anti-rust paint or a specialized product for metal protection.
- Periodically check the condition of the stairs and reapply the anti-rust treatment if needed.
- For more severe damage, consult a professional to assess any necessary repair interventions.
For high-quality anti-rust products and solutions, visit the RESINPRO website at resin-pro.co.uk.
Epoxy Resin
Epoxy resin is a thermosetting material widely used for various purposes, such as coating floors, creating DIY jewelry, or reinforcing surfaces in the construction industry. Comprising two components, resin, and hardener, which when mixed undergo a chemical reaction leading to material solidification. Epoxy resin provides a resistant and durable surface that can be colored with pigments for customized results. It is crucial to follow the usage instructions carefully and wear appropriate protection during processing as harmful chemicals may be present.
Epoxy Resin Coating for Stairs
An epoxy resin coating for stairs is a durable and resistant solution to protect and decorate both vertical and horizontal surfaces. This coating provides a smooth, glossy finish that is easy to clean and highly resistant to wear, impacts, and chemicals. Properly applying epoxy resin to stairs requires attention to surface preparation and correct product mixing. Ensure to follow the manufacturer's instructions for a uniform and long-lasting application. Additionally, ensure that the stairs are completely dry and free from dust and grease before applying the coating for optimal results.
How to Protect Stairs with Epoxy Resin
Protecting stairs with epoxy resin is an excellent solution to enhance their resistance to wear and external aggressions. Here's how to proceed:
Thoroughly clean the stairs to remove dirt and residues.
Sand the surface to ensure resin adhesion.
Apply a specific primer for epoxy resin.
Prepare the epoxy resin following the manufacturer's instructions.
Spread the resin evenly on the stairs with a brush or roller.
Allow it to dry for the indicated time.
Apply a second coat if necessary for additional protection.
By following these steps, you can effectively protect your stairs with epoxy resin.
Creative Ideas with Epoxy Resin for Stairs
Get creative with epoxy resin for stairs to completely transform the look of a space. Here are some suggestions:
Cover the steps of the stairs with transparent resin to enhance the beauty of the underlying wood.
Add pigments or glitter effects to the resin to create colored or sparkling steps.
Incorporate decorative elements such as dried flowers, leaves, or stones into the stairs for a natural and unique touch.
Use colored resins to create marble, terrazzo, or concrete effects on the steps.
Apply luminous strips or inserts of phosphorescent resin for a glowing effect at night.
Create 3D effect steps using self-leveling resins.
Protect and reinforce the stairs with non-slip transparent resin for increased safety.
Intense and brilliant color, ideal for Transparent Epoxy Resins. Mix small quantities to get a translucent effect. The high coverage of the “Colorful Original” range allows to obtain a full and bright color. The high concentration provides an opaque color with a few drops.
Usable to color the products of the RESIN PRO range.
💥 Ideal for epoxy creations and resin tables thanks to its features:
✔️ Intense colors
✔️ Easy to mix
✔️ Intense colors
✔️ High concentration
✔️ Easy to get a translucent effect
✔️ 5 stars on Trustpilot
🌿Cruelty Free, Vegan Friendly🐹
$16,00
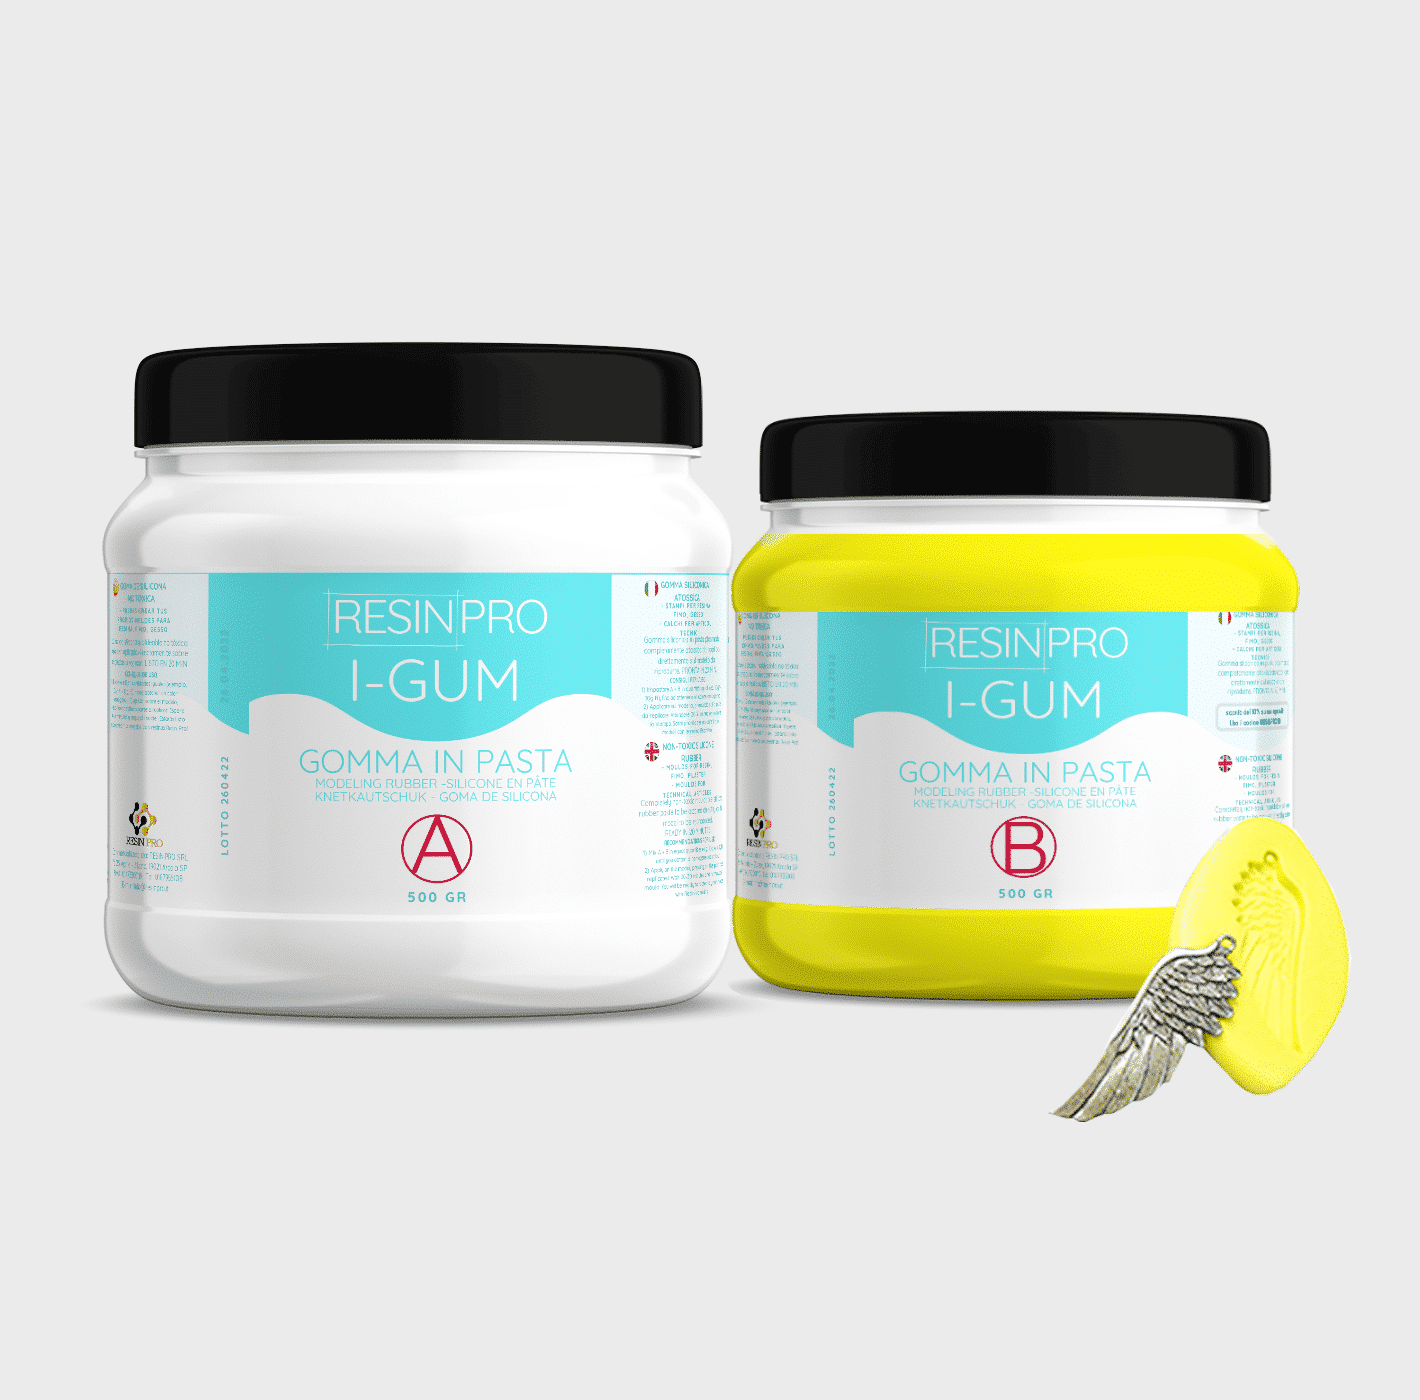
• "I-GUM" - Non-Toxic Silicone Rubber - Paste Form
Pasty silicone rubber "I-GUM" is a two–component product for creating moulds and forms for pouring with epoxy resin.
• Superior formula proven by years of experience:
✔️ Easy to use -> 1:1 mix ratio
✔️ Non-toxic -> You can work without gloves
✔️ Without smell
✔️ Long working time -> 20 minutes
✔️ European quality -> Directly from Italy
✔️ Ideal for creating moulds and frames for working with resin, polyurethanes, wax, cement and other materials
✔️ 🌿Cruelty Free, Vegan Friendly🐹
$22,00

Images
On sale
“Pure Mold” – Translucent Liquid Silicone Rubber for Mould Making, 1:1 Mix Ratio
Available, ready for shipping
Order now to receive your product between Wednesday, April 29 and Wednesday, May 6.
Shipping $16
Choose your kit:
Quantity
"Pure Mold" - Translucent Liquid Silicone Rubber for Mould Making, 1:1 Mix Ratio quantity
The kit: 1 KG (500 GR of A + 500 GR of B)
$52,95 Original price was: $52,95.$44,95Current price is: $44,95.-15%
💰 You save
$8.00
TRANSLUCENT AND FAST CASTING LIQUID SILICONE RUBBER FOR MOULDS
🧪【INNOVATIVE FORMULA】Create your moulds using PURE MOLD silicone rubber! Compatible with many materials including resins, plaster and cement. Its transparency will allow you to observe through the mould and its high mechanical characteristics make it a product suitable for both professional and hobby use.
💎【IMPECCABLE QUALITY】Guarantees the creation of resistant and detailed moulds that will last over time and will be reusable several times!
🌿【SAFE AND CERTIFIED】 100% Made in Italy, guaranteed by a Certificate of Non-toxicity and solvent-free and odorless, this rubber is configured as a safe and easy to use product!
⚙️【EASY TO USE】 Mixing ratio 1: 1; Hardness: 13 Shore; Catalysis in about 6-8 hours. The poly additive formula makes it more resistant than other silicones, allowing the creation of higher quality molds.
+ Easy mixing ratio 1:1
+ Less mould shrinkage over time
+ 30% longer service life
+ Fast (6-8H)
+ Translucent
+ Resistant
Good for:
epoxy resins,
polyester,
polyurethanes and acrylics,
cements and plasters.+ Liquid
🌿Cruelty Free, Vegan Friendly🐹
$44,00
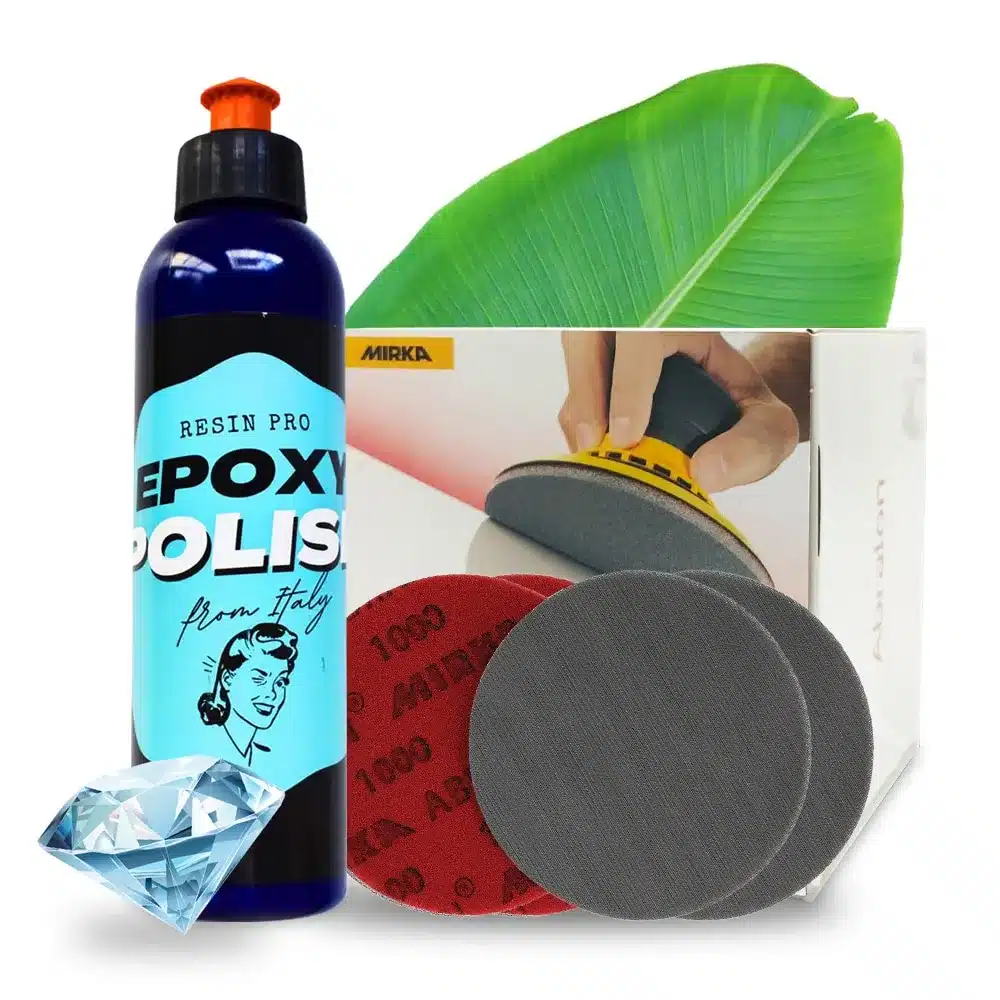
Great way to add some glossy finish to your epoxy project!
Was made especially for resin world.
Resin Pro offers the possibility to achieve a perfect polishing by using different types of abrasive pastes.
It can be used by hand or with an orbital polisher to make your resin creations shiny.
$36,00
 Free shipping on orders over €199,00