![]()
Stones & Binder Calculator Area sqm (L*W*1m): Thickness (cm)*: Calculate Stones: 0 kg Resin binder: 0 kg *Recommended minimum thickness for driveway: 2 cm; Other areas: 1.5 cm. Certified Non-Toxic Transparent Epoxy Binder This resin has been specifically formulated to ensure an impeccable result in various applications. Thanks to its high gloss and transparency, and low viscosity, it offers a flawless, clear, and bubble-free result for your colored pebbles or aggregates. It is also certified non-toxic for skin contact post-cure. High Resistance and Durability Excellent resistance for your permeable floor: this binder ensures outstanding mechanical performance once cured. It also cures very quickly, making the floor walkable and fully usable in just 24 hours. Guaranteed Yellowing Resistance The cycloaliphatic amine-based hardener, along with the use of UV filters, guarantees high resistance to yellowing. Key Features High transparency Excellent mechanical resistance Good chemical resistance and carbonation resistance High impregnation and structural reinforcement for permeable floors Long working time Glossy surface High UV resistance for long-lasting creations (low yellowing) High mechanical resistance for scratch protection Low viscosity that reduces air bubbles after curing and facilitates aggregate impregnation Odorless and solvent-free perfectly transparent and bubble-free thanks to the specific formula for natural stones and colored marbles Curing Time Complete curing is achieved in about 24 hours, but the product can be walked on after just 10 hours. Ideal Applications The ideal applications for "ultra-transparent" epoxy resin include colored or dark-colored pebbles and aggregates. Consider these indicative data for epoxy resin for colored aggregates: 1-2 mm - for 20-25 kg of aggregate, add 800g of epoxy resin 3-5 mm - for 20-25 kg of aggregate, add 600g of epoxy resin 6-10 mm - for 20-25 kg of aggregate, add 600g of epoxy resin 10-20 mm - for 20-25 kg of aggregate, add 400g of epoxy resin Main Technical Data (Click the "TDS" icon for the full technical data sheet) Pot-life (150g at 30°C): 1h20' Complete cure after 24h Film cure (1mm at 30°C): 6h Supplied in plastic cans Maximum casting thickness: 2 cm (7 kg at 20°C) Epoxy Resins Epoxy resins are thermosetting polymers derived from monomers containing the three-atom epoxy ring. They are widely used in the production of advanced composite materials, obtained by combining the resin with fibers.
$177,99
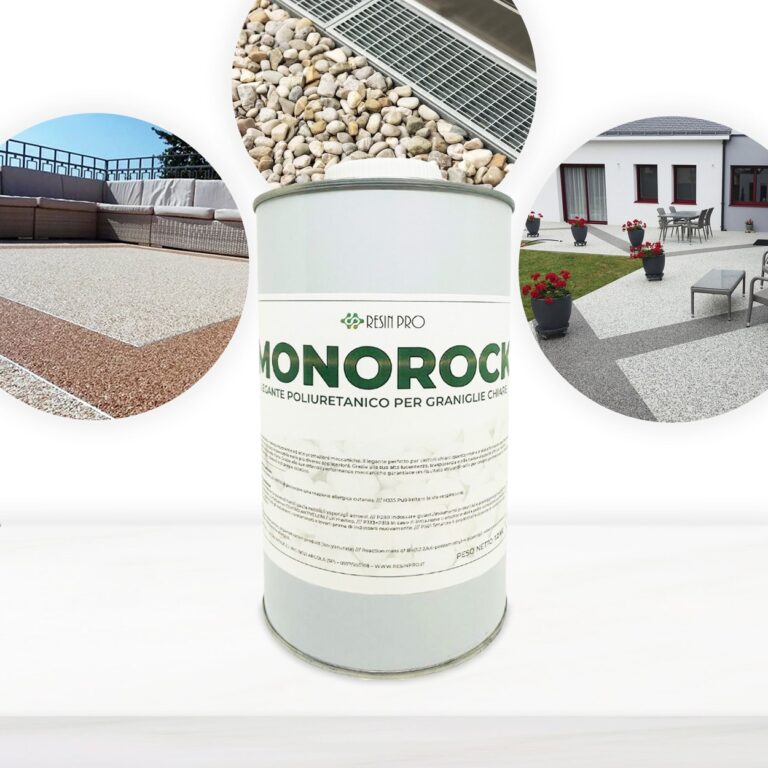
High-Performance Single-Component Polyurethane Resin The perfect binder for white or light-colored pebbles. This resin has been specifically formulated to ensure an impeccable result in various applications. Thanks to its high gloss and transparency, and low viscosity, it offers a flawless, clear, and bubble-free result. Ideal for use as a binder for white or light-colored pebbles. Due to its optimal mechanical performance, it ensures an extraordinary result for creating continuous permeable floors that are durable and aesthetically pleasing. Consumption for Aggregate/Pebble Binder Depending on the chosen grain size, consider these indicative data for polyurethane resin for white or light aggregates: 7-10 mm – for 20-25 kg of aggregate, add 500g of polyurethane resin; 4-6 mm – for 20-25 kg of aggregate, add 650g of polyurethane resin; 2-4 mm – for 20-25 kg of aggregate, add 800g of polyurethane resin; 1-2 mm – for 20-25 kg of aggregate, add 1.2 kg of polyurethane resin; Note: It is advisable to verify the necessary amount of binder before application, as an excess of binder can cause swelling and foaming. The correct amount of binder is just enough to wet the surface of the aggregate without dripping. If you have any doubts, contact our support! These consumption rates are calculated based on the standard sale format of aggregates/pebbles, approximately 20-25 kg per bag. Primer For greater adhesion security, use Transparent Epoxy Resin as a primer for your surfaces: in this application, consider 150-200 g/m² applied with a simple roller; to ensure optimal grip, sprinkle quartz sand to refusal immediately after application. Resistance Excellent mechanical performance, with pebbles perfectly bound together and extraordinary resistance to yellowing. Main Features High transparency Excellent mechanical resistance Good chemical resistance and carbonation resistance High impregnation and reinforcement of technical fabrics Long working time Glossy and self-leveling surface High UV resistance for long-lasting creations - no yellowing High mechanical resistance for scratch protection Low viscosity reduces the presence of air bubbles after curing and facilitates carbon fiber impregnation Odorless and solvent-free Perfectly transparent and bubble-free thanks to its specific formula. Curing Time Complete curing is achieved in about 24 hours. Surface Preparation Apply on solid, compact, dry substrates that are not subject to capillary rising damp, clean, and free of oils and greases. Treat surfaces by shot blasting or sanding followed by residue vacuuming. Alternatively, a cementitious underlay or epoxy screed is recommended. The use of a suitable primer is recommended (see specific application cycle sheets). Product Use Mix the product with colored or monochromatic mineral aggregates of any grain size, using manual (low-speed drill with helical mixer) or automatic (concrete mixer) mixing. For a finished product with maximum chemical and mechanical resistance, use aggregates that are clean of oils or greases and free of moisture. The ratio of aggregate to binder is highly dependent on the shape, size, and porosity of the aggregate; as a guideline: 40:1 for 4-6 mm aggregate; 20:1 for 2-4 mm aggregate; 16:1 for 1-2 mm aggregate. Technical Assistance, Product info: Contacts
$50,49
• "Art Pro Deluxe" non-toxic ultra-high viscosity epoxy resin for artists. The best choice for Resin and Geode-art, making Coasters, Trays, Ocean-art, jewellery and casting surfaces. + gloves & detailed instruction for FREE. • Beloved by many artists around the world: ✔️ ULTRA HIGH viscosity -> easy control lines in resin and geode- art (coasters, trays, paintings) ✔️ Amazing glossy and self-levelling surface ✔️ High scratch resistance -> ideal for finish layers and use for coasters and trays ✔️ UV filter for protection against yellowing -> 10 years warranty ✔️ Safe and Certified -> Non-toxic, Solvent-free, non-flammable, and totally safe ✔️ High transparency -> a true liquid crystal ✔️ Easy to use -> fast curing time (1st stage - 10-12h; 2nd - 18h) ✔️ Trusted quality -> Thousands customers since 2015 Check and tag our social media for inspiration! We always happy to publish your art-work –Instagram Logo Icon - Download in Gradient Style 🌿Cruelty Free, Vegan Friendly🐹
$41,00
• “EPOXYTABLE 5-FIVE” - deep pour epoxy resin for tables & large projects. Free 25ml pigment* + Gloves + Detailed instruction. • The best choice for deep pouring: ✔️ Low exothermic reaction –> castings up to 5cm [1,96”] ✔️ Strong UV filters –> non-yellowing guaranteed for 5 years ✔️ Highly mechanical resistant surface, for maximum scratchproof properties ✔️ Low viscosity –> bubbles free ✔️ Long working time –> no rush in the process ✔️ Heat resistance –> up to 70°C [158 F] ✔️ Trusted quality –> We have already sold more than 26000 kits of this product, since we started in 2015 ✔️ Cruelty Free, Vegan Friendly🐹
$41,00
Preventing Air Bubble Issues in RESINPRO Products
To prevent air bubble issues in RESINPRO products, it is crucial to adhere to specific best practices during the processing phase. Here are some valuable tips:
- Accurately weigh components A and B before mixing them to ensure proper ratios.
- Mix the components slowly to prevent the introduction of air into the compound.
- Use a tall and narrow container to minimize air agitation during mixing.
- Utilize a vacuum deaerator to effectively remove air bubbles before pouring.
- Apply the coating in a uniform thickness to prevent air bubble formation during curing.
By following these guidelines, optimal results can be achieved with RESINPRO products while minimizing air bubble-related issues.
How to Prevent Air Bubbles in Epoxy Resin
To avoid air bubbles in epoxy resin, follow these practical tips
- Mix the epoxy resin and hardener slowly to prevent air incorporation.
- Use a flat and wide container for mixing to evenly distribute the resin.
- Use a torch to eliminate surface air bubbles after pouring the resin into molds.
- Avoid over-agitating the mixture to prevent additional bubbles.
- Allow the resin to rest for a few minutes before pouring it into molds to allow bubbles to rise to the surface and be eliminated.
By following these precautions, you can achieve bubble-free epoxy resin works successfully.
Techniques for Removing Air Bubbles in Silicone Molds
To eliminate air bubbles in silicone molds effectively, consider the following techniques:
Use a thin stick to gently push the air outwards.
Lightly vibrate the mold to bring bubbles to the surface.
Use a hot air gun to eliminate larger bubbles.
Be cautious during mixing to avoid introducing air.
If possible, use a vacuum to efficiently remove the bubbles.
Allow the mold to rest for a while before use to enable bubbles to rise to the surface and disappear.
By implementing these techniques, you can obtain air bubble-free silicone molds with optimal results.
Enhancing the Finish of DIY Resin Projects
To improve the finish of your DIY resin projects, consider the following key steps:
Carefully sand the resin surface with fine-grit sandpaper to remove imperfections.
Apply a specific resin primer to enhance adhesion of the subsequent coating.
Use a transparent resin or silicone coating to provide shine and protection to the project.
Maintain a dust-free working environment for a flawless finish.
Follow the manufacturer's instructions closely to ensure proper application and drying of the materials.
By following these recommendations, you can achieve professional and long-lasting finishes for your DIY resin projects.
Intense and brilliant color, ideal for Transparent Epoxy Resins. Mix small quantities to get a translucent effect. The high coverage of the “Colorful Original” range allows to obtain a full and bright color. The high concentration provides an opaque color with a few drops.
Usable to color the products of the RESIN PRO range.
💥 Ideal for epoxy creations and resin tables thanks to its features:
✔️ Intense colors
✔️ Easy to mix
✔️ Intense colors
✔️ High concentration
✔️ Easy to get a translucent effect
✔️ 5 stars on Trustpilot
🌿Cruelty Free, Vegan Friendly🐹
$16,00
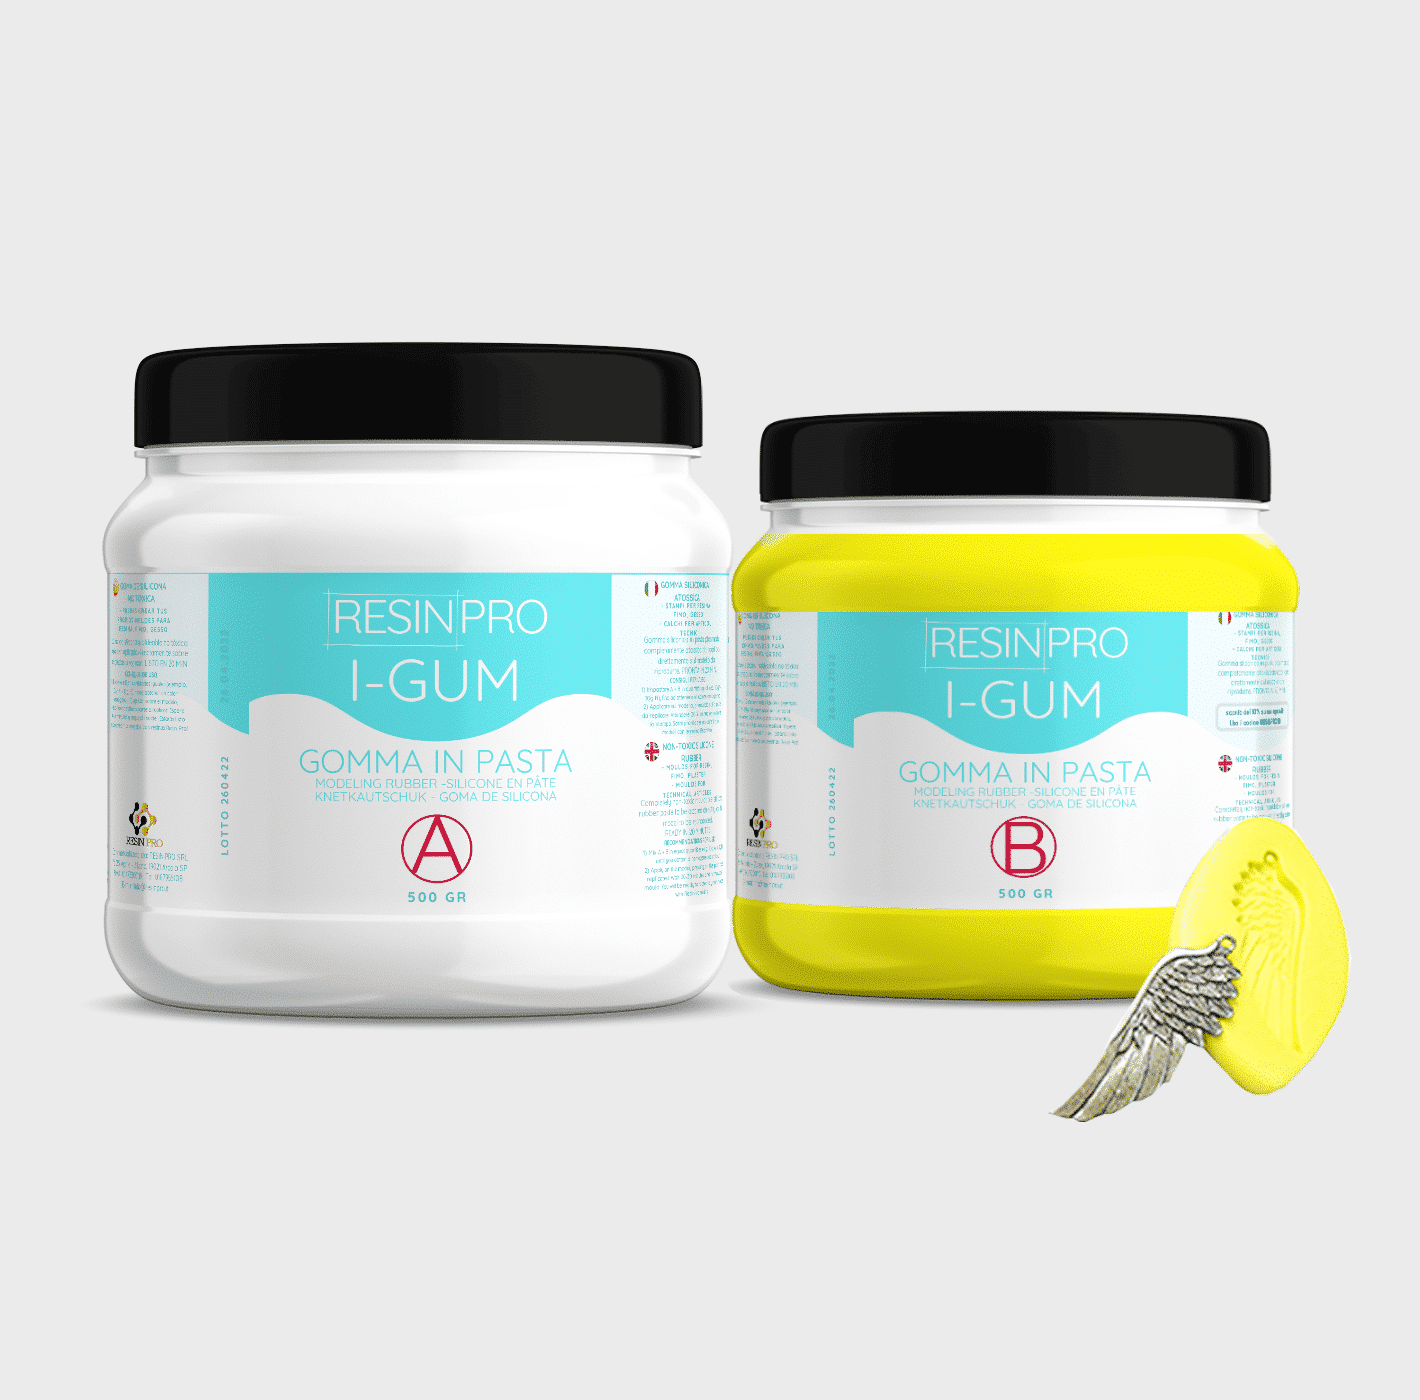
• "I-GUM" - Non-Toxic Silicone Rubber - Paste Form
Pasty silicone rubber "I-GUM" is a two–component product for creating moulds and forms for pouring with epoxy resin.
• Superior formula proven by years of experience:
✔️ Easy to use -> 1:1 mix ratio
✔️ Non-toxic -> You can work without gloves
✔️ Without smell
✔️ Long working time -> 20 minutes
✔️ European quality -> Directly from Italy
✔️ Ideal for creating moulds and frames for working with resin, polyurethanes, wax, cement and other materials
✔️ 🌿Cruelty Free, Vegan Friendly🐹
$22,00

Images
On sale
“Pure Mold” – Translucent Liquid Silicone Rubber for Mould Making, 1:1 Mix Ratio
Available, ready for shipping
Order now to receive your product between Wednesday, April 29 and Wednesday, May 6.
Shipping $16
Choose your kit:
Quantity
"Pure Mold" - Translucent Liquid Silicone Rubber for Mould Making, 1:1 Mix Ratio quantity
The kit: 1 KG (500 GR of A + 500 GR of B)
$52,95 Original price was: $52,95.$44,95Current price is: $44,95.-15%
💰 You save
$8.00
TRANSLUCENT AND FAST CASTING LIQUID SILICONE RUBBER FOR MOULDS
🧪【INNOVATIVE FORMULA】Create your moulds using PURE MOLD silicone rubber! Compatible with many materials including resins, plaster and cement. Its transparency will allow you to observe through the mould and its high mechanical characteristics make it a product suitable for both professional and hobby use.
💎【IMPECCABLE QUALITY】Guarantees the creation of resistant and detailed moulds that will last over time and will be reusable several times!
🌿【SAFE AND CERTIFIED】 100% Made in Italy, guaranteed by a Certificate of Non-toxicity and solvent-free and odorless, this rubber is configured as a safe and easy to use product!
⚙️【EASY TO USE】 Mixing ratio 1: 1; Hardness: 13 Shore; Catalysis in about 6-8 hours. The poly additive formula makes it more resistant than other silicones, allowing the creation of higher quality molds.
+ Easy mixing ratio 1:1
+ Less mould shrinkage over time
+ 30% longer service life
+ Fast (6-8H)
+ Translucent
+ Resistant
Good for:
epoxy resins,
polyester,
polyurethanes and acrylics,
cements and plasters.+ Liquid
🌿Cruelty Free, Vegan Friendly🐹
$44,00
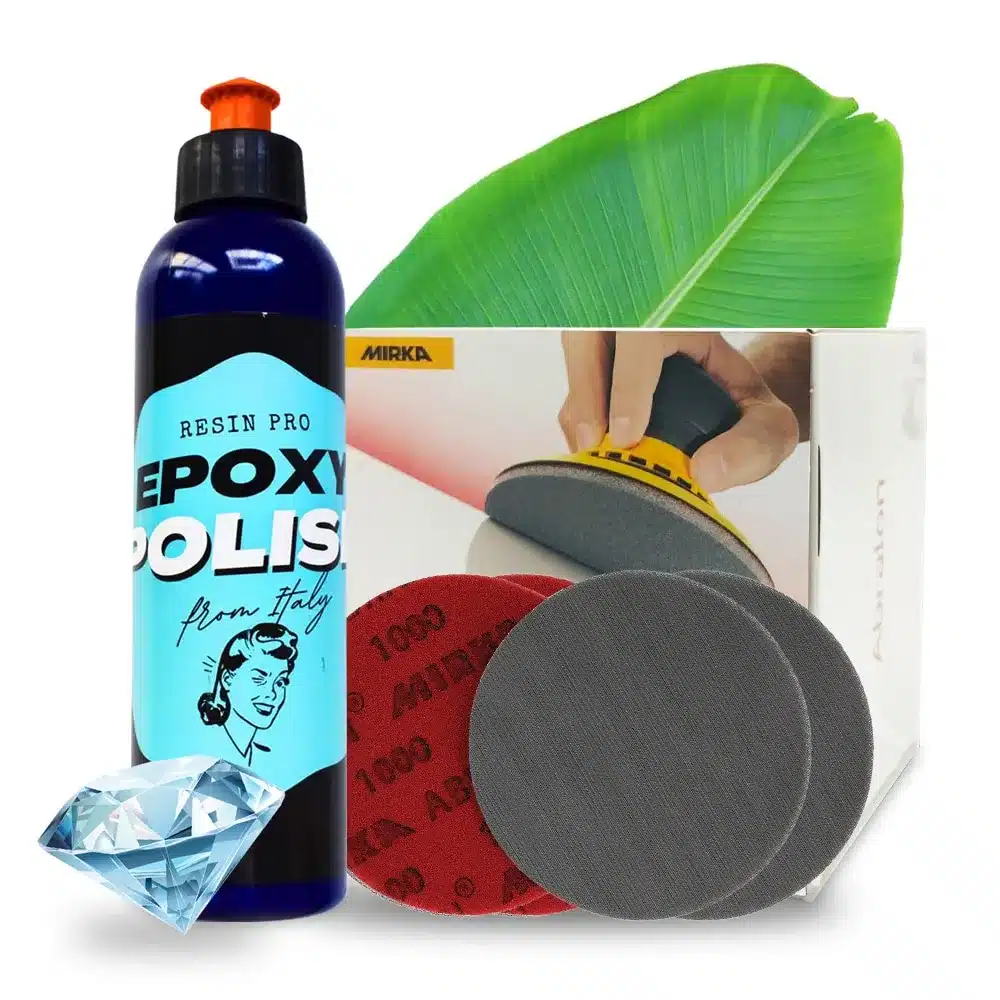
Great way to add some glossy finish to your epoxy project!
Was made especially for resin world.
Resin Pro offers the possibility to achieve a perfect polishing by using different types of abrasive pastes.
It can be used by hand or with an orbital polisher to make your resin creations shiny.
$36,00
 Free shipping on orders over €199,00