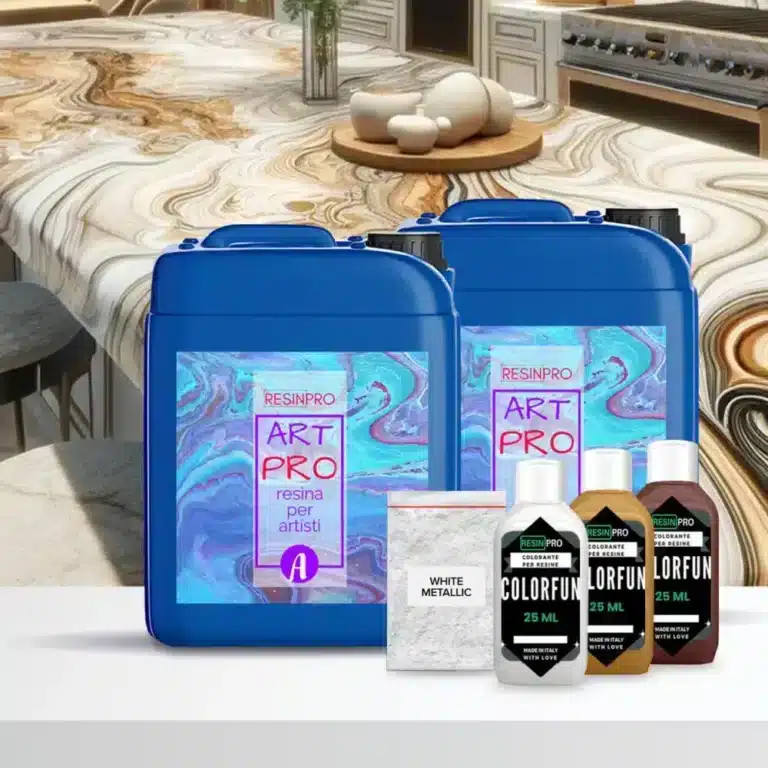
Amber Onyx Effect Kit with Epoxy resin: The 2.49 kg kit (1.66 + 0.83) covers 1 square meter (+ 10 g Sahara white pigment + 25 ml white dye + 25 ml brown dye + 25 ml OXIDE yellow dye) The 4.15 kg kit (2*1.66 + 0.83) covers 2 square meters (+ 2*10 g Sahara white pigment +2* 25 ml white dye +2* 25 ml brown dye +1*25 ml OXIDE yellow dye) The 8.33 kg kit covers 4 square meters (+ 4*10 g Sahara white pigment +4* 25 ml white dye +3* 25 ml brown dye+ 2*25 ml OXIDE yellow dye ) The 16.66kg kit covers 8 square meters (+8*10g Sahara white pigment +8*25ml white dye +4*25ml brown dye + 2 * 25 ml OXIDE Yellow dye) Kit Contents: 2.49 kg, 4.15 kg, 8.33 kg or 16.66 kg of Art Coat Epoxy "Art Pro" for a high quality base White Dye, Oxide Yellow Dye and Brown Dye from the "Colourful" Line for the perfect caramel stone shades - White Metallica Sahara pigment for that extra touch of sparkle Each kit includes dyes and pigment in sufficient quantity for the amount of resin required. Choose the Amber Onyx Effect Kit with Epoxy resin for an easy and elegant transformation of the worktop. Purchase your kit now and elevate your space with the warmth and beauty of caramel marble. Guide Instructions: Step N1: Primer Start by carefully measuring the amount needed to cover the surface based on the consumption of 150 g/m2, making sure to follow the proportions indicated to obtain a homogeneous mixture. Once the base has been prepared, proceed with adding the dye, choosing between white or black depending on your needs. The quantity of colourant to add to the mixture can be measured in a few drops (max 5% by volume). This step is crucial to achieve the desired colour and ensure uniformity of the application. Before applying the primer, it is essential that the surface intended for treatment is adequately prepared. Sand the surface with a coarse grit (40 or 60) before any operation. Make sure it's completely clean, using a soft cloth or brush to remove any pigment, dirt or debris. The surface must also be completely dry; residual humidity can compromise the adhesion of the primer and its effectiveness in sealing the surface. Once the surface is ready, apply the mixture evenly, using a suitable tool such as a brush, roller or spatula, depending on the size of the area to be treated and your personal preference. The key is to get a thin, even layer that can cover the entire area without leaving gaps or excessive product build-up.. After application, it is essential to allow the primer to dry completely before proceeding with further treatments or finishes on the surface. The recommended waiting time is 12 hours; this range may vary slightly depending on environmental conditions, such as humidity and temperature, but offers a good compromise to ensure the mixture has time to dry and adhere properly. During this period, avoid touching or stressing the treated surface to ensure optimal results. Don't worry if you notice any discrepancies on the surface, the next main pour will level everything perfectly. Step N2: application Start by applying masking tape around the perimeter of your countertop to contain the epoxy you're about to pour. This step is essential to ensure the resin stays where it is needed. After applying the resin, wait about 1.5 hours before gently removing the tape. To ensure coverage is even and complete, plan to use approximately 1.6kg of resin for every square meter of surface area. When you are ready to mix the resin, use a drill equipped with a paddle mixer for quick and even action (use at low speed), taking about 2 minutes for this operation. If you prefer to mix by hand, be prepared to take double the time. Don't forget to scrape the sides and bottom of the container halfway through the process with a stick to ensure all the material is mixed well. Next, separate the already mixed resin into different glasses and add the desired colours, mixing the different colours in the different glasses until you obtain an intense and uniform colour per single glass. To create a striking visual effect, pour the coloured resin in random layers into a larger bucket, being careful not to mix the colours together too much. After filling the bucket, spread the contents over the surface of the worktop, leaving a small amount of resin aside to finish the edges later. To remove trapped air bubbles, gently run a propane torch or heat gun over the surface. Once the adhesive tapes have been removed, approximately 1.5 hours after application, if there are any dry edges, moisten them slightly by wearing a protective glove to promote an even appearance. Use appropriate tools, such as spatulas or plastic scrapers, to spread and level the resin along the edges, making sure to cover the entire area well. After letting the resin cure for 24 hours, you can apply a clear top coat or PoliShield scratch-resistant paint to further protect the surface. Finally, for even more refined visual effects, spray 99.9% isopropyl alcohol onto the surface just before the resin begins to fully harden. This will create unique lacy textures. Remember that when you remove the tape, it is essential that the resin is partially hardened, neither too liquid nor completely solid, to avoid unwanted drips. Attention! Safety Guidelines for Using Isopropyl Alcohol (99.9%) Isopropyl alcohol (IPA) is a highly flammable substance. Improper use—especially near heat sources like torches or heat guns—can result in fire or explosion. To ensure safe use, follow these precautions: Primary Risks Highly flammable: IPA vapors can ignite from sparks, open flames, or hot surfaces. Forms explosive vapor-air mixtures, especially in enclosed or poorly ventilated spaces. Strictly Prohibited: Using gas torches or heat guns near areas treated with IPA. Spraying IPA near active heat sources. Storing IPA near flames, heaters, or hot tools. Recommended Safety Measures: 1. Ventilation: Always work in a well-ventilated area when using IPA. 2. Wait Time: After applying IPA, wait at least 5–10 minutes to allow complete evaporation before using any heat tools. 3. Safe Distance: Keep IPA containers at least 2 meters (6 feet) away from heat or flame sources. 4. Storage: Store IPA in a tightly sealed container, away from direct sunlight or high temperatures. 5. Fire Safety: Have a CO₂ or dry chemical fire extinguisher nearby when working with flammable substances and open flames. In Case of Fire: Do not use water to extinguish the fire. Use an appropriate extinguisher, cut off air supply if safe, and call emergency services if needed.
$83,49

The structure of the lessons that you will get access to: Preparation of the workspace and mixing of resin. We will show you how to quickly level the work surface, what temperature and what other conditions are needed for a good solidification of the resin. Let’s prepare the moulds for pouring. We will show you how to mix the resin, give you ready-made calculations of proportions and teach you how to use the automatic proportion calculator in a couple of clicks. Working with glitters: Let’s explain how to add our glitter and sparkles to the filling so that they do not float to the surface and how to ensure we don’t over-pour or use too little resin. Let’s show you three different ways to add glitters. Dropping ink into the resin: This is where the magic happens, because the process of dropping ink into the resin is simply mesmerising! The inks can be seen spinning in the resin! We prepare the ink, and drop it into the resin at the right time and in a way and sequence that creates the most beautiful and unique results – we will show everything! In the course, we shared 6 wonderful colour schemes for ink combinations from the PIÑATA line. After the course you will feel confident about which colours are better for which combination, and which colours can be diversified if desired. Finishing touches! We take the work out of the mould at the right time, and check the backdrop for sharp corners. If there are any found, we “smooth” them with a nail file as shown in the video. Also, here we will show you how to use a marker for creating gold or silver edges. The finishing layer: How to apply the finish correctly for the best effect. How to calculate the amount of resin for the finish of a decoration and how to overcome smudges, if they suddenly flow onto the back of the product. Bows: We will teach you how to tie a festive bow on a decoration so that it looks even more attractive and aesthetically pleasing, as well as beautifully hung on a festive tree. Bonus additional technique of filling “Silk” – how to do it and what will be needed for this? Bonus additional technique of filling “Flame ” – how to do it and what will be needed for this? Bonus additional technique for filling the “Cloud” – How is it done and what is needed for this? Bonus additional technique of filling with shiny ink-three options for working with them
$28,49
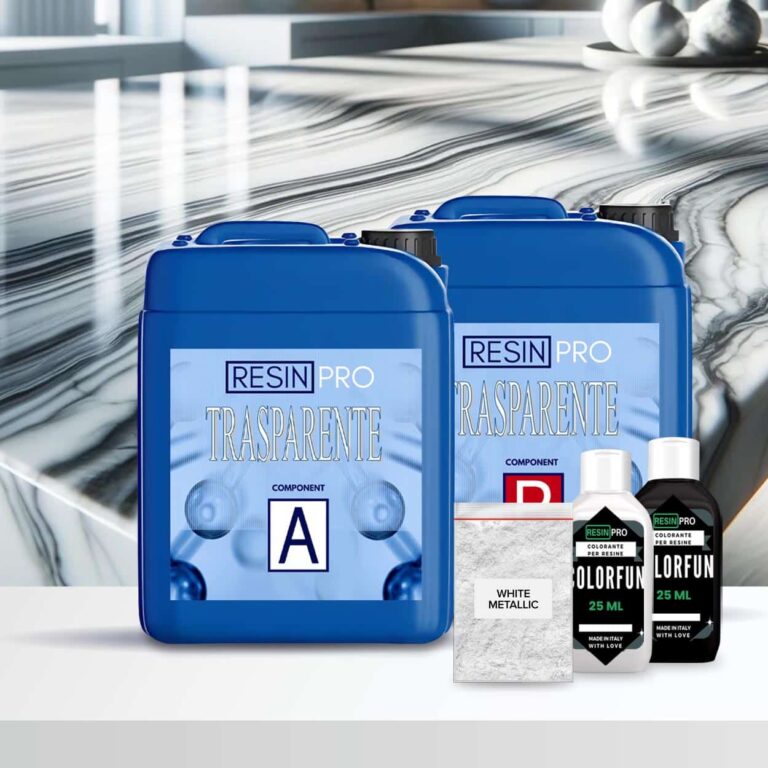
Top Cucina Kit Carrara Marble Effect with Epoxy Resin: The 2.4 kg kit (1.6 + 0.8) covers 1 square meter (+ 10 g white metallic pigment + 25 ml white dye +25 ml black dye) The 4 kg kit (2*1.6 + 0.8) covers 2 square meters (+ 2*10 g metallic pigment +2* 25 ml white dye + 2*25 ml black dye) The 8 kg kit covers 4 square meters (+ 4*10 g metallic pigment +4* 25 ml white dye+ 4*25 ml black dye) The 16 kg kit covers 8 square meters (+ 8*10 g white metallic pigment +8* 25 ml white dye 8*25 ml black dye) Kit Contents: 2.4kg, 4kg, 8kg or 16kg of "Art Pro" Epoxy Art Coat for a high quality base White dyeand Black of the "Colorfun" line for the perfect stone shades White Metallica Sahara pigment for that extra touch of sparkle Good to add: To enhance the appeal of the design:: Isopropanol 99.9% (additional option, not included in the price) To make the coating last longer: Polishield 100 Gloss (additional option, not included in the price). The coverage of a 0.5 kg kit is approximately 4 m2 Each kit includes dyes and pigment in sufficient quantity for the amount of resin required. HOW TO CREATE YOUR MARBLE EFFECT WITH EPOXY Guide Instructions: Step N1: Primer Start by carefully measuring the amount needed to cover the surface based on the consumption of 150 g/m2, making sure to follow the proportions indicated to obtain a homogeneous mixture. Once the base has been prepared, proceed with adding the dye, choosing between white or black depending on your needs. The quantity of colourant to add to the mixture can be measured in a few drops (max 5% by volume). This step is crucial to achieve the desired colour and ensure uniformity of the application. Before applying the primer, it is essential that the surface intended for treatment is adequately prepared. Sand the surface with a coarse grit (40 or 60) before any operation. Make sure it's completely clean, using a soft cloth or brush to remove any pigment, dirt or debris. The surface must also be completely dry; residual humidity can compromise the adhesion of the primer and its effectiveness in sealing the surface. Once the surface is ready, apply the mixture evenly, using a suitable tool such as a brush, roller or spatula, depending on the size of the area to be treated and your personal preference. The key is to get a thin, even layer that can cover the entire area without leaving gaps or excessive product buildup.. After application, it is essential to allow the primer to dry completely before proceeding with further treatments or finishes on the surface. The recommended waiting time is 12 hours; this range may vary slightly depending on environmental conditions, such as humidity and temperature, but offers a good compromise to ensure the mixture has time to dry and adhere properly. During this period, avoid touching or stressing the treated surface to ensure optimal results. Don't worry if you notice any discrepancies on the surface, the next main pour will level everything perfectly. Step N2: application Start by applying masking tape around the perimeter of your countertop to contain the epoxy you're about to pour. This step is essential to ensure the resin stays where it is needed. After applying the resin, wait about 1.5 hours before gently removing the tape. To ensure coverage is even and complete, plan to use approximately 1.6kg of resin for every square meter of surface area. When you are ready to mix the resin, use a drill equipped with a paddle mixer for quick and even action (use at low speed), taking about 2 minutes for this operation. If you prefer to mix by hand, be prepared to take double the time. Don't forget to scrape the sides and bottom of the container halfway through the process with a stick to ensure all the material is mixed well. Next, separate the already mixed resin into different glasses and add the desired colours, mixing the different colours in the different glasses until you obtain an intense and uniform colour per single glass. To create a striking visual effect, pour the coloured resin in random layers into a larger bucket, being careful not to mix the colours together too much. After filling the bucket, spread the contents over the surface of the worktop, leaving a small amount of resin aside to finish the edges later. To remove trapped air bubbles, gently run a propane torch or heat gun over the surface. Once the adhesive tapes have been removed, approximately 1.5 hours after application, if there are any dry edges, moisten them slightly by wearing a protective glove to promote an even appearance. Use appropriate tools, such as spatulas or plastic scrapers, to spread and level the resin along the edges, making sure to cover the entire area well. After letting the resin cure for 24 hours, you can apply a clear top coat or PoliShield scratch-resistant paint to further protect the surface. Finally, for even more refined visual effects, spray 99.9% isopropyl alcohol onto the surface just before the resin begins to fully harden. This will create unique lacy textures. Remember that when you remove the tape, it is essential that the resin is partially hardened, neither too liquid nor completely solid, to avoid unwanted drips. Attention! Safety Guidelines for Using Isopropyl Alcohol (99.9%) Isopropyl alcohol (IPA) is a highly flammable substance. Improper use—especially near heat sources like torches or heat guns—can result in fire or explosion. To ensure safe use, follow these precautions: Primary Risks Highly flammable: IPA vapors can ignite from sparks, open flames, or hot surfaces. Forms explosive vapor-air mixtures, especially in enclosed or poorly ventilated spaces. Strictly Prohibited: Using gas torches or heat guns near areas treated with IPA. Spraying IPA near active heat sources. Storing IPA near flames, heaters, or hot tools. Recommended Safety Measures: 1. Ventilation: Always work in a well-ventilated area when using IPA. 2. Wait Time: After applying IPA, wait at least 5–10 minutes to allow complete evaporation before using any heat tools. 3. Safe Distance: Keep IPA containers at least 2 meters (6 feet) away from heat or flame sources. 4. Storage: Store IPA in a tightly sealed container, away from direct sunlight or high temperatures. 5. Fire Safety: Have a CO₂ or dry chemical fire extinguisher nearby when working with flammable substances and open flames. In Case of Fire: Do not use water to extinguish the fire. Use an appropriate extinguisher, cut off air supply if safe, and call emergency services if needed.
$73,49
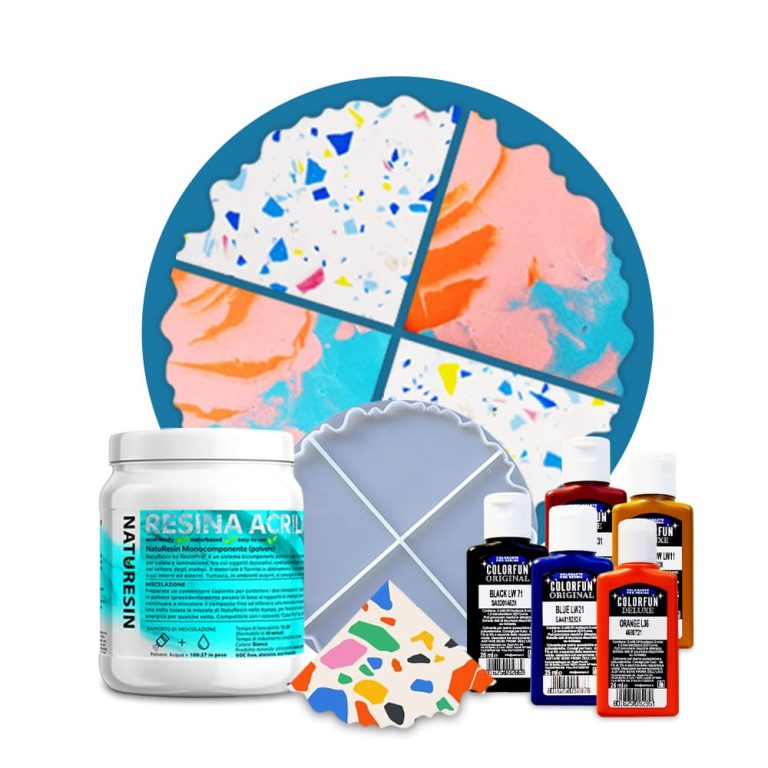
Creative Kit: Create your own coasters in Naturesin KIT INSTRUCTIONS This kit contains: 1 kg of mineral resin Silicone mould for 4 coasters 5 colors specific to Naturesin Gloves and mixing tools You will also need: Water Lay out a plastic tarp or old newspapers to protect the work surface. Make sure that the silicone mould is clean and all materials are at hand. Using a scale, weigh Naturesin powder and water in a ratio of 100:27 by weight. For every 100 grams of Naturesin powder, you will need 27 grams of water. Add Naturesin powder to the water slowly, constantly and thoroughly mixing so that the powder and water form a homogeneous creamy compound. Follow these two steps for about 10 minutes before the mixture begins to solidify. Pour the mixture into several cups/containers. Colour each part by adding a few drops of dye, mixing thoroughly to get the desired shades. Pour mixtures of different colours into different places of the silicone mould to create interesting colour effects. If you notice air bubbles, gently shake the mould (let it vibrate) to bring them to the surface and help them disappear. Allow the casting to harden for 40-60 minutes. After 1 hour, your creations can be removed from the moulds, but over the next 4-8 hours they will continue to harden and gain greater hardness. Sometimes, with the use of dyes, the curing time may be longer - take your time, Naturesin works for you! Other methods! Alternative methods: 1. For a visually impressive design, start by mixing a small portion of powder with water using the same ratio of 100:27. Add the desired colour to this mixture and apply it to the mould, creating drops or stripes. Allow this first layer to harden for 30-40 minutes. 2. After the initial layer hardens, prepare the basic powder mixture with water. Use a contrasting colour. Fill the mould with this contrasting composition, which will blend beautifully with the previously hardened layer. In addition, select the mosaic effect by completely filling the mould with a Naturesin mixture coloured according to your choice. As soon as the material is completely solidified, take it out of the mould and break it into small pieces. Put these fragments back into the mould and fill the spaces with a new mixture of Naturesin powder and water, using a different colour - the effect will be great!
$55,95
In order to transform an oxide into a solid layer, a synthesis process called Chemical Vapor Deposition (CVD) is required. This method entails depositing a gaseous substance onto a solid substrate where a chemical reaction occurs to produce the desired coating. For oxides like metallic oxides, it is feasible to convert them into solid layers using CVD. Throughout the procedure, the gas containing the oxide precursor reacts on the substrate surface at elevated temperatures, resulting in the formation of a solid oxide layer. This technique finds extensive applications in various industries such as electronics, optics, and the manufacturing of advanced materials.
Epoxy Resin
Epoxy resin is a thermosetting material utilized to craft protective coatings and resilient, smooth surfaces. Comprising two components ? the epoxy resin and the hardener ? this blend polymerizes to establish a surface that withstands chemical agents, abrasion, and mechanical strain. Epoxy resins are extensively employed in the DIY sector for constructing floors, rectifying surface imperfections, and producing artistic pieces. Owing to their adaptability and endurance, epoxy resins are a favored option for domestic and industrial ventures necessitating high-caliber, enduring finishes.
Epoxy Resin for Creating Prints
Epoxy resin is a versatile substance employed to fashion top-notch three-dimensional prints. Once solidified, this type of resin furnishes a sleek, transparent surface that accentuates the print's intricacies. To fabricate prints with epoxy resin, it is vital to meticulously adhere to the manufacturer's instructions for blending and application. Typically, the process encompasses accurately mixing the resin with the hardener, incorporating colors or pigments if desired, and pouring the mixture into the mold. Following solidification, the print can be extracted from the mold and optionally refined to attain the desired outcome.
Epoxy Resin Pigments
Epoxy resin pigments are specialized formulations devised to introduce color into the resin during processing. These pigments are obtainable in an extensive array of hues and are blendable to generate bespoke shades. Generally, epoxy resin pigments are highly concentrated, necessitating only a small quantity to achieve vivid outcomes. Prior to incorporating the pigment into the resin, it is recommended to precisely measure the quantities to ensure consistent coloring. Additionally, closely adhering to the manufacturer's guidelines is essential to achieve optimal aesthetic and enduring results.
DIY Techniques with Epoxy Resin
DIY methods involving epoxy resin are exceptionally popular for crafting art pieces and jewelry. Here are some concepts to experiment with this material:
Pouring resin into molds to fabricate personalized jewelry or petite decorative items
Infusing colors or pigments into the resin before pouring to achieve distinctive effects
Employing the layering technique to introduce depth and dimension into your projects
Imbedding objects like dried flowers, leaves, or glitter in the resin for a personalized touch
Utilizing DIY molds to produce exclusive and innovative shapes
Explore and unleash your creativity with epoxy resin.
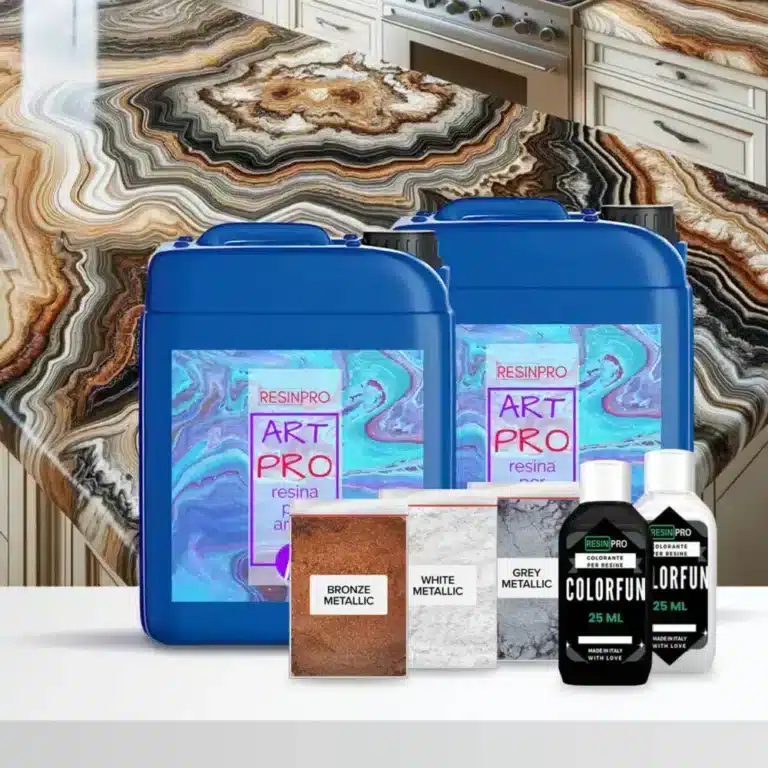
Kit Exotic white marble effect with Epoxy resin: The 2.49 kg kit (1.66 + 0.83) covers 1 square meter (+ 10 g white Sahara pigment + 10 g bronze Sahara pigment + 10 g dark gray Sahara pigment + 2*25 ml white dye + 1* 10 g colorfun black) The 4.15 kg kit (2*1.66 + 0.83) covers 2 square meters (+ 2*10 g white Sahara pigment + 2*10 g bronze Sahara pigment + 2*10 g dark gray Sahara pigment + 4 *25 ml white dye + 2* 10 g black colorfun) The 8.33 kg kit covers 4 square meters (+ 4*10 g white Sahara pigment + 4*10 g bronze Sahara pigment + 4*10 g dark gray Sahara pigment + 5*25 ml white dye + 2* 10 g colorfun black) The 16.66 kg kit covers 8 square meters (+ 6*10 g white Sahara pigment + 6*10 g bronze Sahara pigment + 6*10 g dark gray Sahara pigment + 8*25 ml white dye + 3* 10 g colorfun black) Kit Contents: 2.49 kg, 4.15 kg, 8.33 kg or 16.66 kg of Art Coat Epoxy "Art Pro" for a high quality base Black and White Dye from the "Colorfun" Line for the perfect stone shades Metallica Sahara white, bronze, gray pigment for that extra touch of sparkle Good to add: To enhance the appeal of the design: Isopropanol 99.9% To make the covering last longer: + polishield 100 GLOSS Each kit includes dyes and pigment in sufficient quantity for the amount of resin required. Guide Instructions: Step N1: Primer Start by carefully measuring the amount needed to cover the surface based on the consumption of 150 g/m2, making sure to follow the proportions indicated to obtain a homogeneous mixture. Once the base has been prepared, proceed with adding the dye, choosing between white or black depending on your needs. The quantity of colourant to add to the mixture can be measured in a few drops (max 5% by volume). This step is crucial to achieve the desired colour and ensure uniformity of the application. Before applying the primer, it is essential that the surface intended for treatment is adequately prepared. Sand the surface with a coarse grit (40 or 60) before any operation. Make sure it's completely clean, using a soft cloth or brush to remove any pigment, dirt or debris. The surface must also be completely dry; residual humidity can compromise the adhesion of the primer and its effectiveness in sealing the surface. Once the surface is ready, apply the mixture evenly, using a suitable tool such as a brush, roller or spatula, depending on the size of the area to be treated and your personal preference. The key is to get a thin, even layer that can cover the entire area without leaving gaps or excessive product buildup.. After application, it is essential to allow the primer to dry completely before proceeding with further treatments or finishes on the surface. The recommended waiting time is 12 hours; this range may vary slightly depending on environmental conditions, such as humidity and temperature, but offers a good compromise to ensure the mixture has time to dry and adhere properly. During this period, avoid touching or stressing the treated surface to ensure optimal results. Don't worry if you notice any discrepancies on the surface, the next main pour will level everything perfectly. Step N2: application Start by applying masking tape around the perimeter of your countertop to contain the epoxy you're about to pour. This step is essential to ensure the resin stays where it is needed. After applying the resin, wait about 1.5 hours before gently removing the tape. To ensure coverage is even and complete, plan to use approximately 1.6kg of resin for every square meter of surface area. When you are ready to mix the resin, use a drill equipped with a paddle mixer for quick and even action (use at low speed), taking about 2 minutes for this operation. If you prefer to mix by hand, be prepared to take double the time. Don't forget to scrape the sides and bottom of the container halfway through the process with a stick to ensure all the material is mixed well. Next, separate the already mixed resin into different glasses and add the desired colours, mixing the different colours in the different glasses until you obtain an intense and uniform colour per single glass. To create a striking visual effect, pour the coloured resin in random layers into a larger bucket, being careful not to mix the colours together too much. After filling the bucket, spread the contents over the surface of the worktop, leaving a small amount of resin aside to finish the edges later. To remove trapped air bubbles, gently run a propane torch or heat gun over the surface. Once the adhesive tapes have been removed, approximately 1.5 hours after application, if there are any dry edges, moisten them slightly by wearing a protective glove to promote an even appearance. Use appropriate tools, such as spatulas or plastic scrapers, to spread and level the resin along the edges, making sure to cover the entire area well. After letting the resin cure for 24 hours, you can apply a clear top coat or PoliShield scratch-resistant paint to further protect the surface. Finally, for even more refined visual effects, spray 99.9% isopropyl alcohol onto the surface just before the resin begins to fully harden. This will create unique lacy textures. Remember that when you remove the tape, it is essential that the resin is partially hardened, neither too liquid nor completely solid, to avoid unwanted drips. Attention! Safety Guidelines for Using Isopropyl Alcohol (99.9%) Isopropyl alcohol (IPA) is a highly flammable substance. Improper use—especially near heat sources like torches or heat guns—can result in fire or explosion. To ensure safe use, follow these precautions: Primary Risks Highly flammable: IPA vapors can ignite from sparks, open flames, or hot surfaces. Forms explosive vapor-air mixtures, especially in enclosed or poorly ventilated spaces. Strictly Prohibited: Using gas torches or heat guns near areas treated with IPA. Spraying IPA near active heat sources. Storing IPA near flames, heaters, or hot tools. Recommended Safety Measures: 1. Ventilation: Always work in a well-ventilated area when using IPA. 2. Wait Time: After applying IPA, wait at least 5–10 minutes to allow complete evaporation before using any heat tools. 3. Safe Distance: Keep IPA containers at least 2 meters (6 feet) away from heat or flame sources. 4. Storage: Store IPA in a tightly sealed container, away from direct sunlight or high temperatures. 5. Fire Safety: Have a CO₂ or dry chemical fire extinguisher nearby when working with flammable substances and open flames. In Case of Fire: Do not use water to extinguish the fire. Use an appropriate extinguisher, cut off air supply if safe, and call emergency services if needed.
$98,95
Intense and brilliant color, ideal for Transparent Epoxy Resins. Mix small quantities to get a translucent effect. The high coverage of the “Colorful Original” range allows to obtain a full and bright color. The high concentration provides an opaque color with a few drops.
Usable to color the products of the RESIN PRO range.
💥 Ideal for epoxy creations and resin tables thanks to its features:
✔️ Intense colors
✔️ Easy to mix
✔️ Intense colors
✔️ High concentration
✔️ Easy to get a translucent effect
✔️ 5 stars on Trustpilot
🌿Cruelty Free, Vegan Friendly🐹
$16,00
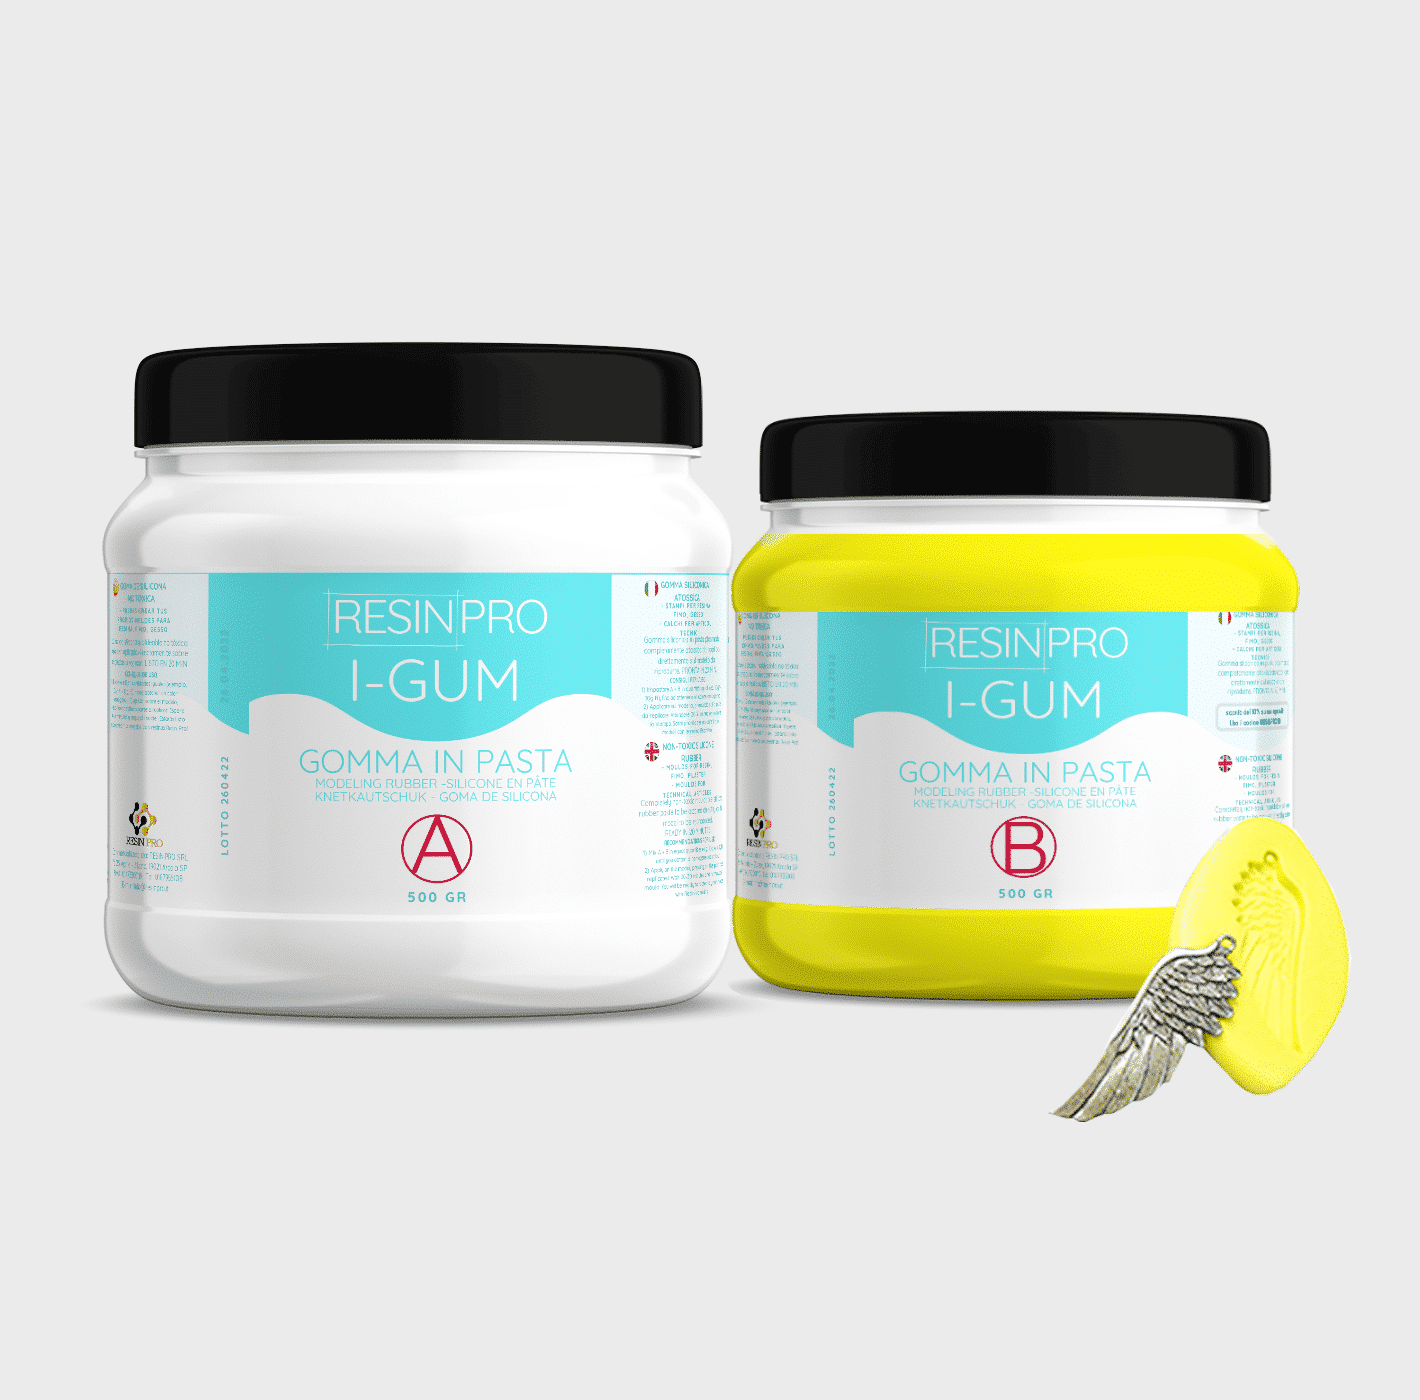
• "I-GUM" - Non-Toxic Silicone Rubber - Paste Form
Pasty silicone rubber "I-GUM" is a two–component product for creating moulds and forms for pouring with epoxy resin.
• Superior formula proven by years of experience:
✔️ Easy to use -> 1:1 mix ratio
✔️ Non-toxic -> You can work without gloves
✔️ Without smell
✔️ Long working time -> 20 minutes
✔️ European quality -> Directly from Italy
✔️ Ideal for creating moulds and frames for working with resin, polyurethanes, wax, cement and other materials
✔️ 🌿Cruelty Free, Vegan Friendly🐹
$22,00

Images
On sale
“Pure Mold” – Translucent Liquid Silicone Rubber for Mould Making, 1:1 Mix Ratio
Available, ready for shipping
Order now to receive your product between Wednesday, April 29 and Wednesday, May 6.
Shipping $16
Choose your kit:
Quantity
"Pure Mold" - Translucent Liquid Silicone Rubber for Mould Making, 1:1 Mix Ratio quantity
The kit: 1 KG (500 GR of A + 500 GR of B)
$52,95 Original price was: $52,95.$44,95Current price is: $44,95.-15%
💰 You save
$8.00
TRANSLUCENT AND FAST CASTING LIQUID SILICONE RUBBER FOR MOULDS
🧪【INNOVATIVE FORMULA】Create your moulds using PURE MOLD silicone rubber! Compatible with many materials including resins, plaster and cement. Its transparency will allow you to observe through the mould and its high mechanical characteristics make it a product suitable for both professional and hobby use.
💎【IMPECCABLE QUALITY】Guarantees the creation of resistant and detailed moulds that will last over time and will be reusable several times!
🌿【SAFE AND CERTIFIED】 100% Made in Italy, guaranteed by a Certificate of Non-toxicity and solvent-free and odorless, this rubber is configured as a safe and easy to use product!
⚙️【EASY TO USE】 Mixing ratio 1: 1; Hardness: 13 Shore; Catalysis in about 6-8 hours. The poly additive formula makes it more resistant than other silicones, allowing the creation of higher quality molds.
+ Easy mixing ratio 1:1
+ Less mould shrinkage over time
+ 30% longer service life
+ Fast (6-8H)
+ Translucent
+ Resistant
Good for:
epoxy resins,
polyester,
polyurethanes and acrylics,
cements and plasters.+ Liquid
🌿Cruelty Free, Vegan Friendly🐹
$44,00
 Free shipping on orders over €199,00