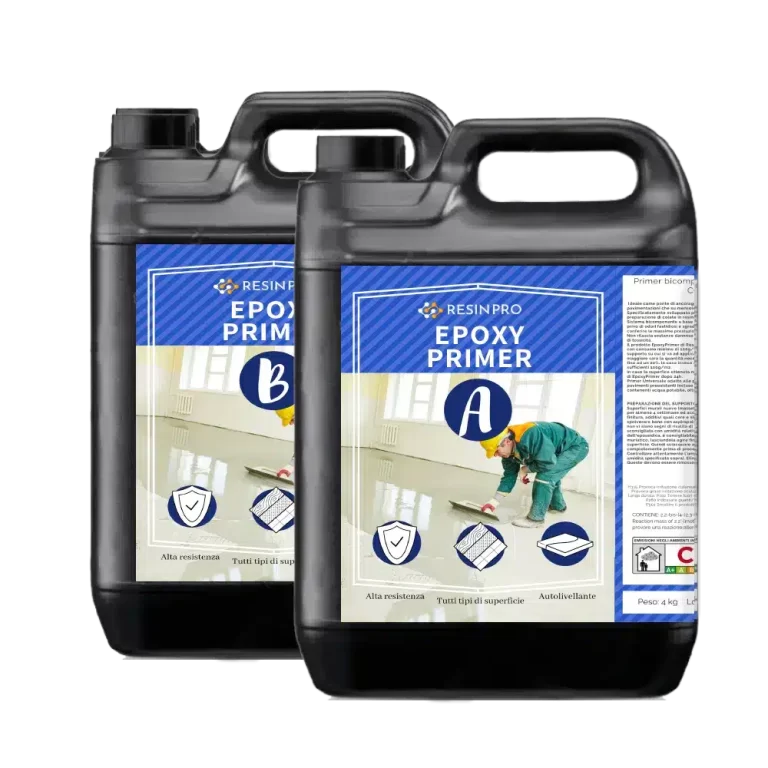
Great solution for making initial layer of your epoxy floor, which helps to increase the adhesion of your main layer! 💥About "EPOXYPRIMER" - Universal Water-Based Primer - For Stable & Durable Floors: Two-component system based on epoxy resins in water emulsion, and therefore free of annoying and unpleasant odors, additive with inorganic structurants suitable for giving maximum performance of resistance, durability and adhesion to the support. The product" EpoxyPrimer " by ResinPro can be applied with a roller, brush or spatula with a minimum consumption of 100g/m2 up to 300g/m2 , depending on the condition of the surface on which you are going to apply. The greater the porosity of the initial surface (concrete for example), the greater the quantity required and the dilution ratio can vary from 5% up to 20%. In the case of tiles or other poorly absorbent surfaces, 100g/m2 will be sufficient. If the surface obtained is not homogeneous, it is advisable to reapply a coat of " EpoxyPrimer". Mixing Ratio: 100:40 by weight Full curing time: 24/48h at room temperature
$212,95
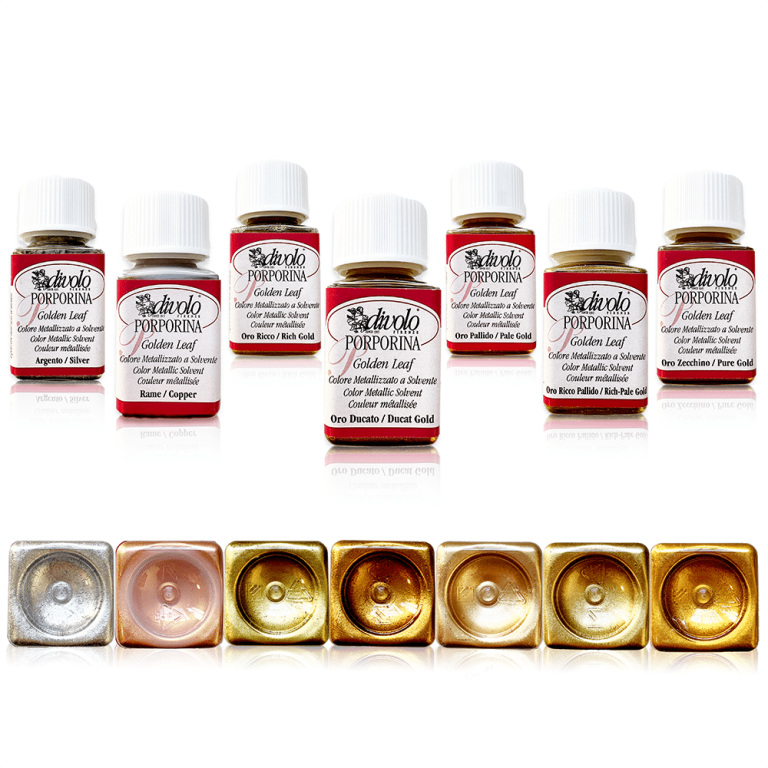
Golden Leaf is a particular paint based on metallic purples, dispersed in a solution of petroleum resin and white spirit. Once spread, the product forms a highly effective metallized film. The product can be used for finishes in the field of decoration and hobby, it is resistant and very stable when used on substrates intended for internal use. To apply this paint, just put the desired amount on a brush with which you will slowly massage the work surface. Drying time: 24 h The Golden Leaf series is available in 7 shades of different colors: Oro Ricco, Oro Pallido, Oro Ricco Pallido, Oro Zecchino, Oro Ducato, Rame, Silver.
$10,23
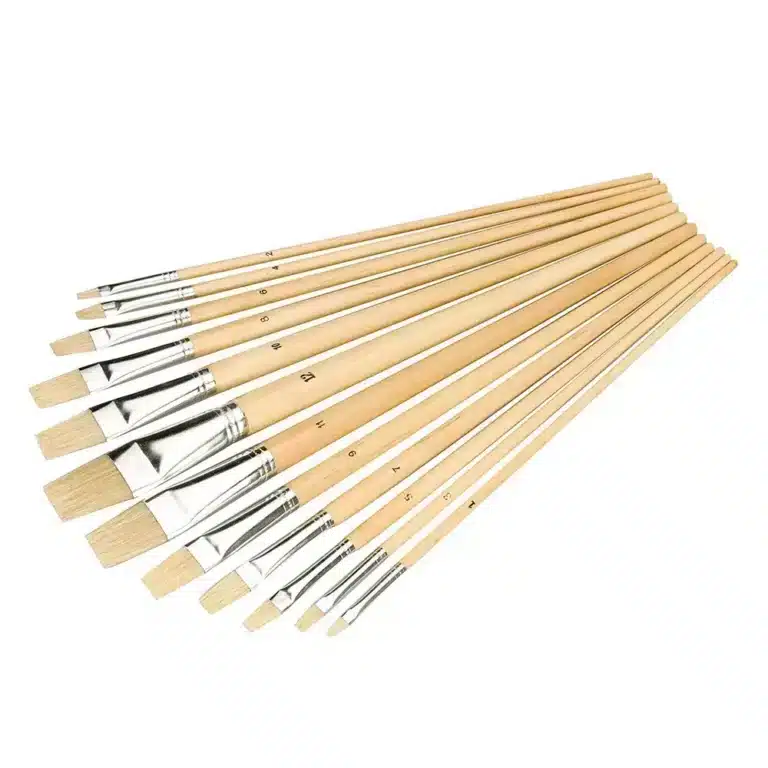
The Artist's Paint Brush Set includes 12 high-quality brushes designed to elevate your epoxy resin projects with precision and finesse. This versatile set features a range of brush shapes and sizes, from fine detail brushes to broader strokes, making it ideal for various techniques and intricate detailing in resin art. Crafted with durable synthetic bristles that resist shedding, these brushes offer smooth and even application of epoxy resin, helping you achieve a flawless finish. The comfortable handles ensure extended use without discomfort, and the range of brush types allows you to work on both detailed designs and larger surfaces with ease. Perfect for creating custom resin artworks, adding intricate details, or achieving precise effects, this brush set is an essential tool for artists and DIY enthusiasts alike. Whether you’re pouring, painting, or finishing your resin projects, these brushes will help you achieve professional results. Pure bristle with natural wooden handles. For finishing work, painting and priming. Tip sizes from 1mm - 12mm. Natural wood handles Tip sizes from 3-14mm
$9,24
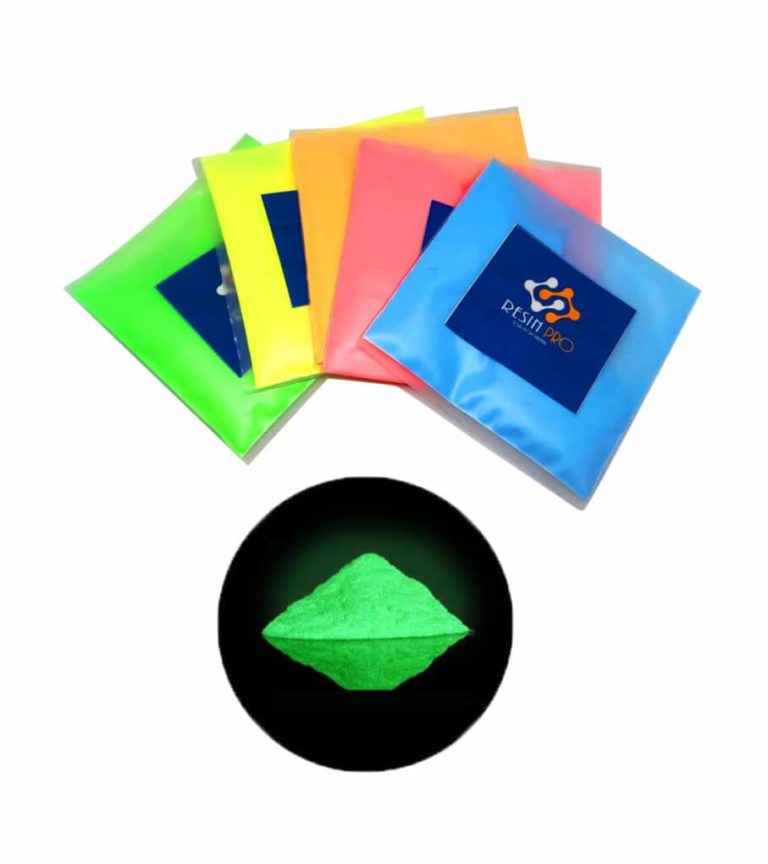
FLUORESCENT UV PIGMENT (Fluorescent powder) – Luminescent, glows in the dark. Due to the high concentration of active components, this fluorescent powder pigment glows in the dark and it is strongly phosphorescent! It is designed to highlight those details you want to make visible in the dark, such as escape routes or exits, simply by adding it to resins, paints or varnishes. It is great for decoupage, decoration and anything related to DIY or creativity. Available in 5 colours. SAFETY: the products are NOT toxic, harmful or radioactive. They are NOT considered to be hazardous (see certificate of analysis). APPLICATION: Thanks to their characteristics, these pigments are suitable for several technical or artistic purposes. They are perfectly safe and it is possible to use them on products in direct contact with the body such as clothing, shoes, helmets, toys, watches, fishing or sports equipment. Since they are long-lasting, easy to apply and reliable, these pigments are particularly appreciated in the security field. Pigments are widely used in industry for the production of paints, injection moulding, grinding of plastic materials, screen printing, tapes or light films, ceramic tiles, etc. Use in quantity 20-30% to binder ratio and apply on light surfaces. These pigments charge by exposing them to a light source (sunlight, electric light or UV light), and slowly return energy by glowing in the dark.
$11,11
Applying Primer Before Painting
Applying primer before painting is crucial to ensure proper adhesion and protection of the underlying material. The primer is a product that prepares the surface for painting, enhancing the anchorage and long-term resistance of the coating. Prior to applying the primer, it is essential to thoroughly clean and degrease the surface to ensure optimal adhesion. It is also recommended to meticulously follow the manufacturer's instructions regarding the quantity to be applied and the required drying time. By applying the primer before painting, you can achieve superior results and extend the durability of the coating.
Epoxy Resin Applications
Epoxy resin is a thermosetting material widely utilized to create protective coatings and durable surfaces. Consisting of two primary components, epoxy resin and hardener, they are blended to initiate the polymerization process. This material is renowned for its chemical, mechanical, and heat resistance, making it ideal for various industrial and DIY applications. Epoxy resins are commonly used for flooring, surface coatings, structural adhesives, molds, and more. Due to their versatility and long-lasting properties, epoxy resins are a favored choice in multiple sectors.
Epoxy Resin for DIY Projects
Epoxy resin for DIY projects is a versatile and robust material perfect for crafting jewelry, home decor items, decorations, and more. This resin, composed of epoxy resin and hardener, is easily mixable and can be tinted with pigments to achieve customized effects. Once poured into molds or onto surfaces, the resin quickly solidifies, creating a transparent and glossy finish. It is crucial to adhere closely to the mixing and curing instructions to ensure optimal outcomes. Epoxy resin for DIY projects is an excellent option for individuals seeking to craft creative and personalized projects with a professional finish.
Silicone Mold Tutorial
Silicone molds are invaluable tools for producing custom objects in epoxy resin, plaster, or other materials. To create them, follow these steps:
Prepare the model: Select the object to replicate and ensure it is clean and free of dust.
Pour the liquid silicone into a container and mix thoroughly to eliminate any air bubbles.
Pour the silicone over the model, ensuring complete coverage.
Allow it to dry for the specified time, following the manufacturer's instructions.
Once hardened, gently remove the mold and fill it with the desired material.
Let it dry again, then carefully extract the object from the mold.
By following these steps, you can easily craft silicone molds for your DIY projects.
Transparent Resin Pigments
Transparent resin pigments are specialized formulations designed to color transparent resins like epoxy resin, polyurethane, or polyester. These pigments are distinguished by their high transparency and brilliance, enabling the addition of color without compromising the final transparency of the product. They are available in a wide array of colors and shades to meet the creative requirements of each project. Prior to adding the pigments to the transparent resin, it is essential to meticulously follow the manufacturer's instructions to achieve optimal and long-lasting results.
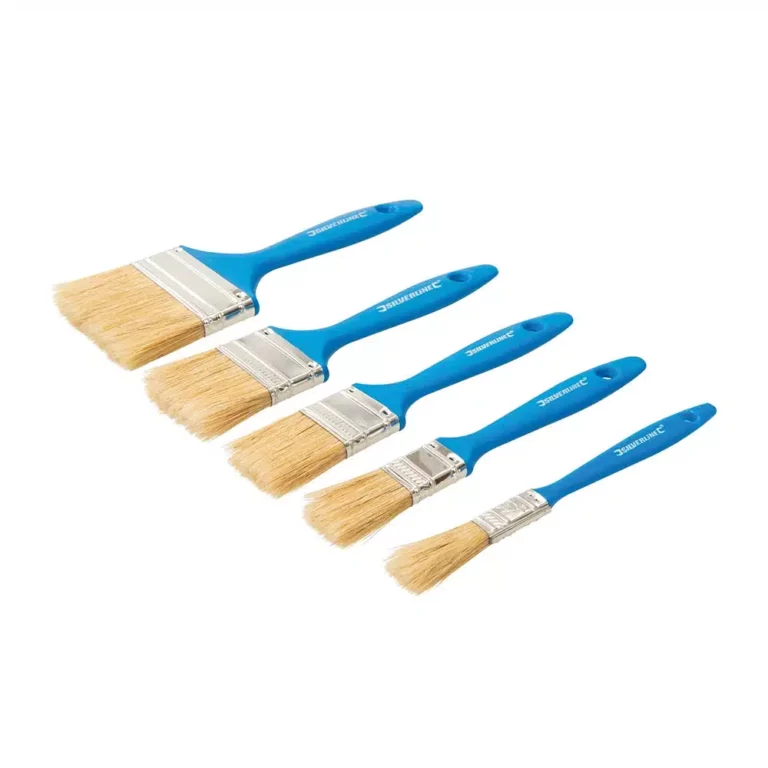
Disposable utility brushes with pure bristles, polymer handles and zinc-plated steel ferrules. Ideal for cleaning parts, painting trim and touch-up work. For use with paint, resin, glue, acetone and other solvents. Includes sizes 0,47", 0,98", 1,57", 1,97" and 2,95". Pure bristles Polymer handles & zinc-plated steel ferrules Ideal for cleaning parts, painting trim & touch-up work
$8,49

💥 BESTSELLER FOR: –Resin-art: Geode-art, Ocean-art, Coasters, Trays, Fluid art (pour paint) and Art objects; –Surface coating: Coating + very good for vertical applications by brush or roller; –Restoration : Covering objects and furniture to add depth and brilliance to the colour. The surface is perfectly smooth and moisture-resistant. Solvent-free and odourless epoxy resin. 💥About ULTRA-HIGH VISCOSITY epoxy resin for artists "ART PRO DELUXE": The epoxy resin for the artistic sector: thanks to its special formula and its dense structure, it allows you to create paintings with the "pour paint" and liquid paint technique. It does not leak out from the working surface, slowly reaching the corners of the frame. Great choice for ocean-art; coasters and trays! ART PRO DELUXE preserves your original design and prevents any possible modification due to the casting of the resin: because of its special thick formula, the layers of colours do not expand and do not mix (unless you deliberately intervene), faithfully keeping with your creative idea! Additional features: Crystal Clear; + Odourless; + Excellent mechanical strength; + High impregnation and reinforcement of technical fabrics. The product can be coloured with any epoxy dye (both in paste and powder) in a percentage no more than 5% from the mix weight. It can also be thickened by the use of aggregates such as powders and fumed silica. DEAR ARTISTS! This type of epoxy has higher viscosity than you may expect! Please, read this note - 1. If you have no a lot of experience or you prefer to work with more liquid resin, please, check this Resin 👉🏽 ART PRO 2. If you prefer to do art-works in more viscosity resin, please, choose ART PRO DELUXE. But if it`s your first experience, we suggest to design your project before pouring, because, in this case you have short working-time (15-20 min). Due to its exceptionally high viscosity, our Deluxe epoxy resin is ideally suited for delicate casting projects, including ocean art, pour-art, and other creations that demand a resin with superior viscosity. When undertaking basic castings of 1-1.5cm, special care is needed to address bubble formation. We recommend a multi-layer approach for such castings, employing a heat gun after each application. For these projects, we suggest considering our lower viscosity resins - "Transparente" and "Art-Pro" - as the optimal solutions. Transparent self-levelling UV-resistant epoxy system, which creates a hard and glossy protective layer for casting up to 1 cm [0,39”] (ex. coasters, trays, art objects). The surface is perfectly smooth and moisture-resistant. Solvent-free and odourless epoxy resin. 💥Key features: ⚙️ 【RESIN ART EPOXY】 ART PRO DELUXE EPOXY RESIN is a ultra-high viscosity and high resistance product. The best choice for Resin-art, making Coasters, Trays, Ocean and Geode-art and casting surfaces. The particular formulation makes it a resistant product suitable for both the surface finishes of paintings, tables or even artistic floors. 🧪 【PROFESSIONAL QUALITY】Art Pro Deluxe Resin, unlike traditional "multipurpose" resins, has a special formulation and viscosity, which allows to obtain an impeccably transparent and glossy surface in any condition. Easily polished. The added UV Anti-Yellowing Filters helps save transparency over time. The low density allows prevent the incorporation of air bubbles making it perfectly suitable for river tables and countertops. Compatible with silicone and wood, fabric, glass, paper or photographs. Complete catalysis ~ 24-48 hours, but it will be ready for "unmoulding" after about 12 hours. 🌿 【SAFE AND CERTIFIED】 All our resins are Certified Non-Toxic, Solvent-free, non-flammable, and totally safe. 💧 【EASY TO USE】 The 100:70 mixing ratio (by weight) makes this product very easy to use. Being a two-component resin, simply mix RESIN A + HARDENER B in the ratio indicated above the package and let it harden without the need for further additives. Can be coloured as desired. 📞 【FREE PROFESSIONAL ASSISTANCE SERVICE】 Since we are directly a manufacturer, we have access to a professional laboratory that will happily help you with any complex project. 🇬🇧 【UK BASED TRUSTED COMPANY】 – RESIN-PRO team collect and send your order as fast as possible. We produce and realise epoxy resins since 2015. Just google our social media, where you find thousands of projects made with our products around the world. ____________________________________________________________________ 💥 Applications: - artworks, creation of art objects (paintings, panels, etc.) with the "fluid-art" (pour paint) technique (pouring up to 1 cm [0,39”]); - vertical applications by brush or roller - coating of surfaces, objects and furniture to add depth and brilliance to the colour; - create a 3D effect on prints, photos and images in general; - creation of a perfectly transparent protective layer on your projects. The "ART-PRO DELUXE" formula is specifically developed for coating in artistic applications. Compatible with colouring agents, powder pigments, alcohol-based and oil-based dyes, aerosol paints. Warning: the product is moisture sensitive, do not use on wet surfaces or with water-based dyes (e.g. Acrylics) ____________________________________________________________________ Epoxy resin is a complicated technical product, but if you follow the basic rules, you will get wonderful results! If you need any assistance, just call us - 07596 850968 or email us –
[email protected] With best regards, RESIN PRO TEAM😊 Check and tag our social media for inspiration! We are always happy to publish your art-work – [CP_CALCULATED_FIELDS id="1"]
$48,49
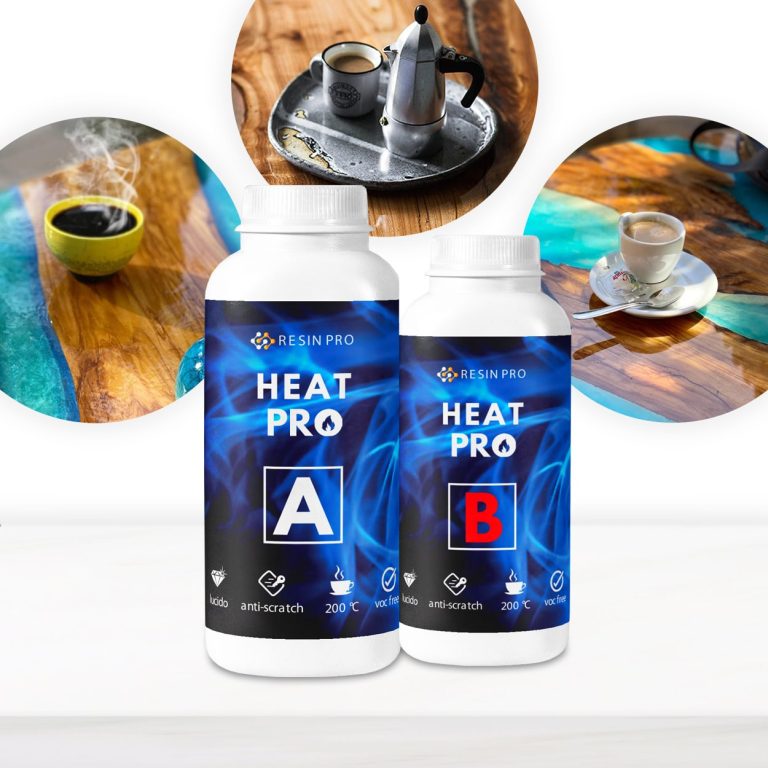
💥 BESTSELLER FOR COVERING: – Trays & Coasters; – Dooming and artistic applications on fabrics; – Other surfaces that need heat and scratch protection. 💥About “HEAT PRO” – Heat-resistant Anti-scratch Glossy Coating: HEAT PRO is a transparent, two-component polyurethane resin, ideal for protecting your projects. Its special elastic formulation allows it to absorb shocks and scratches, always remaining mirror-polished! It also resists up to 200°C and is ideal for surfaces that will come into contact with pots or other material at high temperature. It`s perfect to be applied as a final layer (1-3mm) and allows to cover surfaces. Catalysis at room temperature in a few hours and in 24h is completely ready for any use. The full curing time is 72h. 💥Key features: ⚙️ ULTRA TRANSPARENT PROTECTIVE COATING: -Heat Pro is ideal for creating a protective coating that withstands scratches temperatures up to 175°C (2 hours) and 200 C (15 minutes), keeping your creations in perfect condition. 🧪PROFESSIONAL QUALITY: -Made from high quality materials – Excellent transparency, No bubbles, Odourless, Self-leveling glossy surface 🌿 SAFE AND CERTIFIED: -All our resins are Certified Non-Toxic, Solvent-free, non-flammable, and totally safe. 💧 EASY TO USE: -The 100:75 mixing ratio makes this product very easy to use. Simply mix components RESIN A + HARDENER B in the ratio indicated above the package and let it harden without the need for further additives. 📞 FREE PROFESSIONAL ASSISTANCE SERVICE: -Since we are directly a manufacturer, we have access to a professional laboratory that will happily help you with any complex project. 🇬🇧 UK BASED TRUSTED COMPANY: -RESIN-PRO team collects and sends your order as fast as possible. We produce and realise epoxy resins since 2015. Just google our social media, where you will find thousands of projects made with our products around the world. Please pay attention to these product features before using it! Apply only on perfectly dry surfaces without traces of moisture. Not compatible with acrylic or liquid dyes: we strongly don`t recommend use this product with acrylic art-works! The product should be applied only on a transparent resin surfaces (without dyes). If you need to apply it on coloured resin or other materials (wood, concrete and stone and etc), create at least one 1mm layer of clear resin beforehand. Wait 24-48h and apply Heat Pro. It is very important to have the correct room temperature, above 20°C for all processing steps. Heat Pro must have a temperature above 20°C, so if you are not sure if the temperature is right, warm the cans slightly by keeping them in a warm place for at least a couple of hours. The product is ideal for application on small surfaces, not exceeding 0.25 square metres. Use a heat source carefully to eliminate bubbles: be careful to pass the torch or hairdryer only briefly (max. 2 seconds) over each area to avoid damage to the finish. The hardened Heat Pro coating will have a softer texture than classical resins: this specific texture will guarantee maximum performance! For the same reason, the coating cannot be sanded and polished. The hardened Heat Pro coating becomes resistant to hot objects and scratches only 72-96 hours after application! You can store objects covered with Heat Pro in a “stack” only through paper or cloth. In no case should such products be stacked on top of each other without this protection - the coating may stick to another object tightly!
$21,49
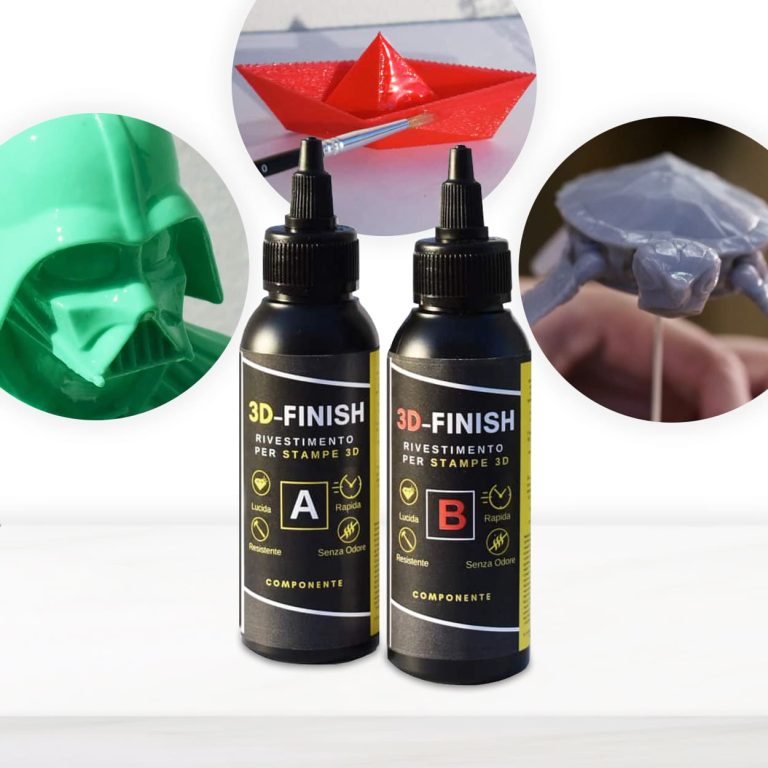
3D – FINISH “Fast” Post-print coating for polishing and finishing 3D prints. Applied on any kind print, it makes the treated surface glossy, smooth and impact-resistant. Specifically developed to be used in 3D applications, it does not drip or cover small details, faithfully respecting all the shapes of the printing. Eliminates unevenness between the different layers; Glossy; Strengthens the mechanical resistance of the printing; Can be polished and painted. If you want to paint your printing according to your tastes, 3D Finish “Fast” can be coloured with colouring pastes and metal powders. Excellent adhesion and reinforcement on PLA, LAYWOOD, ABS. Fast and effective, it is an easy-to-apply solution to create finished items through 3D printing more quickly, improving their aesthetic uniformity and their impact strength. Thanks to its high mechanical resistance, it is also perfect to be used as a bonding agent between printings or to repair damaged 3D artefacts. We recommend to store the product in a dark, cool and dry place away from direct sunlight. The tools must be washed with IPA (isopropyl alcohol).
$16,49
 Free shipping on orders over €199,00