Dried flowers for decorating works made of epoxy resin
$7,95
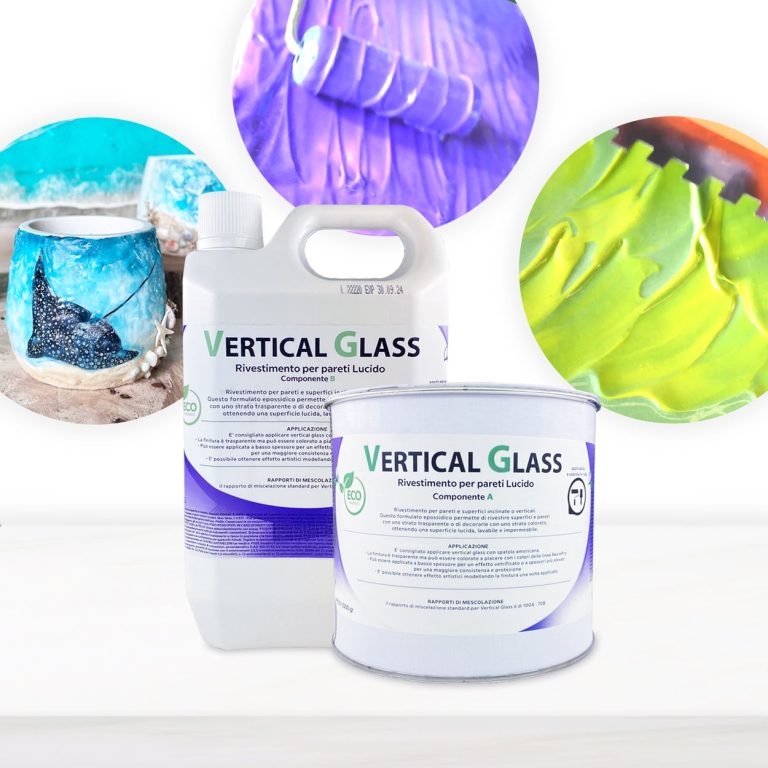
Coating for inclined or vertical walls and surfaces / This epoxy formulation allows you to coat surfaces and walls with a transparent layer or decorate them with a colored layer, resulting in a glossy, washable and waterproof surface. The Vertical Glass resin differs from normal resins allows creatives to create sharp shapes and designs on surfaces and canvases without the resin mixing unintentionally losing the original design! Transparent, UV-resistant epoxy system that creates a hard, glossy protective layer. Vertical Glass allows you to keep your initial design, faithfully respecting your creative idea! The surface will be perfectly smooth and resistant to moisture. Solvent-free and odorless epoxy resin. Applications: Floors and Walls (pre-existing) also vertical; Protection of material coatings and other artistic decorations; Coating, repair and decoration of shower trays and sanitary ware; Coating of surfaces, objects and furniture to give depth and brilliance to the color, even in Vertical! Features: For a smooth coating, it is applied with a spatula to the surface of any material: tile, concrete, wood, brick, etc. It has good hiding power, and completely covers the work surface in one application Creates a glossy, smooth and moisture-resistant layer To create a matte surface, it is easily sanded (48 hours after application, with a grain size of 1000-2000 P) Protects from moisture and gives a new life to surfaces It can be painted with dyes and pigments from our assortment Does not self-align: saves the drawing that you set for it 🙂 Please note that in the unpainted form, the material is not completely transparent, and there is a slight “milky” shade with almost imperceptible micro-particles, so we recommend painting it It is used for: Floor coverings, walls, furniture and other surfaces Protection of surfaces of materials Painting, repair and decoration of showers and bathrooms Creation of paintings, murals and other works of art
$109,49
Our decorative Silicone candle mold is the perfect choice to bring your creative projects to life! This versatile mold is ideal for creating candles, soap, and resin works, offering endless artistic possibilities. Universal: Suitable for candles, soap and resin. ✅ Shape size: 2.5 x 4.8 cm. ✅ Dimensions of the finished product: 2.2 x 2 x 4.7 cm. ✅ High-quality material: flexible and durable silicone. ✅ Easy to remove: Precise details and easy to use. Don't miss the opportunity to create amazing works of art! Buy our decorative candle mold and start making your own unique and charming creations
$12,10
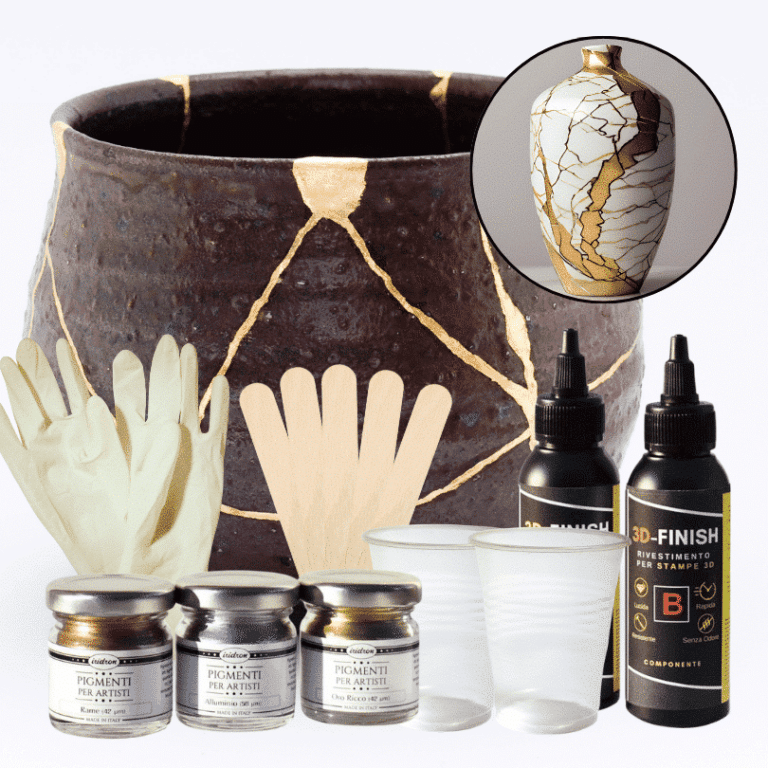
Kintsugi Repair Kit - Repair and Transform Your Ceramics with Elegance Celebrate imperfection with the ancient Japanese art Discover the traditional Japanese art of Kintsugi with our complete repair kit. Transform your broken ceramics into unique and fascinating works of art, highlighting imperfections with elegant gold, silver, or copper veins. Our kit is perfect for both beginners and experts, offering detailed instructions and everything you need to give new life and value to your most cherished items. 🌟 Specific epoxy resin (150g): slow catalysis to eliminate any bubbles or imperfections, allowing you to complete the work without rushing. 🎨 Dye of your choice (gold, copper, silver): customize your repair with a touch of elegance and refinement. ✨ Respect the tradition: follow the ancient art of Kintsugi and transform your ceramics into unique and precious treasures. The kit contains: 150g of resin for 3D decorations, 2 pairs of protective gloves, 2 mixing cups, and 5 spatulas for applying the resin, detailed instructions, everything you need in one kit. Give your ceramics a unique touch: repair them with style and make them even more beautiful. Buy the Kintsugi Repair Kit now and start creating your works of art today! Kintsugi Kit Instructions: Mix Resin: Measure 100A:50B by volume (or 100A:45B by weight) using a scale. Mix for 2 minutes, ensuring all surfaces are scraped. Add Colour: Mix your chosen metallic dye (gold, silver, or copper) into the resin to highlight the cracks. Prepare Surface: Ensure surfaces are clean, dry, and sanded. Apply Resin: Fill the cracks with the colored resin. Curing: Work in a temperature-controlled area, avoiding humidity. Safety: Wear protective gear.
$22,95
How to Minimize Flaws in Decorative Epoxy Resin
Minimizing imperfections in decorative epoxy resin is essential for achieving a flawless finish. Follow these practical tips to ensure a smooth application:
- Thoroughly blend the resin and hardener to prevent the formation of air bubbles.
- Use a torch to eliminate bubbles within the resin.
- Level the surface meticulously before pouring the resin to avoid unevenness.
- Cover the project during the curing process to shield it from dust and contaminants.
- If needed, lightly sand the surface to address any minor defects.
By adhering to these guidelines, you can create a seamless and polished appearance with your decorative epoxy resin.
Epoxy Resin for DIY Projects
Epoxy resin is a versatile and robust material ideal for DIY enthusiasts. Commonly utilized for coatings and finishes, epoxy resin offers strong adhesion to various substrates like wood, glass, and metal. Its easy mixing and application facilitate the creation of sleek and glossy surfaces with a professional finish. Proper surface preparation and adherence to the manufacturer's instructions are crucial for optimal outcomes. With its exceptional wear resistance and long-lasting durability, epoxy resin is the go-to choice for creative and decorative projects.
Using Pigments in Epoxy Resin
Incorporating pigments into epoxy resin requires attention to detail for vibrant and consistent results. Follow these key steps:
- 1. Pigment Selection: Opt for pigments specifically designed for epoxy or polyurethane resins to avoid interference with the catalyzation process.
- 2. Measurement: Accurately measure the pigment as per the manufacturer's recommendations to prevent alterations in catalysis and resin hardening.
- 3. Thorough Mixing: Blend the pigment into the resin meticulously until achieving a uniform color without clumps or streaks.
- 4. Application: Pour the colored resin into molds as desired and allow it to cure following the manufacturer's guidelines.
Adhering to these steps ensures even and high-quality coloring in epoxy resin.
Guide to Making Silicone Molds
Crafting resin objects necessitates the creation of silicone molds. Begin by preparing a clean and dust-free model for replication. Follow the manufacturer's instructions to mix the silicone, ensuring the elimination of air bubbles. Pour the silicone evenly over the model and allow it to dry completely. Once hardened, gently remove the model to unveil your silicone mold, ready for use. Prioritize safety precautions throughout the entire mold-making process.
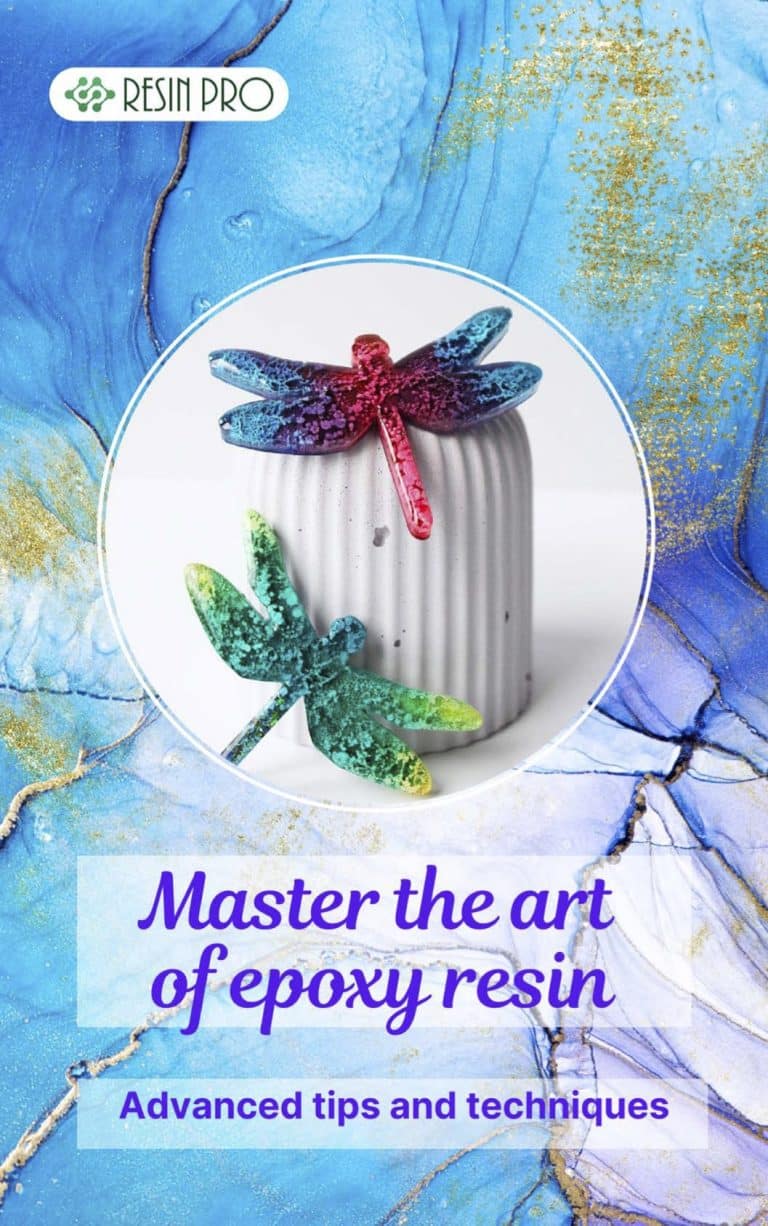
Discover the captivating world of epoxy resin with our e-book "Mastering the Art of Epoxy Resin: Tips and Advanced Techniques." Whether you're a passionate artist, an experienced DIYer, or looking to express your creativity, this book will guide you in learning and mastering this versatile technique. This comprehensive e-book offers an in-depth opportunity to learn advanced epoxy resin manipulation techniques. You'll uncover the secrets of harmonious blends, vibrant pigments, and flawless finishes to create unique works of art. Additionally, our practical tips will help you avoid common mistakes and overcome challenges encountered when working with this fascinating material. Whether you want to create epoxy resin jewelry, make stunning paintings, or design unique decorative objects, this e-book will be your essential companion. Unleash your creativity and master the art of epoxy resin with our expert advice and detailed instructions. Download "Mastering the Art of Epoxy Resin: Tips and Advanced Techniques" now to uncover the secrets of this versatile artistic method. Develop your artistic skills and create one-of-a-kind pieces that will captivate your friends and family. Don't miss this opportunity to become an epoxy resin expert and make your artistic mark
$21,95
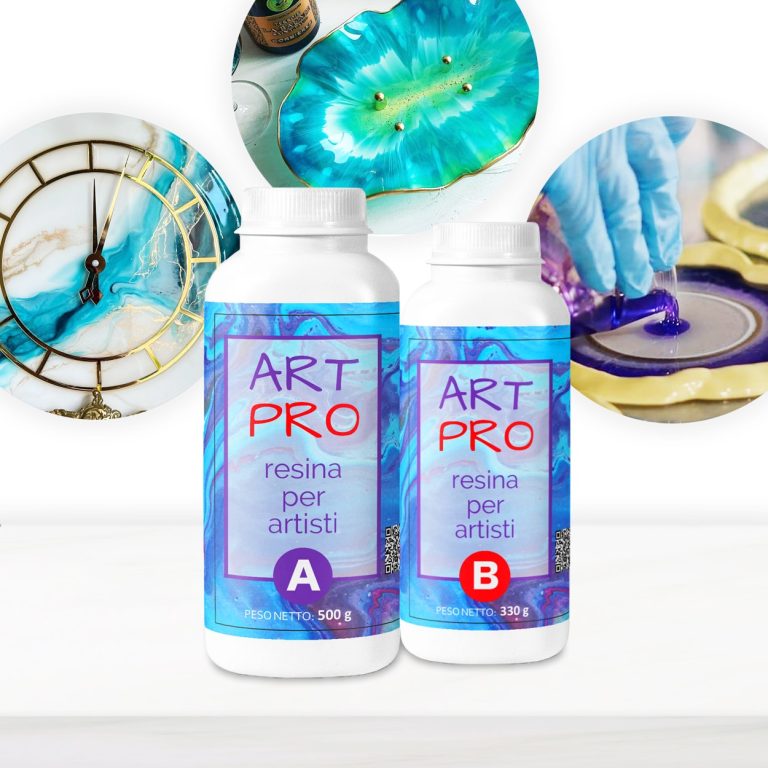
💥 BESTSELLER FOR: – Resin Artworks on surfaces, panels: Ocean Art, Marble Effect, Geode Art and etc; – Coasters and Trays with colour effects (layer thickness up to 1 cm [0,39”]); – Coating of surfaces - Floors, Canvases, Furniture, Etc; – 3D effect on prints, photos and images in general; – Fixation of decorative objects (decorative elements, glass, stone, quartz pieces, etc.); – Creation of a perfectly transparent protective layer on your projects. 💥About “ART PRO ” – Ultra Clear Medium Viscosity Epoxy Resin for Artists: First class quality epoxy resin for the artistic sector: thanks to its special dense formula, it allows you to create Resin Art works. It does not leak out from the working surface, slowly reaching the corners of the frame. ART PRO preserves your original design and prevents any possible modification due to the thickness of the resin: because of its special formula, the layers of colours do not expand and do not mix (unless you deliberately intervene), faithfully keeping with your creative idea! Additional features: Long working time; + Odourless; + Excellent mechanical strength; + High impregnation and reinforcement of technical fabrics. The product can be coloured with any epoxy dye (both in paste and powder) in a percentage ranging from 0.1% to 2.0%). It can also be thickened by the use of aggregates such as powders and fumed silica. 💥Key features: ⚙️ ULTRA TRANSPARENT EPOXY RESIN: -The crystal clear epoxy resin is suitable for both beginners and professionals. Start making Resin Art works, coasters, trays and any other DIY – creation that involves the use of medium viscosity resin. 🧪PROFESSIONAL QUALITY: -Made from high quality materials – Excellent transparency, Glossy surface, Odourless – because of unique formula for DIY, craft and artistic creations. Compatible with silicone, wood, fabric, glass and paper. 🌿 SAFE AND CERTIFIED: -All our resins are Certified Non-Toxic, Solvent-free, non-flammable, and totally safe. 💧 EASY TO USE: -The 3:2 mixing ratio makes this product very easy to use. Being a two-component resin, simply mix RESIN A + HARDENER B in the ratio indicated above the package and let it harden without the need for further additives. Can be coloured as desired. 📞 FREE PROFESSIONAL ASSISTANCE SERVICE: -Since we are directly a manufacturer, we have access to a professional laboratory that will happily help you with any complex project. 🇬🇧 UK BASED TRUSTED COMPANY: -RESIN-PRO team collects and sends your order as fast as possible. We produce and realise epoxy resins since 2015. Just google our social media, where you will find thousands of projects made with our products around the world. The "ART-PRO" formula is specifically developed for coating in artistic applications. Compatible with colouring agents, powder pigments, alcohol-based and oil-based dyes, aerosol paints. The migration laboratory test on cured resin samples ensures that the final product does not release any harmful substances, if applied following the instructions. Warning: the product is moisture sensitive, do not use on wet surfaces or with water-based dyes (e.g. Acrylics) ____________________________________________________________________ if you have not enough experience, we insistly suggest to make a small test before working with large project.
$28,49
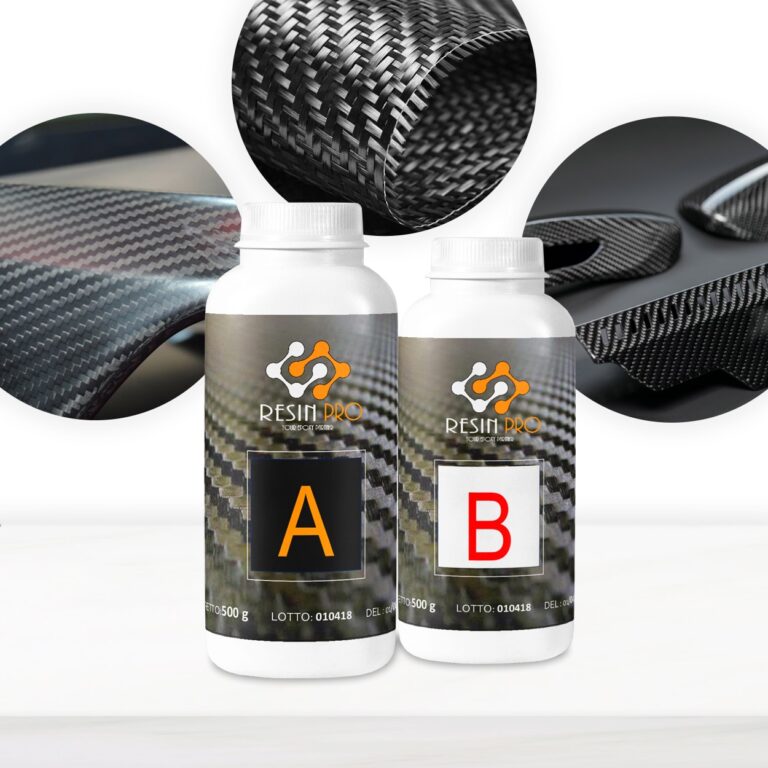
The Resin for Lamination with Carbon Fibre and Glass Fibre is a product formulated to ensure maximum mechanical strength and a perfect impregnation of the technical fabric. Its epoxy formulation allows an application at room temperature and guarantees a glossy and moisture resistant surface. Available quantities: 775 gr (500 gr of component A + 275 gr of component B). 1550 gr (1000 gr of component A + 550 gr of component B) 3.1 kg (2000 gr of component A + 1100 gr of component B)
$26,99
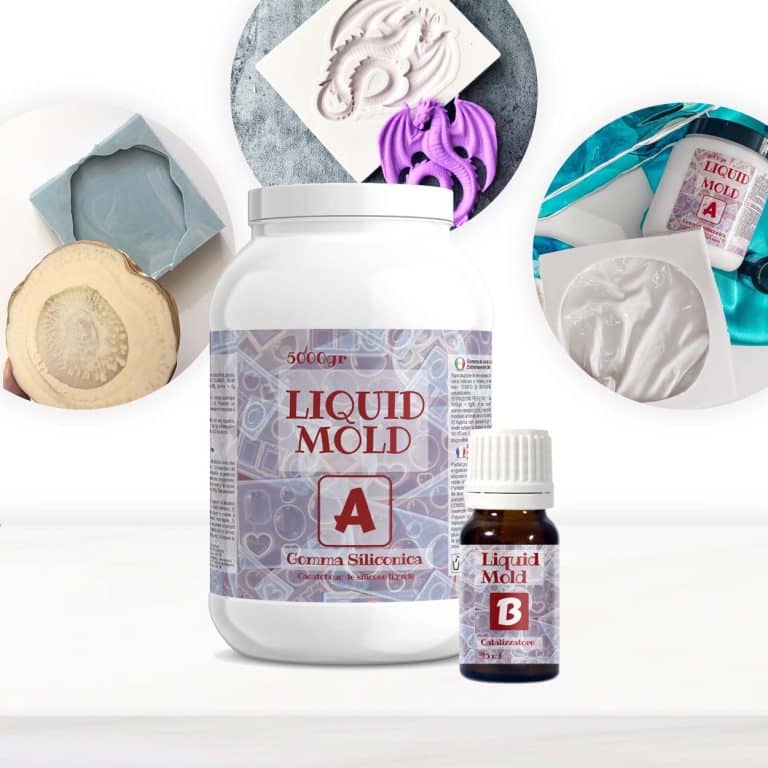
CASTING LIQUID SILICONE RUBBER – for mold-making. Two-component A + B. Liquid silicone rubber for mold-making; able to penetrate everywhere and to reproduce every small detail. It is suitable for making molds for small objects, even with very fine details and noticeable undercuts. Liquid Silicone Rubber for Making Highly Detailed Molds. Compatible with Resin, Soap and Polymer Pastes. Ideal for multiple reproductions of models and complex shapes and jewelry of any kind. White Color – Mixing Ratio: 100: 2 by weight (for 20 Shore type), 100:3 by weight (for 15 Shore type). Complete cure in 12 hours. Liquid medium-hard condensation pourable silicone rubber. It possesses high mechanical characteristics, and it is suited for the preparation of molds with fine details: reproduction of bronze statues (artistic foundries), serial reproduction of complex objects in resin (polyester, polyurethane and epoxy), in plaster, natural and synthetic wax, concrete (e.g., statues, decorative garden items, decorative candles, prototypes, decorative ceramics, rosettes, frames, faux wood decorations, etc.). Castings for technical products. Technical Features: + Mix ratio: 100: 2 by weight (for 20 Shore type), 100:3 by weight (for 15 Shore type), + Pot Life – 60-80 min; + Pouring time – 60-80 min; + Demold time – 12 hours; + Hardness – 20 + -3 Shore A + Color – white, semi-gloss.
$19,49
ResinPro: one supplier for all your needs
15 years of experience at your complete disposal, supplying resins and accessories for creativity, industry, DIY, flooring and marine applications.
At your home, directly from the manufacturer!
ResinPro is the direct manufacturer of our resin range for companies and hobbyists, guaranteeing the lowest prices on the market.
Learn more
The widest range of resins in the US!
We offer resins for every need, from artistic creations to marine and construction applications, far beyond the “limited” selection typically found in local DIY stores.
Expert technical support!
Our technicians provide free remote consulting to help you avoid mistakes and ensure you achieve the result you want — unlike “generic retailers” who sell 1,000 different products.
get a free consultation
RESIN PRO is a leader in resin production and distribution!
24-hour delivery: We ship across the US on the same day. Enjoy convenient home delivery with our appointment service—our courier will contact you in advance and deliver the package to your preferred location, or leave it at an alternative address of your choice.

Full support!
We provide continuous support from preparation to final application, including remote technical assistance, ensuring a smooth experience.
Talk with a specialist and place a phone order without registration and without credit cards!
 Free shipping on orders over €199,00