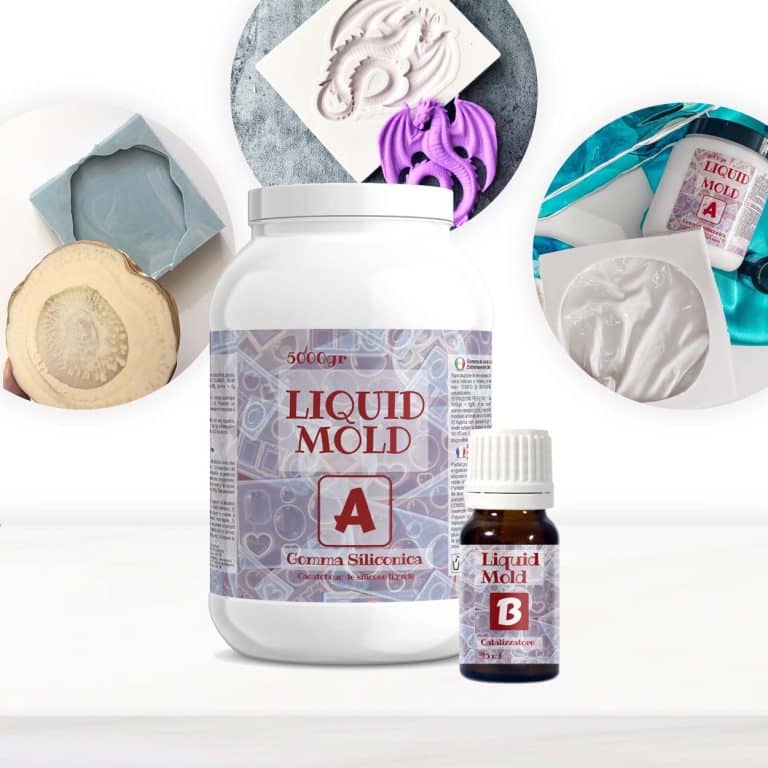
CASTING LIQUID SILICONE RUBBER – for mold-making. Two-component A + B. Liquid silicone rubber for mold-making; able to penetrate everywhere and to reproduce every small detail. It is suitable for making molds for small objects, even with very fine details and noticeable undercuts. Liquid Silicone Rubber for Making Highly Detailed Molds. Compatible with Resin, Soap and Polymer Pastes. Ideal for multiple reproductions of models and complex shapes and jewelry of any kind. White Color – Mixing Ratio: 100: 2 by weight (for 20 Shore type), 100:3 by weight (for 15 Shore type). Complete cure in 12 hours. Liquid medium-hard condensation pourable silicone rubber. It possesses high mechanical characteristics, and it is suited for the preparation of molds with fine details: reproduction of bronze statues (artistic foundries), serial reproduction of complex objects in resin (polyester, polyurethane and epoxy), in plaster, natural and synthetic wax, concrete (e.g., statues, decorative garden items, decorative candles, prototypes, decorative ceramics, rosettes, frames, faux wood decorations, etc.). Castings for technical products. Technical Features: + Mix ratio: 100: 2 by weight (for 20 Shore type), 100:3 by weight (for 15 Shore type), + Pot Life – 60-80 min; + Pouring time – 60-80 min; + Demold time – 12 hours; + Hardness – 20 + -3 Shore A + Color – white, semi-gloss.
$19,49
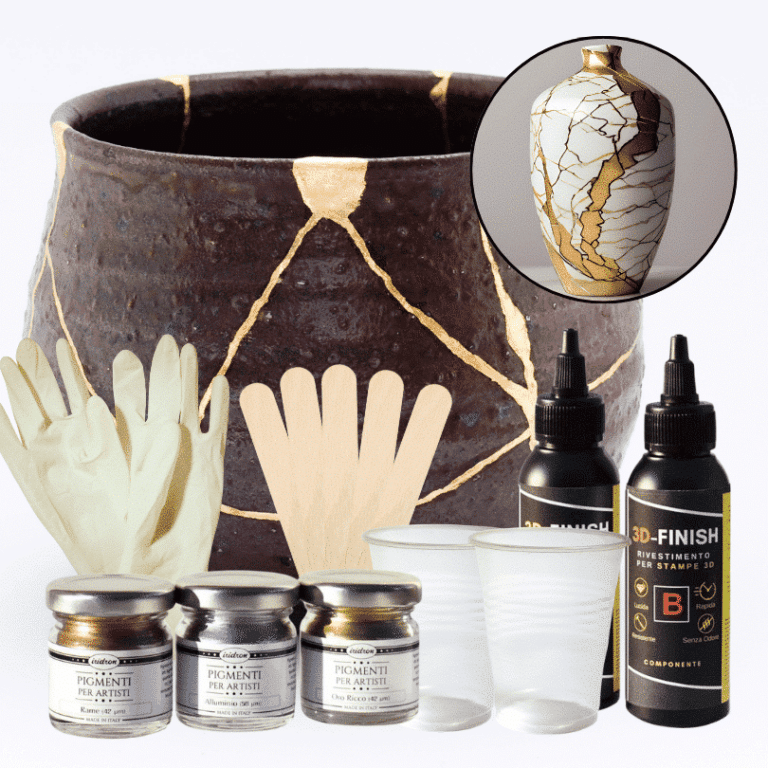
Kintsugi Repair Kit - Repair and Transform Your Ceramics with Elegance Celebrate imperfection with the ancient Japanese art Discover the traditional Japanese art of Kintsugi with our complete repair kit. Transform your broken ceramics into unique and fascinating works of art, highlighting imperfections with elegant gold, silver, or copper veins. Our kit is perfect for both beginners and experts, offering detailed instructions and everything you need to give new life and value to your most cherished items. 🌟 Specific epoxy resin (150g): slow catalysis to eliminate any bubbles or imperfections, allowing you to complete the work without rushing. 🎨 Dye of your choice (gold, copper, silver): customize your repair with a touch of elegance and refinement. ✨ Respect the tradition: follow the ancient art of Kintsugi and transform your ceramics into unique and precious treasures. The kit contains: 150g of resin for 3D decorations, 2 pairs of protective gloves, 2 mixing cups, and 5 spatulas for applying the resin, detailed instructions, everything you need in one kit. Give your ceramics a unique touch: repair them with style and make them even more beautiful. Buy the Kintsugi Repair Kit now and start creating your works of art today! Kintsugi Kit Instructions: Mix Resin: Measure 100A:50B by volume (or 100A:45B by weight) using a scale. Mix for 2 minutes, ensuring all surfaces are scraped. Add Colour: Mix your chosen metallic dye (gold, silver, or copper) into the resin to highlight the cracks. Prepare Surface: Ensure surfaces are clean, dry, and sanded. Apply Resin: Fill the cracks with the colored resin. Curing: Work in a temperature-controlled area, avoiding humidity. Safety: Wear protective gear.
$22,95
HIGH-QUALITY SILICONE MOULD FOR HANDCRAFTS This flat Mould has a smooth interior and produces a beautiful art-work with a professional finish. Use our heat-resistant resin to make something that is not only functional. Dimensions: Bottle holder - 10 x 4.1 inches (1pcs) Coaster - d 5.1 inches (2pcs) If you're using these moulds to make coasters, we recommend that you add a 3mm thick clear layer of Heat-Resistant resin first in your mould. Let it set and then add more resin with colour, ink, glitter, flowers etc. Once turned out (after 3-4 days), what was the bottom will be the top and heat-resistant up to 200C! Remember that our Heat-Resistant resin needs up to 72 hours to achieve full cure, so don't place a hot cup on it too early. DO-IT-YOURSELF. Material: Silicone, Colour: Semi-transparent; Reusable, Non-stick, Easy to use and clean. Warning: do not use aggressive solvents, High-quality moulds, heat-resistant: -40°C to + 210°C [-104° F to +410° F]
$10,23
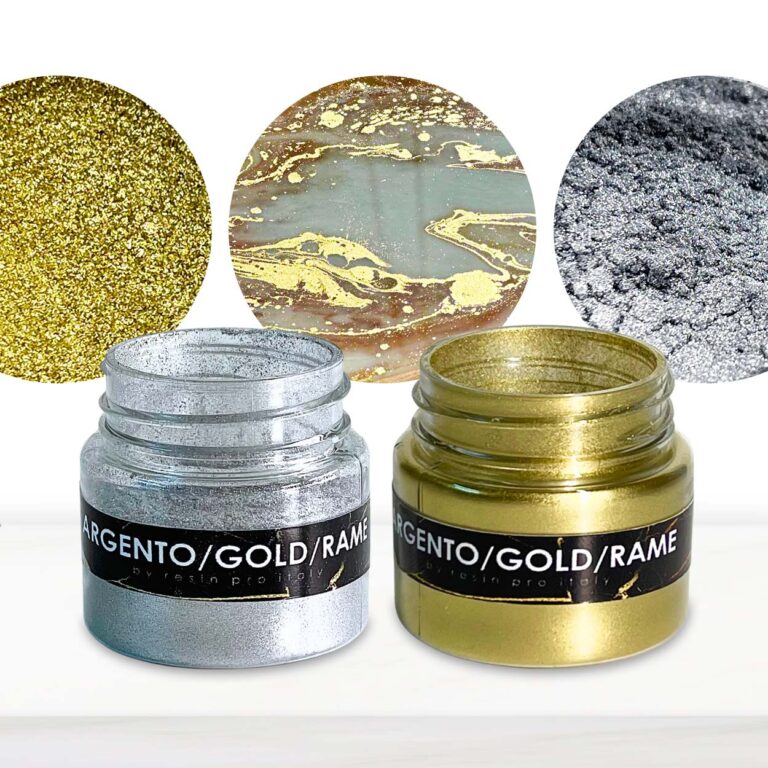
High gloss Pop up metallic pigment: a touch of luxury for your resin creations Being a very light pigment, it easily rises to the surface and leaves golden streaks allowing you to create a unique style. Ideal for: Resin Art technique, Pour Paint (Fluid Art), decoupage, decorations (paintings, furniture, boxes, trays, coasters) Do it Yourself or DIY
$6,95
To revitalize old parquet flooring with wood filler, you can follow these steps
- 1. Cleaning: Remove dirt and old finishes from the parquet using a specialized cleaner.
- 2. Sanding: Eliminate scratches and imperfections by sanding the floor.
- 3. Filling: Fill any gaps and cracks with a wood filler that is compatible with the parquet.
- 4. Finishing Sanding: Blend the filler with the surrounding wood by sanding the surface again.
- 5. Application of Finish: Apply a new protective finish to enhance resistance and durability.
This process breathes new life into old parquet flooring, enhancing its aesthetics and longevity.
Epoxy Resin for Parquet Flooring
Epoxy resin for parquet flooring is a highly durable protective and decorative coating, perfect for safeguarding wood from wear, scratches, and weathering. When applied to wooden floors, epoxy resin creates a smooth, glossy surface that is easy to clean and maintain over time. This type of coating is renowned for its longevity and its ability to withstand foot traffic, impacts, and chemicals. Additionally, epoxy resin for parquet flooring can be used to renovate existing floors, providing a modern and uniform appearance to the space.
How to Fill Gaps in Old Parquet Flooring
To effectively fill gaps in old parquet flooring, carefully follow these steps
Thoroughly clean the area to be filled, removing dirt and residues.
Select a suitable parquet filler for the type of wood.
Apply the filler into the gaps or holes using a spatula to achieve a smooth surface.
Remove any excess filler with a spatula or a damp sponge.
Allow the filler to dry completely as per the manufacturer's instructions.
If needed, lightly sand the surface to level the filler with the parquet.
Finally, protect the parquet with an appropriate protective treatment or finish.
By following these steps diligently, you can effectively and durably fill gaps in old parquet flooring.
DIY Parquet Restoration Guide
Restoring parquet flooring on your own demands attention and precision. Here are essential steps to achieve excellent results:
- 1. Assessment: Check the condition of the parquet to identify scratches, stains, or dents.
- 2. Cleaning: Use a specific parquet cleaner to remove dirt and old finishes.
- 3. Sanding: Level the surface and remove the damaged superficial layer using a sander.
- 4. Filling: Fill any cracks with a specific parquet filler.
- 5. Finishing: Protect and revive the wood by applying a layer of varnish or oil.
By meticulously following these steps, you can safely and effectively restore your parquet flooring to its original splendor.
Parquet Grout Colors
When grouting parquet flooring, it is advisable to use colors specifically designed for this purpose. Parquet grout colors come in various shades to best match the wood color. Before applying the grout, ensure the floor is clean and free of residue. Spread the grout with a spatula and level it with the floor. Once dry, sand the surface for a uniform result. Remember to protect the parquet with a quality protective treatment to maintain its beauty over time.
The 4X4 sheet is most commonly used to protect worktops and floors when working with Epoxy Resin! These very light but resistant sheets can be applied both on work tables (where artistic castings are made) and on floors when casting large size and in addition can be reused!
$4,07
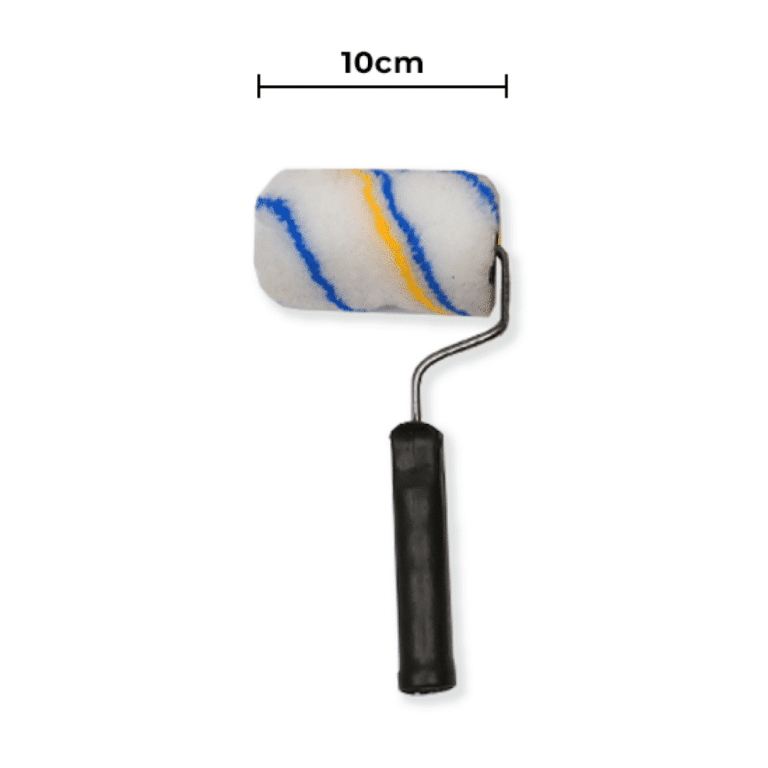
Small roller 10 cm Our wide, short-pile rollers allow you to process resin surfaces and floors with high precision without leaving an excessive dose of resin. In addition, their structure allows you to work accurately and evenly, ensauring perfect results. Precise and uniform processing: Thanks to the short pile, our roller allows you to work with precision and uniformity, providing perfect results without leaving an excessive dose of resin on the surface. Large roller 20cm If you need to cover large surfaces in a short time, but our large short pile roller for resins now and get perfect and uniform results! Sponge Roller For Resin Floors & Surfaces Uniform self-leveling sponge: The sponge of our roller allows you to cast a generous dose of resin that will self-level evenly on the surface, ensuring perfect and even results without any imperfection. If you want to achieve perfect and even surfaces in your resin floor and wall designs, buy our resin floor and wall sponge roller now!
$4,95
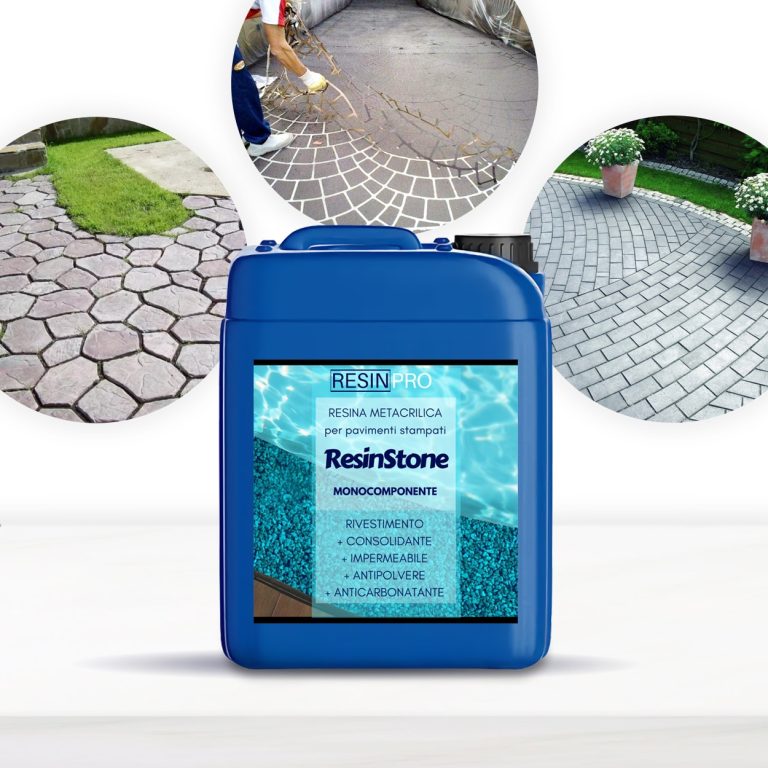
ONE-COMPONENT METHACRYLIC RESIN “RESINSTONE” for stamped floors 5 KG [176,37 Oz] ONE-COMPONENT METHACRYLIC RESIN for stamped floors CONSOLIDANT, WATERPROOF, DUSTPROOF AND ANTI-CARBONATION METHACRYLIC COATING FOR CONCRETE FLOORS. “RESINSTONE” is a low-viscosity, one-component, liquid formula that penetrates deeply for capillary absorption in concrete floors and surfaces, providing moisture protection and increasing both mechanical resistance and protection against chemical agents. “RESINSTONE” is formulated with enhanced methacrylic polymers in order to guarantee: Ø Consolidation and protection of concrete surfaces Ø Moisture protection Ø Protection against oils, acids and other chemical agents (perfect also for industrial environments) Ø Revitalization of the colour tone Concrete surfaces treated with “RESINSTONE” do not absorb water, creating polished, clean, dust-proof but still breathable surfaces. Resistant to yellowing, washing, bad weather (even acid rain). MAIN APPLICATIONS ✓ Consolidation and protection for concrete surfaces. ✓ Great to protect indoor spaces such as cellars, warehouses, garages, etc. ✓ Thanks to its excellent anti-UV rays features, it is ideal for outdoor areas such as yards, parking lots, paths, courtyards, etc. ✓ “RESINSTONE” can be applied 8 hours after the execution of the concrete artifact (following preventive test) ADVANTAGES ✓ Easy to apply (one-component, ready to use, just pour it over the concrete and wait a few hours until it is dry) ✓ Its low viscosity allows it to deeply penetrate and strengthen ✓ Fast: ready in less than 12 hours! ✓ Waterproof and water vapor permeable (thus allowing surfaces to breathe with no moisture penetration!) ✓ Good chemical resistance to oils, grease and acids. ✓ Range of applications from +5°C [41 F] to +35°C [95 F]. ✓ Resistant to temperature changes from -30°C [86 F] to +80°C [176 F]. ✓ Excellent mechanical properties make it a lasting product over the years and with high scratch-resistance if you have not enough experience, we insistly suggest to make a small test before working with large project. WARNINGS: During processing, use protective masks, gloves, and other protective clothing. In case of contact with eyes, immediately rinse with cold water for 15 minutes and immediately consult a doctor.
$42,95
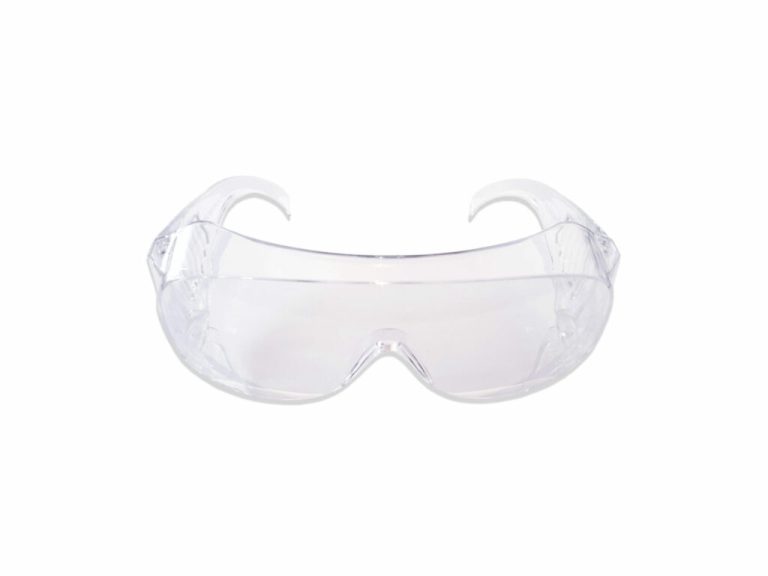
Glasses to protect the mucous membrane of the eyes when working with epoxy resin The high performance properties of the glasses allow you to feel comfortable during the working day, providing excellent visibility and reliable eye protection. Excellent for grinding, drilling, milling, turning, assembly, locksmith and other work related to the cold processing of metals, stone, plastics, wood and other materials.
$6,95
 Free shipping on orders over €199,00