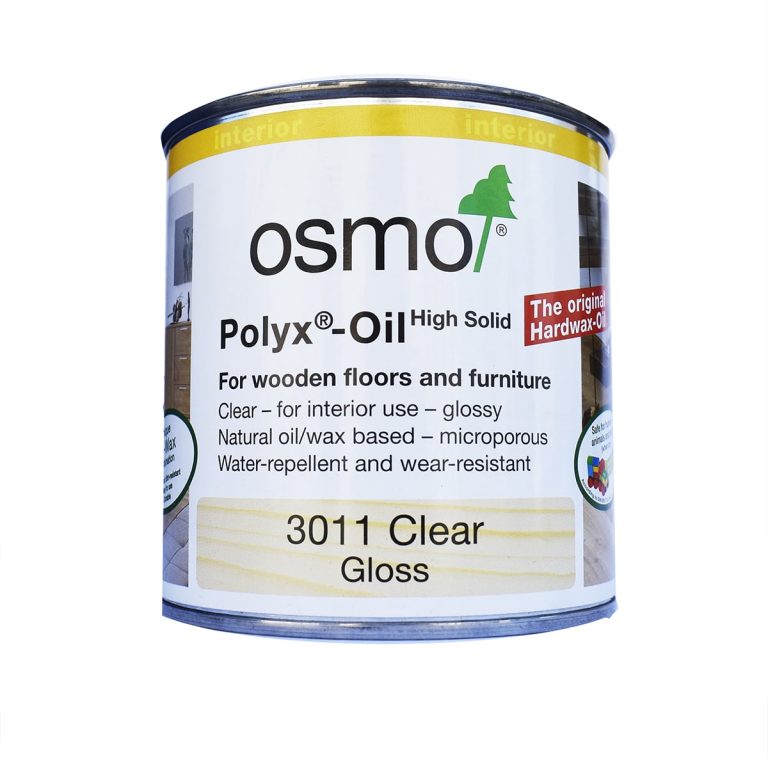
Osmo Hard-Oil-Wax is a general-purpose resin and wood finish derived from natural plant oils and waxes. Resistant to water, dirt, beer, wine, cola and saliva, Osmo Hard-Oil-Wax is microporous and molecularly bonds with the wood, thereby it does not crack, flake or peel. The new advanced formula of Osmo Hard-Oil-Wax has been specially elaborated in Germany to be the first Osmo Hard-Oil-Wax on the European market that can be easily applied with a brush or a roller, no buffing is necessary! It can be used for spot repair and/or restoration/renovation without the need to sand, therefore resin or wood will no longer need complete sanding and refinishing. Clear glossy wood/epoxy finish, which uniquely combines all the advantages of oils and waxes in one product. Osmo-Polyx - Oil Original gloss is resistant to water, dirt and abrasion, and it smoothens any wood surface. Suitable for wood and epoxy resin; microporous surface does not crack, flack or peel. Resistant to wine, beer, cola, coffee, tea, fruit juice, milk and water according to DIN 68861-1A- no water spots. When dry, finish is safe for people, animals and plants and it is also suitable for toys as per EN 71-3 (European norm) and is saliva resistant and sweat-resistant according to DIN 53160 (German industry standard). Recommended use: Osmo Polyx - Oil Original is perfect for the protection of all surfaces and wooden floors, such as solid wood, planks, strips, OSB and cork flooring, as well as furniture surfaces. Ingredients: Based on natural plant oils and paraffin, desiccants and hydrophobing agent. Dearomatized turpentine (benzene-free). EU limit value for this product (cat.A/i): 500 g/l [0,03 lb/oz] VOC (2010). This product contains max. 500 g/l [0,03 lb/oz] VOC. Detailed declaration of ingredients available upon request. Storage: up to 5 years and longer if the can is stored in a dry place and hermetically sealed. Surface preparation: wood and epoxy resin surface must be clean, dry and frost-free (moisture content max. 18%). Osmo Polyx Oil Original is ready to use and should not be diluted. Stir well before use. Clean old microporous stains thoroughly. Old paints and lacquers must be completely removed. As a general rule, wear a dust mask during sanding. Sand wood or epoxy surfaces carefully. Begin with coarse sandpaper – for final sanding use P.120-150, for broom or vacuum. The final result may be influenced by several factors, including the natural features of the wood. Therefore, a trial application is always recommended, especially for unfamiliar timbers. ADVANTAGES Extremely long-lasting and hardwearing Highly resistant to water and dirt Enhances the natural wood characteristics Resistant to common liquids such as water, juice, tea, cola and wine Saliva resistant and sweat-resistant, suitable for toys Microporous breathable finish which does not crack, peel or flake No need to sand for spot repairs or future applications TECHNICAL DATA Approx. coverage: 24 m²/L [7,63 ft²/oz] with one coat No. of coats: 2 coats Application temperature: +5°C to 35°C [41 F to 95 F] Drying time: 8-10 hrs. Sizes: 0.375 L [13,19 oz] Viscosity 95-240 mPas Specific weight: 0.88-0.95 g/cm3 [0,03 lb/in3] Methods of Applications: with Osmo Flat Brush, Floor brush, Oil Finish Applicator Fleece (Hand Pad Holder) or Microfibre Roller, thinly apply to the clean and dry surface along the grain and distribute well. Let it dry for approx. 8-10 hours under good ventilation. Once dry, quickly apply a second thin coat. When renovating or recoating an already oiled surface, one coat applied to the clean and dry surface is usually enough. WARNINGS: During processing, use protective masks, gloves, and other protective clothing. In case of contact with eyes, immediately rinse with cold water for 15 minutes and immediately consult a doctor.
$35,99

About Wood Wax & Polish: Wood Wax & Polish is ideal for treating finished or unfinished wood. It is specifically designed to help preserve and prevent the wood from drying out and fading. With added conditioning oils, it actively feeds your wood while enhancing the natural beauty and depth of the grain. The Wood Wax contains natural beeswax and carnauba wax that offer a superior protective coating, and the formula is infused with orange oil for a pleasant aromatic finish. Wood Wax & Polish can be used on all wood surfaces, including finished and unfinished wood and is suitable for use on antiques and modern items alike. Designed to bring life back to old, faded and tired wooden surfaces, it should be used whenever the wood begins to look dry and faded, or at least once every six months. It is cream like in consistency and so is very easy to apply, we recommend the Wax & Polish for everyday polishing (for items you'd do monthly), and for items that are unfinished (i.e. are not treated with an oil, varnish or paint). Thats because it can soak into the wood, providing nourishment and accentuating the grain. The Beeswax Polish would be used for surfaces that you want to polish to a high shine, or for treating wood that is already finished. 💥Key features: • ⚙️ 【DRYING TIME】-20 minutes. • 🧪 【COVERAGE】-20m2 per litre. • 🌿【COATS】 -One coat. Two coats to bare wood. • 💧 【RE-COAT TIME】 -Once previous has dried • 👍【MAINTENANCE】 -When showing signs of 'drying'. • ✨【APPLICATION】 -Apply with a Lint Free Cloth. Wood Wax & Polish is Suitable For Wax & Polish can be used on all types of wood (oak, beech, maple etc) and on wood used in any environment. Interior Wood Hardwoods and Softwoods Kitchen Worktops & Utensils Furniture Doors and Windows Hardwood Floors Toys Turned Wood Untreated timber and bare wood Wood Wax & Polish Coverage and Shelf Life Coverage: 40m2 per litre Store in a cool dry place, away from direct sunlight. Store between 10°C and 25°C. Once opened, use within three years. [xyz-ips snippet="TRUSTPILOT-WIDGET"]
$16,49
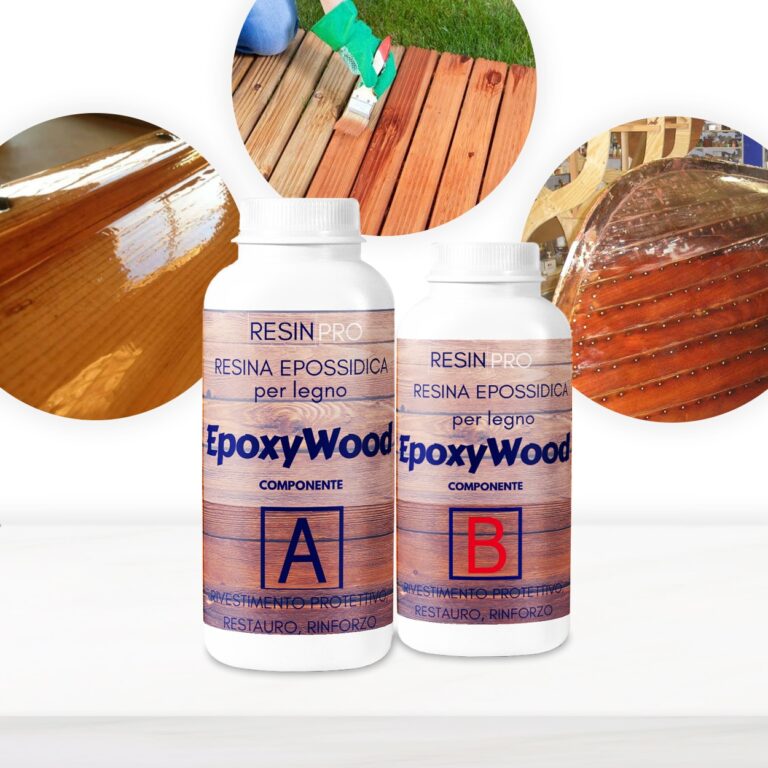
“EPOXYWOOD” Epoxy Resin for Wood - Protective coating, Restoration, Reinforcement Protects, strengthens and polishes the wood, deeply penetrating thanks to its low viscosity. Solvent-free, it can be applied to any type of wood, including fibreglass and metal. Great for wooden, fibreglass and metal surfaces. In addition to surface protection, it enhances the wood grain and provides a pleasant aesthetic effect. Filler applicable with additions of 2/3 of glass beads (available in our shop) Colour: STRAW-YELLOW, not suitable for high-thickness castings (in such cases, we recommend ResinPro Transparent Epoxy Resin) Solvent-free structural epoxy system formulated for the construction, the protection and the restoration of fibreglass, timber and many other substrates. Its properties of penetration, adhesion and weather-resistance make “EPOXYWOOD” essential for the maintenance and protection of surfaces. With “EPOXYWOOD” you can have high strength bonding, surface protection and waterproofing of the hull. Wood treated with “EPOXYWOOD” becomes completely waterproof and reinforced while maintaining its characteristics of flexibility and resistance. Surface preparation: Before applying “EPOXYWOOD”, ensure that the surface to be treated is perfectly dry and moisture-free. The wood to be treated must always be clean and free of oils or other solvents. We recommend to sand the surface before application.
$36,49
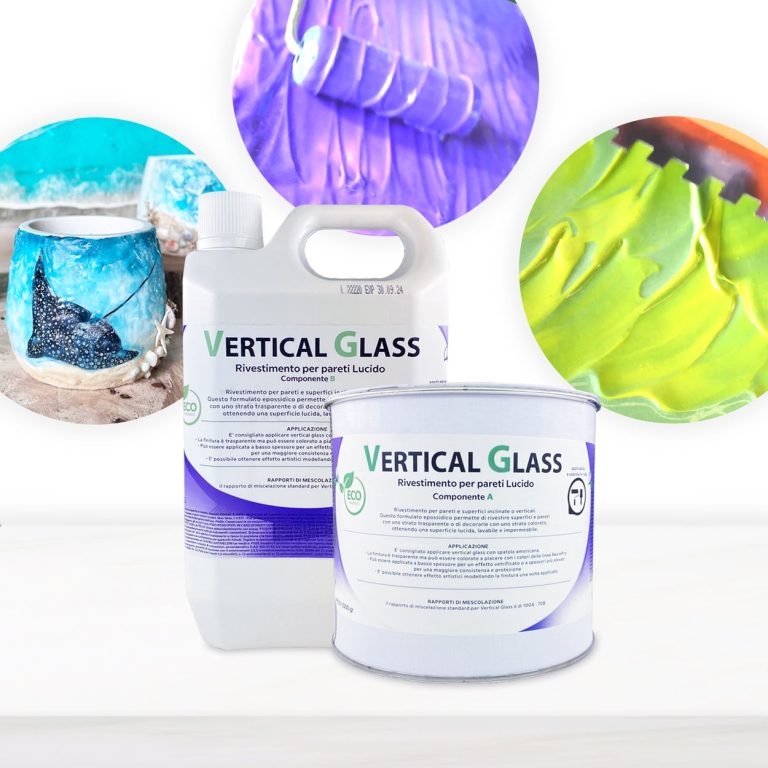
Coating for inclined or vertical walls and surfaces / This epoxy formulation allows you to coat surfaces and walls with a transparent layer or decorate them with a colored layer, resulting in a glossy, washable and waterproof surface. The Vertical Glass resin differs from normal resins allows creatives to create sharp shapes and designs on surfaces and canvases without the resin mixing unintentionally losing the original design! Transparent, UV-resistant epoxy system that creates a hard, glossy protective layer. Vertical Glass allows you to keep your initial design, faithfully respecting your creative idea! The surface will be perfectly smooth and resistant to moisture. Solvent-free and odorless epoxy resin. Applications: Floors and Walls (pre-existing) also vertical; Protection of material coatings and other artistic decorations; Coating, repair and decoration of shower trays and sanitary ware; Coating of surfaces, objects and furniture to give depth and brilliance to the color, even in Vertical! Features: For a smooth coating, it is applied with a spatula to the surface of any material: tile, concrete, wood, brick, etc. It has good hiding power, and completely covers the work surface in one application Creates a glossy, smooth and moisture-resistant layer To create a matte surface, it is easily sanded (48 hours after application, with a grain size of 1000-2000 P) Protects from moisture and gives a new life to surfaces It can be painted with dyes and pigments from our assortment Does not self-align: saves the drawing that you set for it 🙂 Please note that in the unpainted form, the material is not completely transparent, and there is a slight “milky” shade with almost imperceptible micro-particles, so we recommend painting it It is used for: Floor coverings, walls, furniture and other surfaces Protection of surfaces of materials Painting, repair and decoration of showers and bathrooms Creation of paintings, murals and other works of art
$109,49
 Free shipping on orders over €199,00