SILICONE MOULD FOR HANDCRAFTS. Easy to use, highly polished and perfect for creating beautiful jewellery or decorations. Suitable to be used with soap, plaster, resin, ice, ceramic, clay, wax and other casting materials proper for DIY. Moulds for objects, jewels and chocolate. DO-IT-YOURSELF. Material: Silicone, Colour: Semi-transparent; Reusable, Non-stick, Easy to use and clean. Measures of each mould: 5 CM [1,96"] / 3.5 CM [1,37"] Warning: do not use aggressive solvents, High-quality moulds, heat- resistant: -40°C to + 210°C [-104° F to +410° F]
$5,95
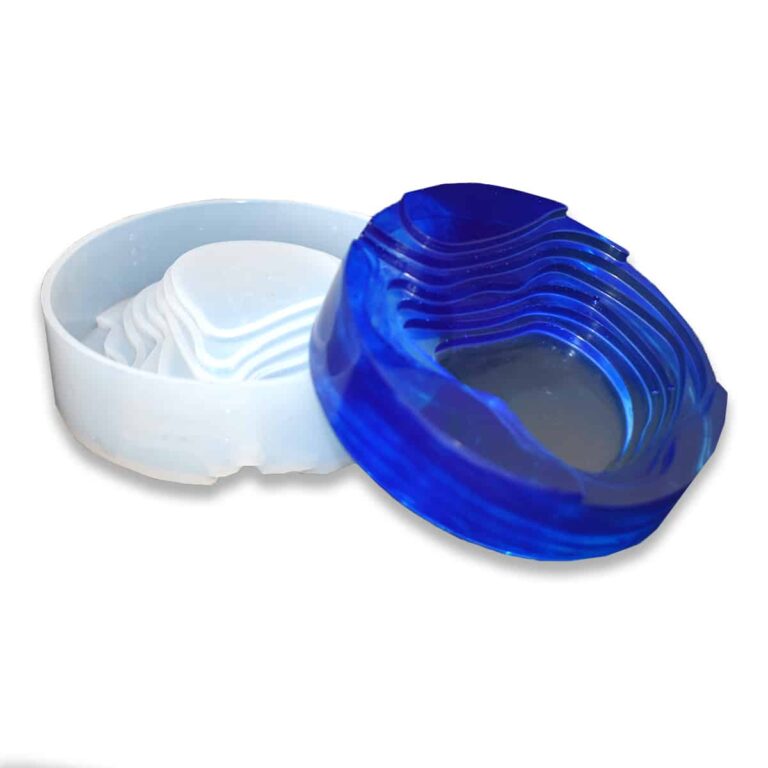
SILICONE MOULD FOR HANDCRAFTS. Easy to use, highly polished and perfect for creating beautiful jewellery or decorations. Suitable to be used with soap, plaster, resin, ice, ceramic, clay, wax and other casting materials proper for DIY. Moulds for objects, jewels and chocolate. DO-IT-YOURSELF. Material: Silicone, Colour: Semi-transparent; Reusable, Non-stick, Easy to use and clean. Measures of each mould: D 12.5 CM [4,92"] / H.3.6 CM [1,41"] Warning: do not use aggressive solvents, High-quality moulds, heat- resistant: -40°C to + 210°C [-104° F to +410° F] Attention! Remove the product from the mold no later than 12 hours after pouring the resin. Otherwise, there is a chance of local adhesion of the resin to the mold.
$15,51

Resin Pro offers the possibility to achieve a perfect polishing by using different types of abrasive pastes. It can be used by hand or with an orbital polisher to make your resin creations shiny. Ebonite Abralon Sanding Pads Cosmetically appealing, consistent scratch pattern provides excellent traction. Combines the benefits of abrasive cloth and non-woven products. Opening in the fabric allows water to flow freely around the abrasive. Solid surface and foam backing provide even surface pressure. Last 5+ times longer than sandpaper. Use wet or dry (residual material can be removed by high pressure air). Now it's possible to get the most aggressive surface texture without that "cheese grater" look. Abralon sanding pads use silicon carbide particles that are precision sifted to a consistent grain size, then bonded evenly to a six-inch round fabric face for the most even scratch pattern available. WARNINGS: During processing, use protective masks, gloves, and other protective clothing. In case of contact with eyes, immediately rinse with cold water for 15 minutes and immediately consult a doctor. The kits may include by variations: EpoxyPolish Polishing cream – 250 ml [8,79 oz] - 1pc Ebonite Abralon Sanding Pads: - Ebonite Abralon Sanding Pad 150mm 360 grit - 1pc - Ebonite Abralon Sanding Pad 150mm 500 grit - 1pc - Ebonite Abralon Sanding Pad 150mm 1000 grit - 1pc - Ebonite Abralon Sanding Pad 150mm 2000 grit - 1pc - Ebonite Abralon Sanding Pad 150mm 3000 grit - 1pc - Ebonite Abralon Sanding Pad 150mm 4000 grit - 1pc EpoxyPolish Polishing cream How to Use: Step 1: Thoroughly clean the surface with a cloth. Step 2: Now you can polish by hand or with an orbital polisher. We recommend using the lowest possible speed to get the best result. Start Polishing with 360-500 grit. Note: Sand the entire surface evenly with circular movements and light pressure. Moisten the pad or the surface with water from time to time. Step 3: Now use the 1000 grit sandpaper. Note: Moisten the sandpaper or the surface with water from time to time. Step 4: Afterwards, use 2000 grit sandpaper. Note: Moisten the sandpaper or the surface with water from time to time. Lastly, use 4000 grit sandpaper to finish sanding. Step 5: Remove the sandpaper from the polishing disc and attach a soft sponge to it. Rinse the surface or wipe it with a damp cloth to remove any residual grain of the sanding. Step 6: Apply EpoxyPolish Polishing cream on the damp sponge. Use by hand or with an orbital polisher, using a large circular motion and exerting slight pressure. Step 7: Clean the surface with plenty of water to remove all the remaining residues. Step 8: Enjoy the result!!!
$21,49
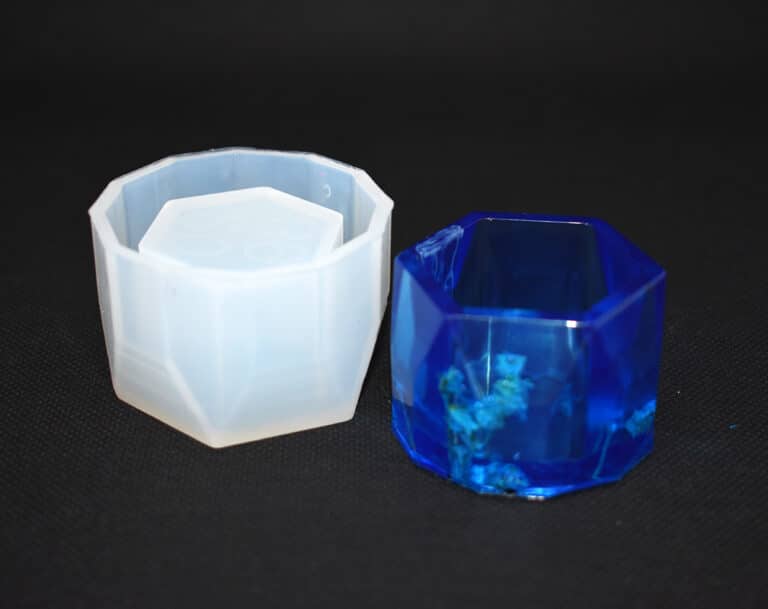
Soft silicone mould for resins. Mould made with professional silicone and absolutely free of imperfections. Non-deformable mould, of great resistance and durability. Type of manual technique: creation of jewelry box. Material: Silicone Color: Semi-Transparent; Reusable, non-stick, easy to use and clean. Glass measures: 11 x 11 CM / H. 6. 5 CM Caution: do not use aggressive solvents for cleaning. High quality moulds, thermal resistance: -40 + 210 centigrade. Attention! Remove the product from the mold no later than 12 hours after pouring the resin. Otherwise, there is a chance of local adhesion of the resin to the mold. Copyright © Resin Pro Srl. The reproduction (total or partial) of the work by any means made and its making available to third parties, either free of charge or for a fee is prohibited.
$7,95
Enhancing Visual Memory in Epoxy Resin Projects
Enhancing visual memory is crucial in the realm of epoxy resins and coatings, where the ability to retain visual information such as images, patterns, or colors for a brief period can significantly impact the final product. This concept plays a vital role in projects involving RESINPRO products, as it aids in recalling the correct sequence for using different materials or colors during tasks like painting or decorating. Keeping visual memory sharp can boost precision and efficiency when working with epoxy resins, silicones, and silicone casting materials.
Epoxy Resin for Molds: A Comprehensive Guide
Epoxy resin for molds stands out as a versatile and resilient material perfect for crafting intricate and enduring molds. Comprising two primary components that must be meticulously mixed, this resin ensures rapid curing and a flawless, glossy finish. Renowned for its exceptional mechanical and chemical resistance, epoxy resin for molds is ideal for producing reusable molds for diverse applications, ranging from jewelry and artistic creations to industrial components. Prior to application, adhering to the manufacturer's guidelines is crucial for achieving optimal and enduring results.
Transparent Resin Pigments: Elevating Artistic Projects
Transparent resin pigments are specially formulated colorants designed to be blended with transparent resins like epoxy resin or polyurethane to impart vibrant and intense hues. Preserving the resin's transparency, these pigments enable the creation of artifacts and artworks boasting distinctive chromatic effects. Available in various shades, transparent resin pigments are perfect for art projects, DIY jewelry, coatings, and art compositions that demand a hint of translucent, brilliant color. User-friendly and guaranteeing professional, long-lasting outcomes, these pigments are a must-have for any creative endeavor.
Epoxy Resin DIY Tutorial: Crafting with Confidence
Embark on creative projects with epoxy resin DIY by following these simple steps:
Prepare your workspace in a well-ventilated, dust-free environment.
Don gloves and protective gear to shield your skin from potential irritation.
Accurately measure and mix the resin and hardener following the prescribed ratio.
Infuse the resin with colors or pigments to create bespoke effects.
Pour the resin into molds and level it using a stick to remove air bubbles.
Allow the resin to cure for the recommended duration.
Once hardened, sand and polish your creation for a flawless finish.
By adhering to these steps, you'll effortlessly bring your creative visions to life with epoxy resin DIY projects.
RESIN COLOUR TRANSLUCENT EFFECT - FOR EPOXY RESINS – 0.85 fl oz / 25 ml Intense and brilliant color, ideal for Transparent Epoxy Resins. Mix small quantity to get a translucent effect. The high coverage of the "Colorfun Deluxe" range allows to obtain a full and bright color. The high concentration provides an opaque color with a few drops. Usable to color the products of the RESIN PRO range. Available colors: White Black Blue Lemon Yellow Oxide Yellow Oxide Red True Red True Green Olive Green Orange Brown
$4,95
Resin art kit to make your own piece of ocean! Attention! If the resin (component A) is cloudy or with sediment, be sure to read this article: The set already includes everything you need to create a real marine masterpiece! Thick resin, liquid dyes in the colour of the sea, an additive for creating real waves – now you no longer need to search for goods separately to assemble a set to create your own miniature sea 🙂
$59,95
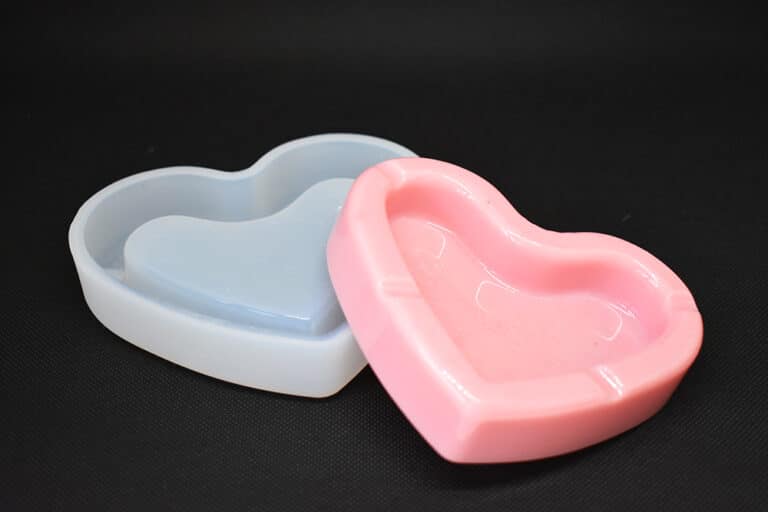
SILICONE MOULD FOR HANDCRAFTS. Easy to use, highly polished and perfect for creating beautiful jewellery or decorations. Suitable to be used with soap, plaster, resin, ice, ceramic, clay, wax and other casting materials proper for DIY. Moulds for objects, jewels and chocolate. DO-IT-YOURSELF. Material: Silicone, Colour: Semi-transparent; Reusable, Non-stick, Easy to use and clean. Measures of each mould: 13 x 11 x 3 CM [5,11" x 4,33" x 1,18"] Warning: do not use aggressive solvents, High-quality moulds, heat- resistant: -40°C to + 210°C [-104° F to +410° F]
$7,95

Finally, the first food contact certified* TRANSPARENT Epoxy Resin! To coat your plates and cutting boards! Non-toxic and certified for food contact (liquids included). Two-component, high-modulus, unfilled, medium-fluidized epoxy system. The system is composed using only raw materials included in the positive list of substances allowed for food contact (EU Regulation No. 10/2011 January 14, 2011) Two-component unfilled high-modulus epoxy resin, medium viscosity. Excellent surface finish and good resistance to yellowing, to be used for casting, characterized by high transparency, good outdoor stability, excellent mechanical resistance and resistance to basic and acid chemical substances. For self-leveling casting. Its medium-high viscosity allows a wide range of applications specifically for the realization of non-toxic surfaces. Charged with mineral aggregates of appropriate grain size, it is used to create self-leveling epoxy and screed surfaces suitable for contact with food. The main features of this product are: high transparency, excellent mechanical resistance, good chemical and carbonation resistance, high impregnation and reinforcement of technical fabrics, long working time, glossy and self-levelling surface. heat resistance - up to 70 C [158 F] 💥Key features: ⚙️ 【RESIN FOR FOOD CONTACT】 The particular formula makes the product, once cured, perfectly compatible with any type of food and is guaranteed by a specific certification. 🧪 【HIGH QUALITY】 Perfectly transparent even after catalysis. Totally shiny and self-leveling, complete catalysis will take about 24/48 hours - depending on atmospheric and environmental conditions - but it will already be workable after about 10 hours. 🌿 【SAFE AND CERTIFIED】 All our resins are Certified Non-Toxic, Solvent-free, non-flammable, and totally safe. Certified for contact with cold snacks. 💧 【EASY TO USE】 The 100:55 mixing ratio makes this product very easy to use. Being a two-component resin, simply mix RESIN A + HARDENER B in the ratio indicated above the package and let it harden without the need for further additives. 📞 【FREE PROFESSIONAL ASSISTANCE SERVICE] Since we are directly a manufacturer, we have access to a professional laboratory that will happily help you with any complex project. * Documentation ensures that the raw materials used are those listed by the Ministry of Health and the migration laboratory test on cured resin samples shall further ensure that the final product does not release any harmful substances if applied following the instructions. This information can be consulted by the end users in the HCCP certification which is the responsibility of the user. EpoxyFood : Food Contact Certificate:
$26,99
 Free shipping on orders over €199,00