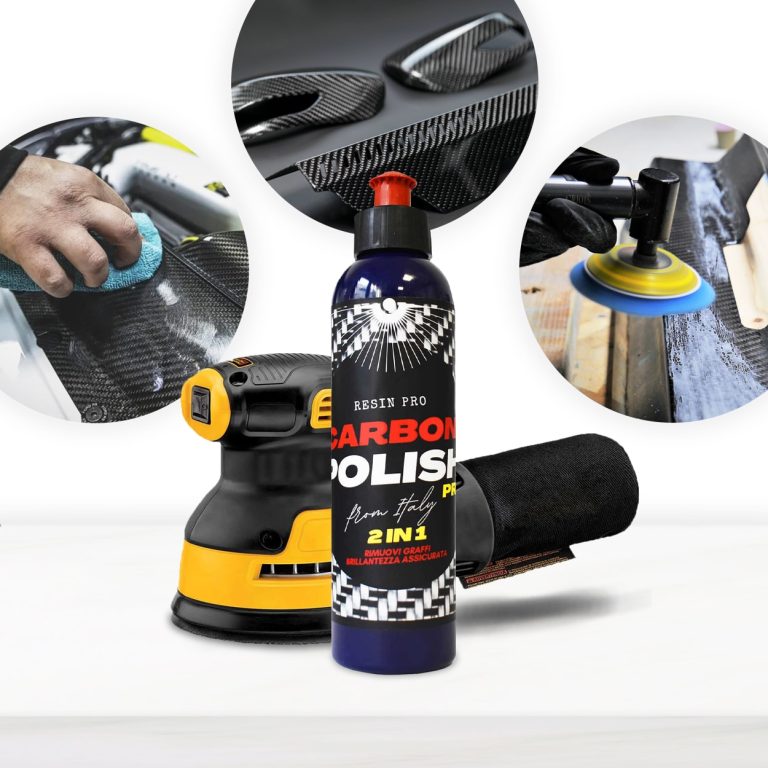
Carbon Polish Black (250ml) is the defined product for polishing your carbon, dark or black surfaces. The aesthetic and economic value of the carbon product is high, and for this reason it is essential to treat the surface with specific and dedicated products, which enhance the beauty of the “carbon look”. It is important to avoid “generic" products that can spoil the work done, with insufficient gloss or even worse, fail to remove scratches. EASY TO APPLY AND REMOVE MISCIBLE WITH WATER ODOURLESS DOES NOT WHITEN PLASTIC PARTS DOES NOT CONTAIN SILICONES VERY LOW ENVIRONMENTAL IMPACT The carbon polishing paste Carbon Polish Pro Black has been developed in a black colour precisely to ensure a brilliant finish and without white dots, typical of generic abrasive pastes. It can therefore be used for all dark surfaces (especially resin). Carbon Polish Pro Black is the specific paste for carbon; black colour prevents residues from remaining visible on surfaces after polishing. Thanks to the NAP (Nano Abrasive Particles) it is a 2 in 1 product; in fact it quickly removes scratches and defects from the surface and gives at the same time a deep shine like only a polish can do. In addition, its Synthetic Polymers allow you to correct and fill all the imperfections on the surfaces of Resin and carbon fiber artifacts. Eliminate scratches, defects and mirror shine with a single product! Carbon Polish Pro Black carbon polishing paste can be used both on the painted carbon and directly on the epoxy resin that covers the carbon fibers. Unlike commercial Polishes, Carbon Polish Pro Black is 100% Made in Italy, born from over 50 years of tradition in polishing. It allows both the hobbyist and the professions to obtain performing results quickly and easily. Here are the simple steps to polish or eliminate blemishes from your carbon fibre surfaces: If you need to use glass paper to remove the deepest scratches, you can do so without hesitation. The polishing paste will then be able to remove the sanding marks and make the surface smooth and shiny. Here's how:- The polishing paste Carbon Polish Black can be used by hand with extreme simplicity, with the help of a microfiber cloth or a foam pad. Or it can be used with electric tools, such as a drill and flexible, equipped with a special shepherd and foam pad (8000-12000 rpm) or with a polisher (1000-2000 rpm both rotary and ro orbital) with foam pad or wool (also synthetic). The use of tools of this kind will speed up the maintenance and ensure optimal results in even faster times. How to prepare the surface to be polished? Here are the tricks to make the most of NAP (Nano Abrasive Particles) technology:- Removals defects and scratches from sanding Depending on the depth of the scratch/defect, start with abrasive papers grit 800-1000 (for deep scratches) or simply 3000-4000 (for light scratches), always tend the surface wetted with water (this will help to make the result homogeneous) Apply the polishing paste for carbon fiber on the surface and spread it with circular and more or less energetic movements depending on the defect you want to remove. Or by directly attaching the buffer of the polisher / hose. We recommend one / two drops of carbon polishing paste every 3-4 cm. You can apply it several times thanks to synthetic polymers, without risking consuming the carbon, until the result is perfect. Clean up simply with water and a clean cloth. Put on your sunglasses and enjoy the dazzling result! Surface renewal: The product is also suitable as a fast and effective tool to renew your precious carbon surfaces, which wear out with normal use or exposure to atmospheric agents. In this case, the process is even easier: it is sufficient to apply the paste on the surface (well cleaned) and roll it out with circular movements, or by directly applying the buffer of the polisher / flexible. We recommend one / two drops of carbon polishing paste every 2-3 cm. The carbon polishing paste Carbon Polish Pro Black has been developed in black colour precisely to ensure a brilliant finish and without white dots, typical of generic abrasive pastes, and can therefore be used for all dark surfaces (especially resin). The special formula is free of volatile silicones and is therefore not harmful to health; it can also be used in painting processes.
$21,49
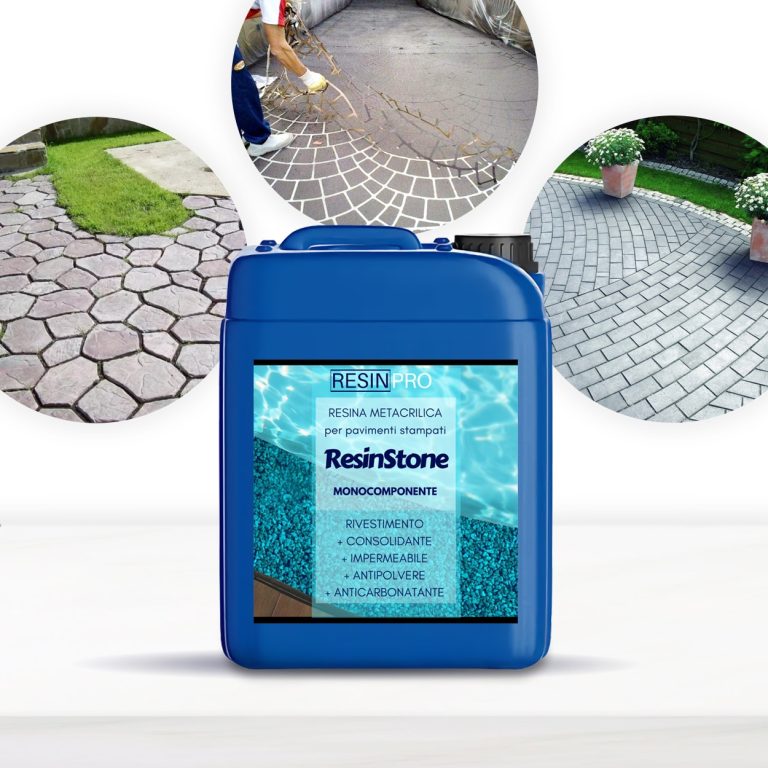
ONE-COMPONENT METHACRYLIC RESIN “RESINSTONE” for stamped floors 5 KG [176,37 Oz] ONE-COMPONENT METHACRYLIC RESIN for stamped floors CONSOLIDANT, WATERPROOF, DUSTPROOF AND ANTI-CARBONATION METHACRYLIC COATING FOR CONCRETE FLOORS. “RESINSTONE” is a low-viscosity, one-component, liquid formula that penetrates deeply for capillary absorption in concrete floors and surfaces, providing moisture protection and increasing both mechanical resistance and protection against chemical agents. “RESINSTONE” is formulated with enhanced methacrylic polymers in order to guarantee: Ø Consolidation and protection of concrete surfaces Ø Moisture protection Ø Protection against oils, acids and other chemical agents (perfect also for industrial environments) Ø Revitalization of the colour tone Concrete surfaces treated with “RESINSTONE” do not absorb water, creating polished, clean, dust-proof but still breathable surfaces. Resistant to yellowing, washing, bad weather (even acid rain). MAIN APPLICATIONS ✓ Consolidation and protection for concrete surfaces. ✓ Great to protect indoor spaces such as cellars, warehouses, garages, etc. ✓ Thanks to its excellent anti-UV rays features, it is ideal for outdoor areas such as yards, parking lots, paths, courtyards, etc. ✓ “RESINSTONE” can be applied 8 hours after the execution of the concrete artifact (following preventive test) ADVANTAGES ✓ Easy to apply (one-component, ready to use, just pour it over the concrete and wait a few hours until it is dry) ✓ Its low viscosity allows it to deeply penetrate and strengthen ✓ Fast: ready in less than 12 hours! ✓ Waterproof and water vapor permeable (thus allowing surfaces to breathe with no moisture penetration!) ✓ Good chemical resistance to oils, grease and acids. ✓ Range of applications from +5°C [41 F] to +35°C [95 F]. ✓ Resistant to temperature changes from -30°C [86 F] to +80°C [176 F]. ✓ Excellent mechanical properties make it a lasting product over the years and with high scratch-resistance if you have not enough experience, we insistly suggest to make a small test before working with large project. WARNINGS: During processing, use protective masks, gloves, and other protective clothing. In case of contact with eyes, immediately rinse with cold water for 15 minutes and immediately consult a doctor.
$42,95
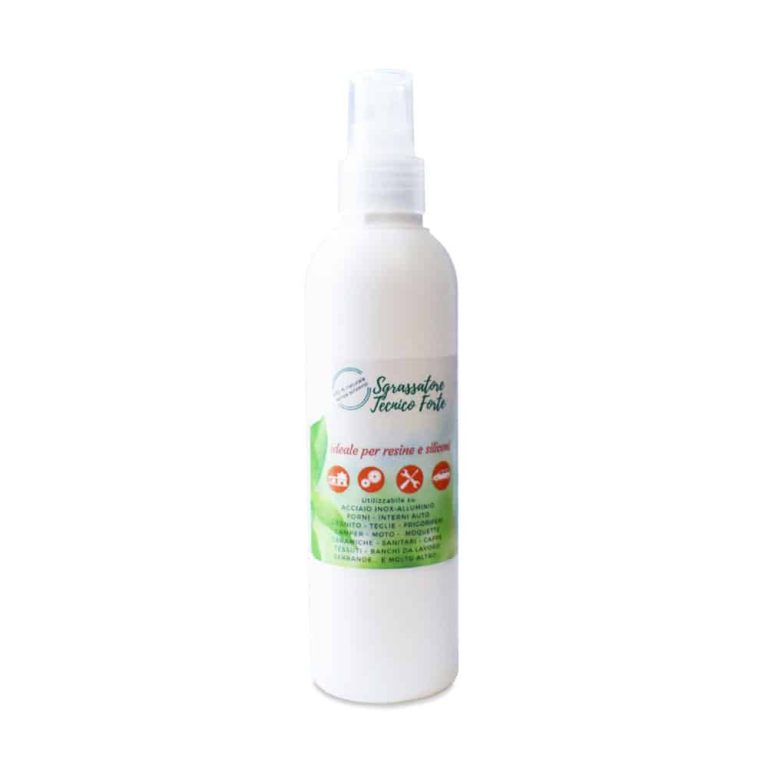
Strong technical degreaser Ideal for Resins and Silicones - it is a liquid degreaser, non-aggressive on the skin: it is dermatologically tested and hypoallergenic. Made only with solvent-free plant extracts. Its formula contains valuable plant extracts! 100% natural – solvent-free! Ingredients: Plant extracts - valerian, aloe vera, mint, rosemary, sage, lavender, calendula, linden, thyme, witch hazel. Extremely delicate. Suitable for use on: STAINLESS STEEL – ALUMINUM OVENS - CAR INTERIORS GRANITE - PANS – REFRIGERATORS CAMPERS - MOTORBIKES – CARPETS CERAMICS - SANITARY WARE – HOODS FABRICS - WORK BENCHES – SHUTTERS AND MUCH MORE ... Solvent-free and alcohol-free, made with raw materials of plant origin. Removes greases, oils, markers, encrustations, adhesive residues, silicone, wax, tar, permanent inks, paints, enamels, resins, pitch, gas oil.
$7,95
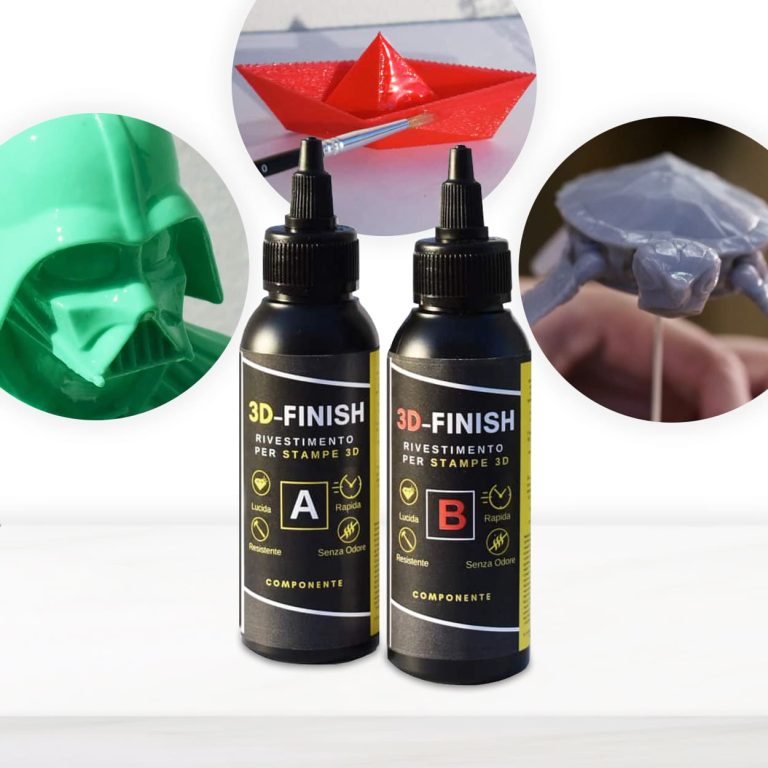
3D – FINISH “Fast” Post-print coating for polishing and finishing 3D prints. Applied on any kind print, it makes the treated surface glossy, smooth and impact-resistant. Specifically developed to be used in 3D applications, it does not drip or cover small details, faithfully respecting all the shapes of the printing. Eliminates unevenness between the different layers; Glossy; Strengthens the mechanical resistance of the printing; Can be polished and painted. If you want to paint your printing according to your tastes, 3D Finish “Fast” can be coloured with colouring pastes and metal powders. Excellent adhesion and reinforcement on PLA, LAYWOOD, ABS. Fast and effective, it is an easy-to-apply solution to create finished items through 3D printing more quickly, improving their aesthetic uniformity and their impact strength. Thanks to its high mechanical resistance, it is also perfect to be used as a bonding agent between printings or to repair damaged 3D artefacts. We recommend to store the product in a dark, cool and dry place away from direct sunlight. The tools must be washed with IPA (isopropyl alcohol).
$16,49
Rust on cars can be effectively treated by following these steps
- 1. **Removal: ** Use sandpaper to eliminate rust from the affected surface.
- 2. **Pretreatment: ** Apply a rust converter to halt the corrosive process.
- 3. **Restoration: ** Fill any holes or cracks with a specific metal primer.
- 4. **Painting: ** Apply an anti-rust primer followed by a protective coating.
- 5. **Maintenance: ** Periodically check the treated area and repeat the process if necessary.
By carefully following these steps, you can effectively treat rust on your car and prevent future damage.
Car Rust Treatment
Treating rust on a car is a crucial process to prevent structural damage and preserve the vehicle's aesthetics. Here are some steps to follow for an effective rust treatment:
- 1. **Rust removal: ** Use wire brushes or sandpaper to eliminate rust from the affected surface.
- 2. **Application of rust converters: ** Use specific products to convert any remaining rust into a stable form.
- 3. **Application of anti-rust primer: ** Apply an anti-rust primer to protect the treated surface.
- 4. **Painting: ** Apply a layer of protective paint to prevent the formation of new rust.
By carefully following these steps, it is possible to effectively treat rust on a car and keep the bodywork in good condition over time.
DIY Rust Removal
DIY rust removal can be carried out by following some simple yet effective steps. Here's what to do:
- Start by brushing off the rust with a wire brush.
- Next, use coarse sandpaper to smooth the rusted surface.
- Apply a rust converter to stop the corrosive process.
- Finally, paint or varnish the treated area to protect it from new rust formation.
With a bit of patience and attention to detail, DIY rust removal can restore the surface to its original appearance and prolong its lifespan.
Anti-Corrosion Products for Cars
Anti-corrosion products for cars are specifically designed to protect metal surfaces from oxidation and corrosion. These products create a protective layer that prevents damage caused by weather agents, water, and road salts. Among the main anti-corrosion products for cars are:
Rust primer applied directly to the metal to prepare the surface for painting.
Protective coatings such as paints and silicone resins that create a waterproof barrier against moisture and corrosive agents.
Products for treating parts already affected by rust such as rust converters and specific enamels.
Regular use of anti-corrosion products helps maintain the car bodywork in good condition over time.
Rust-Proof Paint for Vehicles
Rust-proof paint for vehicles is a coating designed to protect the metal surface from oxidation and corrosion, common issues caused by exposure to weathering agents. This paint contains additives that prevent rust formation, extending the durability and resistance of the treated surface. It is particularly useful for protecting exposed parts such as the chassis, underbody, and other components subject to wear. Rust-proof paint for vehicles can be applied through spray or brush application and represents an effective solution to maintain the appearance and functionality of the vehicle over time.
A clear beeswax polish designed to feed and protect bare wood, and to protect all other wooden surfaces. Natural Beeswax formula feeds, enhances and protects all fine wooden surfaces Soft wax - easy to apply & more cost-effective than aerosol and other alternatives Clear wax - doesn't alter the colour of the surface it is applied too Provides an instant, long-lasting shine Cleans, nourishes, and protects Suitable for all wooden surfaces
$16,49

Complete kit to apply the fibreglass together with the Polyester Resin, for fast, simple and long-lasting repairs! Includes all the necessary to prepare, mix and apply the product. 700 gr [1,54 lb] of orthophthalic polyester resin; 20 ml [0,70 oz] of hardener (to be applied at 3%); 1 square meter of fibreglass MAT 300 gr /m2 [0,66 lb]; 1 brush for application; 2 latex gloves; 1 instruction sheet; 1 container to mix the components; Ideal to repair fenders, car bodies, boats, pipes, water tanks, swimming pools, etc. Are you looking for a simple, fast and inexpensive product to make your repairs in a professional way? We offer you this repair kit, in which you will find everything you need for your application, and we will ship it to your home in 24 hours. This kit is designed to be used as a reinforcement and/or structural material. It consists of a sheet of high-quality glass filaments, a polyester resin (including hardener) for the impregnation of fibreglass, as well as latex gloves, a brush and an instruction sheet for its application. With this practical kit you can immediately repair car bodies, boats, pipes, tanks, swimming pools, roofs, and many others! It is also applicable on several types of materials and surfaces, such as metal, wood, rigid plastic, polyester, glass, porcelain, fibreglass, etc. USE: As described above, this kit is used as a reinforcement and structural material. It features a 1 m2 of high-quality fibreglass mat (300g/m2 [0,66 lb]) together with polyester resin. AREAS OF APPLICATION Composite materials such as skis, canoes, boats, etc. Automotive: composite materials for vehicle components. Industrial: composite for the reinforcement of plastic parts, reinforcement fabrics for structures, decorations, insulators. Sealant for swimming pools, tanks and liquid containers.
$18,49
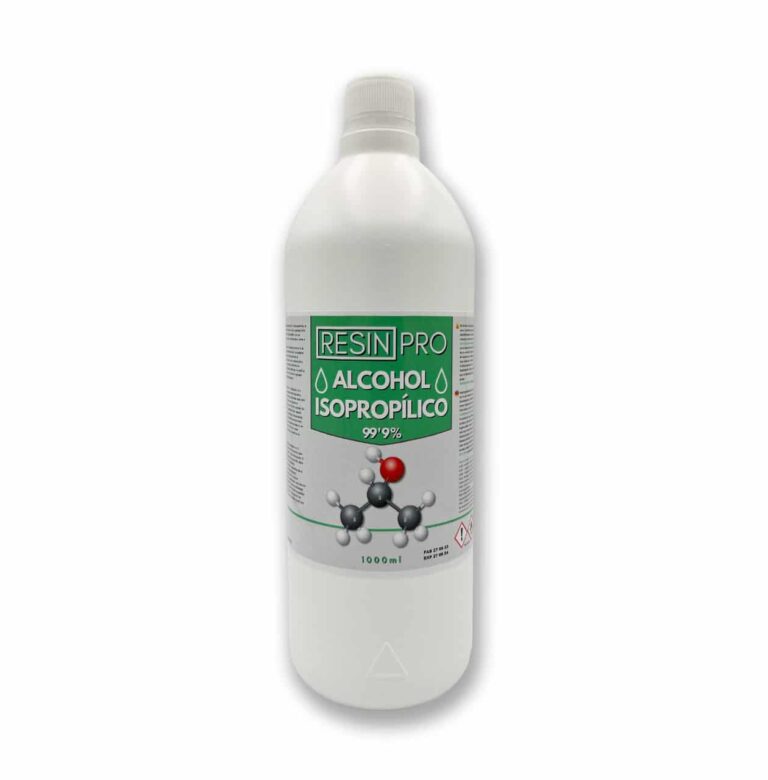
⚙️ In the world of resins: Used to remove surface bubbles from resin mixtures, if applied in drops on top of resin already mixed with mica pigments, it will create fantastic cells with very beautiful degradation and colour mixing. 💦 As a remedy for removing the formation of bubbles: By applying it to the inner surface of silicone moulds with a spray gun, you will remove bubbles on resin parts. 🎨 A multi-purpose product, ideal for: To remove bubbles from epoxy resin mixtures. To create the effect of craters and cells, it is applied to a mixture of epoxy resins with mica pigments. Solvent for coatings or for non-polar industrial processes. As a cleaning agent, it is highly recommended for cleaning electronic devices, LCD displays, DVDs… To remove stains from most fabrics, wood, cotton, etc... To remove oil-based paint residues for reuse. As a moisturiser in lithographic printing. A solvent for polishing varnish used in joinery. If you want to create beautiful effects on countertops, floors and surfaces, as well as easily remove bubbles in your resin products, then this is your product. Pure 99.9% Isopropyl Alcohol Resin Pro, also known as 2-propanol or isopropanol, is used as an electrical contact cleaner among many other applications. Trade Name: Medical ALCOHOL In the resin world, it is used to remove surface bubbles from mixtures, and when applied in drops over resin mixed with mica pigments, cells are formed. APPLICATION: For cleaning electronic components: Apply the product directly to the equipment, let it dry at room temperature or accelerate drying by applying compressed air, and finally reassemble the equipment. Do not use while the equipment is on. PRECAUTIONS: View the safety tab. Isopropyl alcohol in the vapor state is denser than air and is highly flammable, giving a very wide range of fuels. It should be kept away from sources of heat and fire. CHARACTERISTICS, PHYSICAL AND CHEMICAL PROPERTIES: Physical condition: Colourless liquid, very volatile Attention! Safety Guidelines for Using Isopropyl Alcohol (99.9%) Isopropyl alcohol (IPA) is a highly flammable substance. Improper use—especially near heat sources like torches or heat guns—can result in fire or explosion. To ensure safe use, follow these precautions: Primary Risks Highly flammable: IPA vapors can ignite from sparks, open flames, or hot surfaces. Forms explosive vapor-air mixtures, especially in enclosed or poorly ventilated spaces. Strictly Prohibited: Using gas torches or heat guns near areas treated with IPA. Spraying IPA near active heat sources. Storing IPA near flames, heaters, or hot tools. Recommended Safety Measures: 1. Ventilation: Always work in a well-ventilated area when using IPA. 2. Wait Time: After applying IPA, wait at least 5–10 minutes to allow complete evaporation before using any heat tools. 3. Safe Distance: Keep IPA containers at least 2 meters (6 feet) away from heat or flame sources. 4. Storage: Store IPA in a tightly sealed container, away from direct sunlight or high temperatures. 5. Fire Safety: Have a CO₂ or dry chemical fire extinguisher nearby when working with flammable substances and open flames. In Case of Fire: Do not use water to extinguish the fire. Use an appropriate extinguisher, cut off air supply if safe, and call emergency services if needed.
$14,08

About Wood Wax & Polish: Wood Wax & Polish is ideal for treating finished or unfinished wood. It is specifically designed to help preserve and prevent the wood from drying out and fading. With added conditioning oils, it actively feeds your wood while enhancing the natural beauty and depth of the grain. The Wood Wax contains natural beeswax and carnauba wax that offer a superior protective coating, and the formula is infused with orange oil for a pleasant aromatic finish. Wood Wax & Polish can be used on all wood surfaces, including finished and unfinished wood and is suitable for use on antiques and modern items alike. Designed to bring life back to old, faded and tired wooden surfaces, it should be used whenever the wood begins to look dry and faded, or at least once every six months. It is cream like in consistency and so is very easy to apply, we recommend the Wax & Polish for everyday polishing (for items you'd do monthly), and for items that are unfinished (i.e. are not treated with an oil, varnish or paint). Thats because it can soak into the wood, providing nourishment and accentuating the grain. The Beeswax Polish would be used for surfaces that you want to polish to a high shine, or for treating wood that is already finished. 💥Key features: • ⚙️ 【DRYING TIME】-20 minutes. • 🧪 【COVERAGE】-20m2 per litre. • 🌿【COATS】 -One coat. Two coats to bare wood. • 💧 【RE-COAT TIME】 -Once previous has dried • 👍【MAINTENANCE】 -When showing signs of 'drying'. • ✨【APPLICATION】 -Apply with a Lint Free Cloth. Wood Wax & Polish is Suitable For Wax & Polish can be used on all types of wood (oak, beech, maple etc) and on wood used in any environment. Interior Wood Hardwoods and Softwoods Kitchen Worktops & Utensils Furniture Doors and Windows Hardwood Floors Toys Turned Wood Untreated timber and bare wood Wood Wax & Polish Coverage and Shelf Life Coverage: 40m2 per litre Store in a cool dry place, away from direct sunlight. Store between 10°C and 25°C. Once opened, use within three years. [xyz-ips snippet="TRUSTPILOT-WIDGET"]
$16,49
 Free shipping on orders over €199,00