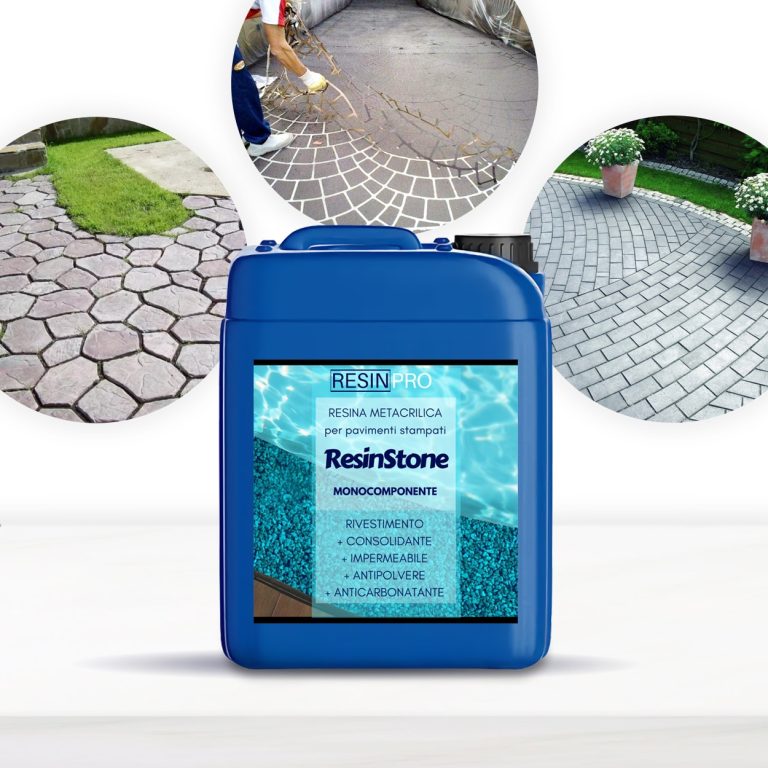
ONE-COMPONENT METHACRYLIC RESIN “RESINSTONE” for stamped floors 5 KG [176,37 Oz] ONE-COMPONENT METHACRYLIC RESIN for stamped floors CONSOLIDANT, WATERPROOF, DUSTPROOF AND ANTI-CARBONATION METHACRYLIC COATING FOR CONCRETE FLOORS. “RESINSTONE” is a low-viscosity, one-component, liquid formula that penetrates deeply for capillary absorption in concrete floors and surfaces, providing moisture protection and increasing both mechanical resistance and protection against chemical agents. “RESINSTONE” is formulated with enhanced methacrylic polymers in order to guarantee: Ø Consolidation and protection of concrete surfaces Ø Moisture protection Ø Protection against oils, acids and other chemical agents (perfect also for industrial environments) Ø Revitalization of the colour tone Concrete surfaces treated with “RESINSTONE” do not absorb water, creating polished, clean, dust-proof but still breathable surfaces. Resistant to yellowing, washing, bad weather (even acid rain). MAIN APPLICATIONS ✓ Consolidation and protection for concrete surfaces. ✓ Great to protect indoor spaces such as cellars, warehouses, garages, etc. ✓ Thanks to its excellent anti-UV rays features, it is ideal for outdoor areas such as yards, parking lots, paths, courtyards, etc. ✓ “RESINSTONE” can be applied 8 hours after the execution of the concrete artifact (following preventive test) ADVANTAGES ✓ Easy to apply (one-component, ready to use, just pour it over the concrete and wait a few hours until it is dry) ✓ Its low viscosity allows it to deeply penetrate and strengthen ✓ Fast: ready in less than 12 hours! ✓ Waterproof and water vapor permeable (thus allowing surfaces to breathe with no moisture penetration!) ✓ Good chemical resistance to oils, grease and acids. ✓ Range of applications from +5°C [41 F] to +35°C [95 F]. ✓ Resistant to temperature changes from -30°C [86 F] to +80°C [176 F]. ✓ Excellent mechanical properties make it a lasting product over the years and with high scratch-resistance if you have not enough experience, we insistly suggest to make a small test before working with large project. WARNINGS: During processing, use protective masks, gloves, and other protective clothing. In case of contact with eyes, immediately rinse with cold water for 15 minutes and immediately consult a doctor.
$42,95
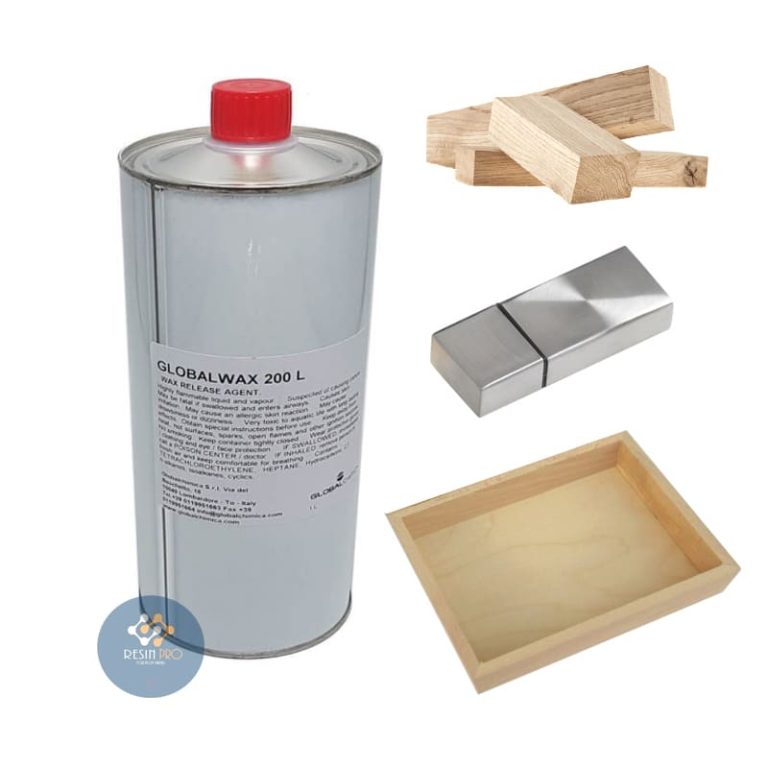
Global Distacc A Distacc Release Wax (Liquid) for Epoxy, Polyurethane and Acrylic Resins. The GlobalA A 2 200 L Liquid is a wax-based product for application with a pen or spray gun Resistant up to + 180 C The Global -a A distacc release agent (Liquid) creates a wax film on the mould surface and model, with a strong anti-adhesion action and high temperature resistance (up to + 180 C It is particularly recommended in the preparation of moulds and formwork in which to cast resin. You can apply it on wood, metal, plastic and even cardboard, making the surface perfectly anti-adherent in which to pour resin or other compounds in just a few minutes. IT IS NOT RECOMMENDED TO USE LIGHTERS, HEAT GUNS OR DEVICES THAT INCREASE THE TEMPERATURE (FOR EXAMPLE WHEN YOU WANT TO REMOVE BUBBLES FROM THE RESIN OR ACCELERATE THE CATALYSIS TIME). Application-brush or spray gun Colour – - white It is a liquid wax release agent packed in 1 liter packs. It is a very effective detachment agent that can be applied by brush or gun. It dries quickly in 2-3 minutes and keeps all the details of the mould. This product belongs to the second category; work only with protective equipment during use. The second category of products - Air freshener, candles, pressed wood, mothballs, non-stick frying pans, plastic bottles. May have carcinogenic properties. CAUSES SKIN IRRITATION. THIS MAY CAUSE AN ALLERGIC SKIN REACTION. THIS MAY CAUSE DROWSINESS OR DIZZINESS. VERY TOXIC TO AQUATIC ORGANISMS WITH LONG-LASTING EFFECTS. HIGH PRESSURE BOTTLE: IT MAY EXPLODE WHEN HEATED. KEEP AWAY FROM HEAT SOURCES, HOT SURFACES, SPARKS, OPEN FLAMES OR OTHER SOURCES OF IGNITION. DON'T SMOKE. DO NOT PIERCE OR BURN EVEN AFTER USE. PROTECT FROM SUNLIGHT. DO NOT EXPOSE TO TEMPERATURES ABOVE 50°C/122°F DO NOT VAPORIZE OVER AN OPEN FLAME OR A SOURCE OF STRONG EXPOSURE TO THE EYES/FACE. DO NOT SPRAY IN THE ENVIRONMENT. contains: TETRACHLOROETHYLENE, heptane, HYDROCARBONS, C7, N-ALKANES, ISOALKANES CYCLIC.
$22,95
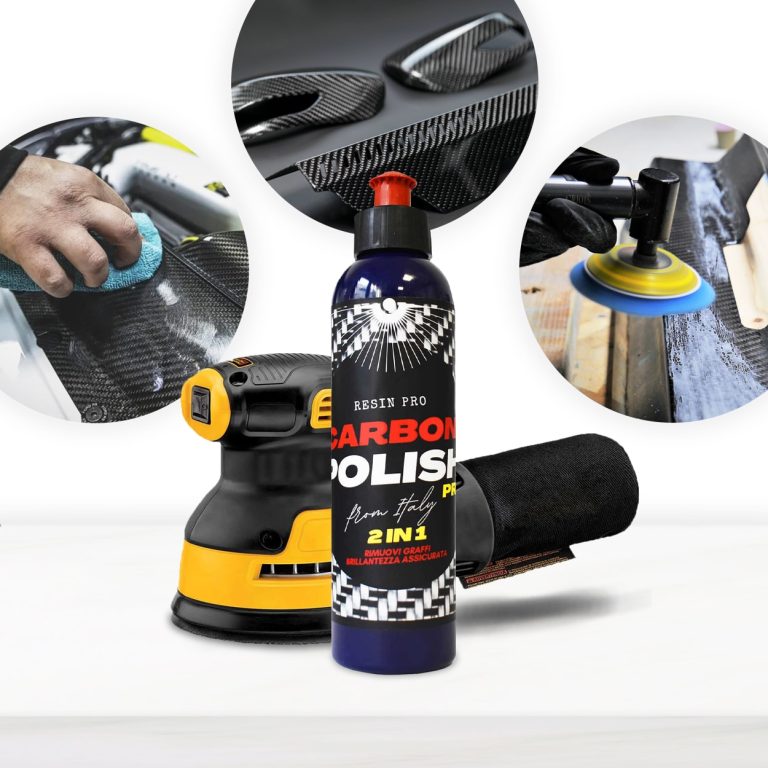
Carbon Polish Black (250ml) is the defined product for polishing your carbon, dark or black surfaces. The aesthetic and economic value of the carbon product is high, and for this reason it is essential to treat the surface with specific and dedicated products, which enhance the beauty of the “carbon look”. It is important to avoid “generic" products that can spoil the work done, with insufficient gloss or even worse, fail to remove scratches. EASY TO APPLY AND REMOVE MISCIBLE WITH WATER ODOURLESS DOES NOT WHITEN PLASTIC PARTS DOES NOT CONTAIN SILICONES VERY LOW ENVIRONMENTAL IMPACT The carbon polishing paste Carbon Polish Pro Black has been developed in a black colour precisely to ensure a brilliant finish and without white dots, typical of generic abrasive pastes. It can therefore be used for all dark surfaces (especially resin). Carbon Polish Pro Black is the specific paste for carbon; black colour prevents residues from remaining visible on surfaces after polishing. Thanks to the NAP (Nano Abrasive Particles) it is a 2 in 1 product; in fact it quickly removes scratches and defects from the surface and gives at the same time a deep shine like only a polish can do. In addition, its Synthetic Polymers allow you to correct and fill all the imperfections on the surfaces of Resin and carbon fiber artifacts. Eliminate scratches, defects and mirror shine with a single product! Carbon Polish Pro Black carbon polishing paste can be used both on the painted carbon and directly on the epoxy resin that covers the carbon fibers. Unlike commercial Polishes, Carbon Polish Pro Black is 100% Made in Italy, born from over 50 years of tradition in polishing. It allows both the hobbyist and the professions to obtain performing results quickly and easily. Here are the simple steps to polish or eliminate blemishes from your carbon fibre surfaces: If you need to use glass paper to remove the deepest scratches, you can do so without hesitation. The polishing paste will then be able to remove the sanding marks and make the surface smooth and shiny. Here's how:- The polishing paste Carbon Polish Black can be used by hand with extreme simplicity, with the help of a microfiber cloth or a foam pad. Or it can be used with electric tools, such as a drill and flexible, equipped with a special shepherd and foam pad (8000-12000 rpm) or with a polisher (1000-2000 rpm both rotary and ro orbital) with foam pad or wool (also synthetic). The use of tools of this kind will speed up the maintenance and ensure optimal results in even faster times. How to prepare the surface to be polished? Here are the tricks to make the most of NAP (Nano Abrasive Particles) technology:- Removals defects and scratches from sanding Depending on the depth of the scratch/defect, start with abrasive papers grit 800-1000 (for deep scratches) or simply 3000-4000 (for light scratches), always tend the surface wetted with water (this will help to make the result homogeneous) Apply the polishing paste for carbon fiber on the surface and spread it with circular and more or less energetic movements depending on the defect you want to remove. Or by directly attaching the buffer of the polisher / hose. We recommend one / two drops of carbon polishing paste every 3-4 cm. You can apply it several times thanks to synthetic polymers, without risking consuming the carbon, until the result is perfect. Clean up simply with water and a clean cloth. Put on your sunglasses and enjoy the dazzling result! Surface renewal: The product is also suitable as a fast and effective tool to renew your precious carbon surfaces, which wear out with normal use or exposure to atmospheric agents. In this case, the process is even easier: it is sufficient to apply the paste on the surface (well cleaned) and roll it out with circular movements, or by directly applying the buffer of the polisher / flexible. We recommend one / two drops of carbon polishing paste every 2-3 cm. The carbon polishing paste Carbon Polish Pro Black has been developed in black colour precisely to ensure a brilliant finish and without white dots, typical of generic abrasive pastes, and can therefore be used for all dark surfaces (especially resin). The special formula is free of volatile silicones and is therefore not harmful to health; it can also be used in painting processes.
$21,49
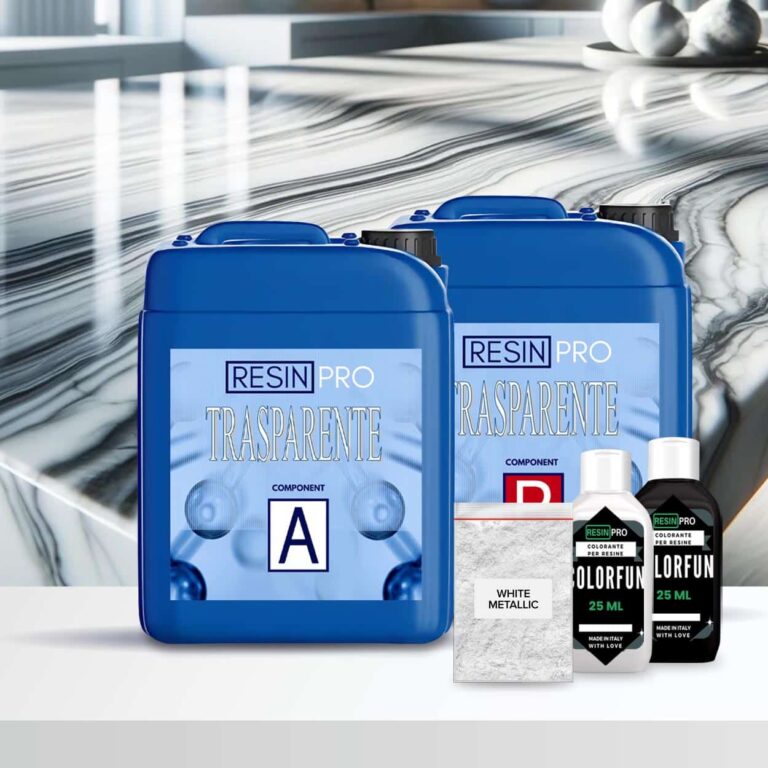
Top Cucina Kit Carrara Marble Effect with Epoxy Resin: The 2.4 kg kit (1.6 + 0.8) covers 1 square meter (+ 10 g white metallic pigment + 25 ml white dye +25 ml black dye) The 4 kg kit (2*1.6 + 0.8) covers 2 square meters (+ 2*10 g metallic pigment +2* 25 ml white dye + 2*25 ml black dye) The 8 kg kit covers 4 square meters (+ 4*10 g metallic pigment +4* 25 ml white dye+ 4*25 ml black dye) The 16 kg kit covers 8 square meters (+ 8*10 g white metallic pigment +8* 25 ml white dye 8*25 ml black dye) Kit Contents: 2.4kg, 4kg, 8kg or 16kg of "Art Pro" Epoxy Art Coat for a high quality base White dyeand Black of the "Colorfun" line for the perfect stone shades White Metallica Sahara pigment for that extra touch of sparkle Good to add: To enhance the appeal of the design:: Isopropanol 99.9% (additional option, not included in the price) To make the coating last longer: Polishield 100 Gloss (additional option, not included in the price). The coverage of a 0.5 kg kit is approximately 4 m2 Each kit includes dyes and pigment in sufficient quantity for the amount of resin required. HOW TO CREATE YOUR MARBLE EFFECT WITH EPOXY Guide Instructions: Step N1: Primer Start by carefully measuring the amount needed to cover the surface based on the consumption of 150 g/m2, making sure to follow the proportions indicated to obtain a homogeneous mixture. Once the base has been prepared, proceed with adding the dye, choosing between white or black depending on your needs. The quantity of colourant to add to the mixture can be measured in a few drops (max 5% by volume). This step is crucial to achieve the desired colour and ensure uniformity of the application. Before applying the primer, it is essential that the surface intended for treatment is adequately prepared. Sand the surface with a coarse grit (40 or 60) before any operation. Make sure it's completely clean, using a soft cloth or brush to remove any pigment, dirt or debris. The surface must also be completely dry; residual humidity can compromise the adhesion of the primer and its effectiveness in sealing the surface. Once the surface is ready, apply the mixture evenly, using a suitable tool such as a brush, roller or spatula, depending on the size of the area to be treated and your personal preference. The key is to get a thin, even layer that can cover the entire area without leaving gaps or excessive product buildup.. After application, it is essential to allow the primer to dry completely before proceeding with further treatments or finishes on the surface. The recommended waiting time is 12 hours; this range may vary slightly depending on environmental conditions, such as humidity and temperature, but offers a good compromise to ensure the mixture has time to dry and adhere properly. During this period, avoid touching or stressing the treated surface to ensure optimal results. Don't worry if you notice any discrepancies on the surface, the next main pour will level everything perfectly. Step N2: application Start by applying masking tape around the perimeter of your countertop to contain the epoxy you're about to pour. This step is essential to ensure the resin stays where it is needed. After applying the resin, wait about 1.5 hours before gently removing the tape. To ensure coverage is even and complete, plan to use approximately 1.6kg of resin for every square meter of surface area. When you are ready to mix the resin, use a drill equipped with a paddle mixer for quick and even action (use at low speed), taking about 2 minutes for this operation. If you prefer to mix by hand, be prepared to take double the time. Don't forget to scrape the sides and bottom of the container halfway through the process with a stick to ensure all the material is mixed well. Next, separate the already mixed resin into different glasses and add the desired colours, mixing the different colours in the different glasses until you obtain an intense and uniform colour per single glass. To create a striking visual effect, pour the coloured resin in random layers into a larger bucket, being careful not to mix the colours together too much. After filling the bucket, spread the contents over the surface of the worktop, leaving a small amount of resin aside to finish the edges later. To remove trapped air bubbles, gently run a propane torch or heat gun over the surface. Once the adhesive tapes have been removed, approximately 1.5 hours after application, if there are any dry edges, moisten them slightly by wearing a protective glove to promote an even appearance. Use appropriate tools, such as spatulas or plastic scrapers, to spread and level the resin along the edges, making sure to cover the entire area well. After letting the resin cure for 24 hours, you can apply a clear top coat or PoliShield scratch-resistant paint to further protect the surface. Finally, for even more refined visual effects, spray 99.9% isopropyl alcohol onto the surface just before the resin begins to fully harden. This will create unique lacy textures. Remember that when you remove the tape, it is essential that the resin is partially hardened, neither too liquid nor completely solid, to avoid unwanted drips. Attention! Safety Guidelines for Using Isopropyl Alcohol (99.9%) Isopropyl alcohol (IPA) is a highly flammable substance. Improper use—especially near heat sources like torches or heat guns—can result in fire or explosion. To ensure safe use, follow these precautions: Primary Risks Highly flammable: IPA vapors can ignite from sparks, open flames, or hot surfaces. Forms explosive vapor-air mixtures, especially in enclosed or poorly ventilated spaces. Strictly Prohibited: Using gas torches or heat guns near areas treated with IPA. Spraying IPA near active heat sources. Storing IPA near flames, heaters, or hot tools. Recommended Safety Measures: 1. Ventilation: Always work in a well-ventilated area when using IPA. 2. Wait Time: After applying IPA, wait at least 5–10 minutes to allow complete evaporation before using any heat tools. 3. Safe Distance: Keep IPA containers at least 2 meters (6 feet) away from heat or flame sources. 4. Storage: Store IPA in a tightly sealed container, away from direct sunlight or high temperatures. 5. Fire Safety: Have a CO₂ or dry chemical fire extinguisher nearby when working with flammable substances and open flames. In Case of Fire: Do not use water to extinguish the fire. Use an appropriate extinguisher, cut off air supply if safe, and call emergency services if needed.
$73,49
Protecting iron from saline agents is crucial to prevent corrosion and ensure its longevity. Here are some effective methods to safeguard iron from these harsh elements:
- Utilize primers and protective paints specifically formulated for metal surfaces exposed to saline agents.
- Apply epoxy or polyurethane resins as protective coatings to shield the iron.
- Establish physical barriers using rust-inhibiting paints or protective films.
- Opt for silicone coatings known for their resistance to saline agents.
- Conduct routine inspections and maintenance to promptly detect and address any signs of corrosion.
By adhering to these practices, you can effectively shield iron from saline agents and maintain its integrity over time.
Epoxy Resin for Iron Protection against Salt Agents
Epoxy resin stands out as an excellent choice for safeguarding iron from salt agents. Thanks to its corrosion resistance and strong adhesion to metal surfaces, epoxy resin forms a reliable protective layer. Before application, it's vital to thoroughly prepare the iron surface by eliminating any rust and grease residues. Subsequently, evenly apply the epoxy resin to the surface and allow it to dry completely. This coating establishes a robust barrier that shields the iron from salt agents, prolonging its lifespan.
Weather-Resistant Epoxy Resin
Epoxy resins are renowned for their resilience against weather conditions. Once polymerized, this type of resin forms a tough and enduring coating that protects surfaces exposed to external elements. Particularly suitable for outdoor use, epoxy resins retain their properties even when exposed to sunlight, rain, wind, and temperature fluctuations. Due to their weather-resistant characteristics, epoxy resins are extensively utilized in the coatings industry to safeguard and enhance surfaces in outdoor settings.
DIY Epoxy Rustproof Resin
The DIY epoxy rustproof resin serves as an ideal protective coating for metal surfaces prone to corrosion. When applied correctly, this resin creates a rust and oxidation-resistant layer, prolonging the lifespan and appearance of metallic objects. Properly preparing the surface by removing dirt and rust before application is crucial to ensure optimal adhesion of the resin. It's recommended to meticulously follow the manufacturer's instructions and use necessary protective gear during application. With DIY epoxy rustproof resin, you can easily protect and rejuvenate various metallic items.
Waterproof Epoxy Resin for Corrosion Protection
Waterproof epoxy resins are commonly employed as protective coatings against corrosion. These materials offer high chemical and mechanical resistance, safeguarding metal surfaces from the corrosive effects of external elements like water, chemicals, and moisture. By forming a waterproof and adherent layer, epoxy resins establish an effective barrier that prevents rust formation and material degradation. Appreciated in industrial and naval sectors, waterproof epoxy resins are valued for their durability and reliability in combating corrosion-related damages.
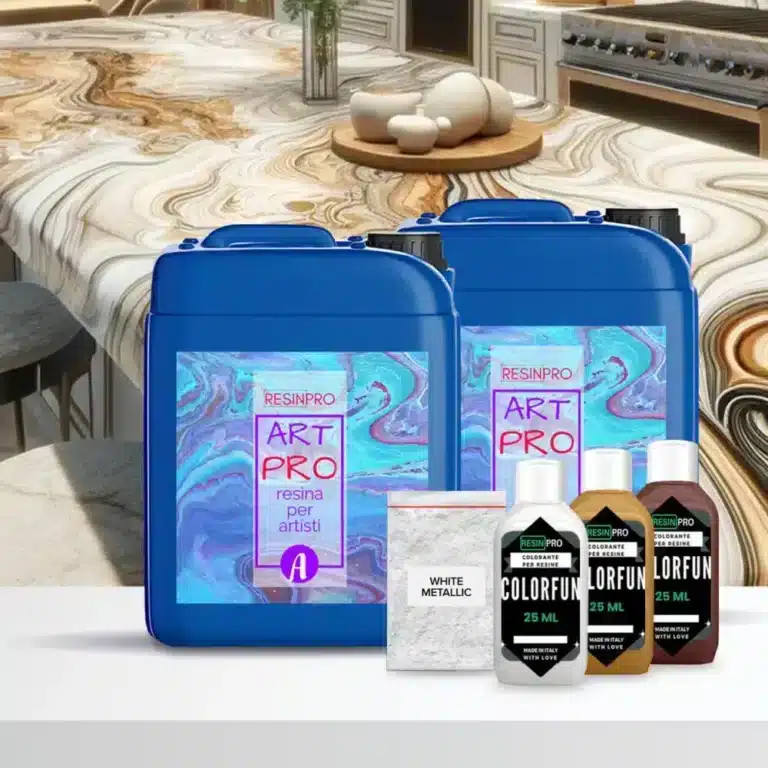
Amber Onyx Effect Kit with Epoxy resin: The 2.49 kg kit (1.66 + 0.83) covers 1 square meter (+ 10 g Sahara white pigment + 25 ml white dye + 25 ml brown dye + 25 ml OXIDE yellow dye) The 4.15 kg kit (2*1.66 + 0.83) covers 2 square meters (+ 2*10 g Sahara white pigment +2* 25 ml white dye +2* 25 ml brown dye +1*25 ml OXIDE yellow dye) The 8.33 kg kit covers 4 square meters (+ 4*10 g Sahara white pigment +4* 25 ml white dye +3* 25 ml brown dye+ 2*25 ml OXIDE yellow dye ) The 16.66kg kit covers 8 square meters (+8*10g Sahara white pigment +8*25ml white dye +4*25ml brown dye + 2 * 25 ml OXIDE Yellow dye) Kit Contents: 2.49 kg, 4.15 kg, 8.33 kg or 16.66 kg of Art Coat Epoxy "Art Pro" for a high quality base White Dye, Oxide Yellow Dye and Brown Dye from the "Colourful" Line for the perfect caramel stone shades - White Metallica Sahara pigment for that extra touch of sparkle Each kit includes dyes and pigment in sufficient quantity for the amount of resin required. Choose the Amber Onyx Effect Kit with Epoxy resin for an easy and elegant transformation of the worktop. Purchase your kit now and elevate your space with the warmth and beauty of caramel marble. Guide Instructions: Step N1: Primer Start by carefully measuring the amount needed to cover the surface based on the consumption of 150 g/m2, making sure to follow the proportions indicated to obtain a homogeneous mixture. Once the base has been prepared, proceed with adding the dye, choosing between white or black depending on your needs. The quantity of colourant to add to the mixture can be measured in a few drops (max 5% by volume). This step is crucial to achieve the desired colour and ensure uniformity of the application. Before applying the primer, it is essential that the surface intended for treatment is adequately prepared. Sand the surface with a coarse grit (40 or 60) before any operation. Make sure it's completely clean, using a soft cloth or brush to remove any pigment, dirt or debris. The surface must also be completely dry; residual humidity can compromise the adhesion of the primer and its effectiveness in sealing the surface. Once the surface is ready, apply the mixture evenly, using a suitable tool such as a brush, roller or spatula, depending on the size of the area to be treated and your personal preference. The key is to get a thin, even layer that can cover the entire area without leaving gaps or excessive product build-up.. After application, it is essential to allow the primer to dry completely before proceeding with further treatments or finishes on the surface. The recommended waiting time is 12 hours; this range may vary slightly depending on environmental conditions, such as humidity and temperature, but offers a good compromise to ensure the mixture has time to dry and adhere properly. During this period, avoid touching or stressing the treated surface to ensure optimal results. Don't worry if you notice any discrepancies on the surface, the next main pour will level everything perfectly. Step N2: application Start by applying masking tape around the perimeter of your countertop to contain the epoxy you're about to pour. This step is essential to ensure the resin stays where it is needed. After applying the resin, wait about 1.5 hours before gently removing the tape. To ensure coverage is even and complete, plan to use approximately 1.6kg of resin for every square meter of surface area. When you are ready to mix the resin, use a drill equipped with a paddle mixer for quick and even action (use at low speed), taking about 2 minutes for this operation. If you prefer to mix by hand, be prepared to take double the time. Don't forget to scrape the sides and bottom of the container halfway through the process with a stick to ensure all the material is mixed well. Next, separate the already mixed resin into different glasses and add the desired colours, mixing the different colours in the different glasses until you obtain an intense and uniform colour per single glass. To create a striking visual effect, pour the coloured resin in random layers into a larger bucket, being careful not to mix the colours together too much. After filling the bucket, spread the contents over the surface of the worktop, leaving a small amount of resin aside to finish the edges later. To remove trapped air bubbles, gently run a propane torch or heat gun over the surface. Once the adhesive tapes have been removed, approximately 1.5 hours after application, if there are any dry edges, moisten them slightly by wearing a protective glove to promote an even appearance. Use appropriate tools, such as spatulas or plastic scrapers, to spread and level the resin along the edges, making sure to cover the entire area well. After letting the resin cure for 24 hours, you can apply a clear top coat or PoliShield scratch-resistant paint to further protect the surface. Finally, for even more refined visual effects, spray 99.9% isopropyl alcohol onto the surface just before the resin begins to fully harden. This will create unique lacy textures. Remember that when you remove the tape, it is essential that the resin is partially hardened, neither too liquid nor completely solid, to avoid unwanted drips. Attention! Safety Guidelines for Using Isopropyl Alcohol (99.9%) Isopropyl alcohol (IPA) is a highly flammable substance. Improper use—especially near heat sources like torches or heat guns—can result in fire or explosion. To ensure safe use, follow these precautions: Primary Risks Highly flammable: IPA vapors can ignite from sparks, open flames, or hot surfaces. Forms explosive vapor-air mixtures, especially in enclosed or poorly ventilated spaces. Strictly Prohibited: Using gas torches or heat guns near areas treated with IPA. Spraying IPA near active heat sources. Storing IPA near flames, heaters, or hot tools. Recommended Safety Measures: 1. Ventilation: Always work in a well-ventilated area when using IPA. 2. Wait Time: After applying IPA, wait at least 5–10 minutes to allow complete evaporation before using any heat tools. 3. Safe Distance: Keep IPA containers at least 2 meters (6 feet) away from heat or flame sources. 4. Storage: Store IPA in a tightly sealed container, away from direct sunlight or high temperatures. 5. Fire Safety: Have a CO₂ or dry chemical fire extinguisher nearby when working with flammable substances and open flames. In Case of Fire: Do not use water to extinguish the fire. Use an appropriate extinguisher, cut off air supply if safe, and call emergency services if needed.
$83,49
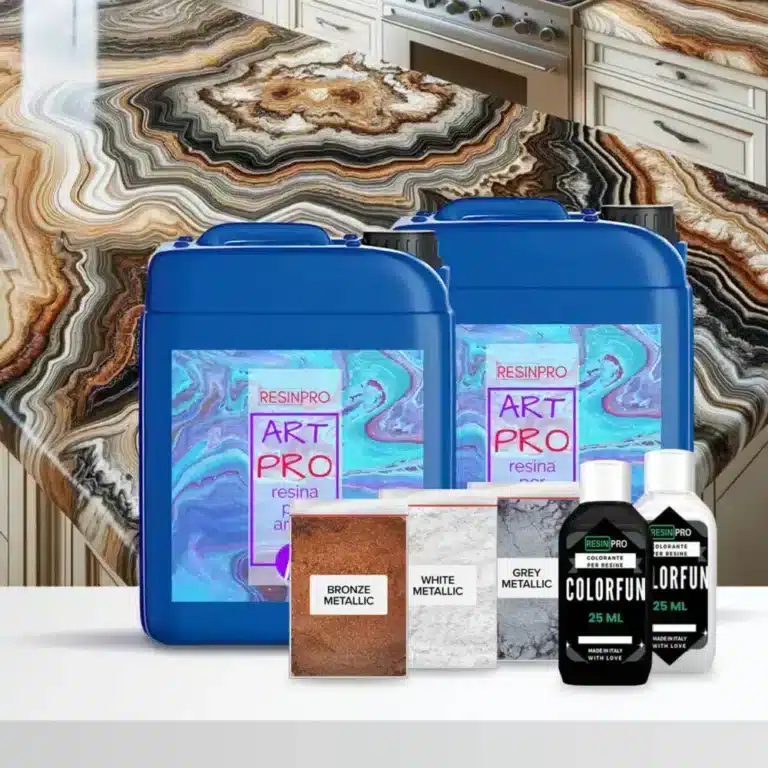
Kit Exotic white marble effect with Epoxy resin: The 2.49 kg kit (1.66 + 0.83) covers 1 square meter (+ 10 g white Sahara pigment + 10 g bronze Sahara pigment + 10 g dark gray Sahara pigment + 2*25 ml white dye + 1* 10 g colorfun black) The 4.15 kg kit (2*1.66 + 0.83) covers 2 square meters (+ 2*10 g white Sahara pigment + 2*10 g bronze Sahara pigment + 2*10 g dark gray Sahara pigment + 4 *25 ml white dye + 2* 10 g black colorfun) The 8.33 kg kit covers 4 square meters (+ 4*10 g white Sahara pigment + 4*10 g bronze Sahara pigment + 4*10 g dark gray Sahara pigment + 5*25 ml white dye + 2* 10 g colorfun black) The 16.66 kg kit covers 8 square meters (+ 6*10 g white Sahara pigment + 6*10 g bronze Sahara pigment + 6*10 g dark gray Sahara pigment + 8*25 ml white dye + 3* 10 g colorfun black) Kit Contents: 2.49 kg, 4.15 kg, 8.33 kg or 16.66 kg of Art Coat Epoxy "Art Pro" for a high quality base Black and White Dye from the "Colorfun" Line for the perfect stone shades Metallica Sahara white, bronze, gray pigment for that extra touch of sparkle Good to add: To enhance the appeal of the design: Isopropanol 99.9% To make the covering last longer: + polishield 100 GLOSS Each kit includes dyes and pigment in sufficient quantity for the amount of resin required. Guide Instructions: Step N1: Primer Start by carefully measuring the amount needed to cover the surface based on the consumption of 150 g/m2, making sure to follow the proportions indicated to obtain a homogeneous mixture. Once the base has been prepared, proceed with adding the dye, choosing between white or black depending on your needs. The quantity of colourant to add to the mixture can be measured in a few drops (max 5% by volume). This step is crucial to achieve the desired colour and ensure uniformity of the application. Before applying the primer, it is essential that the surface intended for treatment is adequately prepared. Sand the surface with a coarse grit (40 or 60) before any operation. Make sure it's completely clean, using a soft cloth or brush to remove any pigment, dirt or debris. The surface must also be completely dry; residual humidity can compromise the adhesion of the primer and its effectiveness in sealing the surface. Once the surface is ready, apply the mixture evenly, using a suitable tool such as a brush, roller or spatula, depending on the size of the area to be treated and your personal preference. The key is to get a thin, even layer that can cover the entire area without leaving gaps or excessive product buildup.. After application, it is essential to allow the primer to dry completely before proceeding with further treatments or finishes on the surface. The recommended waiting time is 12 hours; this range may vary slightly depending on environmental conditions, such as humidity and temperature, but offers a good compromise to ensure the mixture has time to dry and adhere properly. During this period, avoid touching or stressing the treated surface to ensure optimal results. Don't worry if you notice any discrepancies on the surface, the next main pour will level everything perfectly. Step N2: application Start by applying masking tape around the perimeter of your countertop to contain the epoxy you're about to pour. This step is essential to ensure the resin stays where it is needed. After applying the resin, wait about 1.5 hours before gently removing the tape. To ensure coverage is even and complete, plan to use approximately 1.6kg of resin for every square meter of surface area. When you are ready to mix the resin, use a drill equipped with a paddle mixer for quick and even action (use at low speed), taking about 2 minutes for this operation. If you prefer to mix by hand, be prepared to take double the time. Don't forget to scrape the sides and bottom of the container halfway through the process with a stick to ensure all the material is mixed well. Next, separate the already mixed resin into different glasses and add the desired colours, mixing the different colours in the different glasses until you obtain an intense and uniform colour per single glass. To create a striking visual effect, pour the coloured resin in random layers into a larger bucket, being careful not to mix the colours together too much. After filling the bucket, spread the contents over the surface of the worktop, leaving a small amount of resin aside to finish the edges later. To remove trapped air bubbles, gently run a propane torch or heat gun over the surface. Once the adhesive tapes have been removed, approximately 1.5 hours after application, if there are any dry edges, moisten them slightly by wearing a protective glove to promote an even appearance. Use appropriate tools, such as spatulas or plastic scrapers, to spread and level the resin along the edges, making sure to cover the entire area well. After letting the resin cure for 24 hours, you can apply a clear top coat or PoliShield scratch-resistant paint to further protect the surface. Finally, for even more refined visual effects, spray 99.9% isopropyl alcohol onto the surface just before the resin begins to fully harden. This will create unique lacy textures. Remember that when you remove the tape, it is essential that the resin is partially hardened, neither too liquid nor completely solid, to avoid unwanted drips. Attention! Safety Guidelines for Using Isopropyl Alcohol (99.9%) Isopropyl alcohol (IPA) is a highly flammable substance. Improper use—especially near heat sources like torches or heat guns—can result in fire or explosion. To ensure safe use, follow these precautions: Primary Risks Highly flammable: IPA vapors can ignite from sparks, open flames, or hot surfaces. Forms explosive vapor-air mixtures, especially in enclosed or poorly ventilated spaces. Strictly Prohibited: Using gas torches or heat guns near areas treated with IPA. Spraying IPA near active heat sources. Storing IPA near flames, heaters, or hot tools. Recommended Safety Measures: 1. Ventilation: Always work in a well-ventilated area when using IPA. 2. Wait Time: After applying IPA, wait at least 5–10 minutes to allow complete evaporation before using any heat tools. 3. Safe Distance: Keep IPA containers at least 2 meters (6 feet) away from heat or flame sources. 4. Storage: Store IPA in a tightly sealed container, away from direct sunlight or high temperatures. 5. Fire Safety: Have a CO₂ or dry chemical fire extinguisher nearby when working with flammable substances and open flames. In Case of Fire: Do not use water to extinguish the fire. Use an appropriate extinguisher, cut off air supply if safe, and call emergency services if needed.
$98,95
Intense and brilliant color, ideal for Transparent Epoxy Resins. Mix small quantities to get a translucent effect. The high coverage of the “Colorful Original” range allows to obtain a full and bright color. The high concentration provides an opaque color with a few drops.
Usable to color the products of the RESIN PRO range.
💥 Ideal for epoxy creations and resin tables thanks to its features:
✔️ Intense colors
✔️ Easy to mix
✔️ Intense colors
✔️ High concentration
✔️ Easy to get a translucent effect
✔️ 5 stars on Trustpilot
🌿Cruelty Free, Vegan Friendly🐹
$16,00
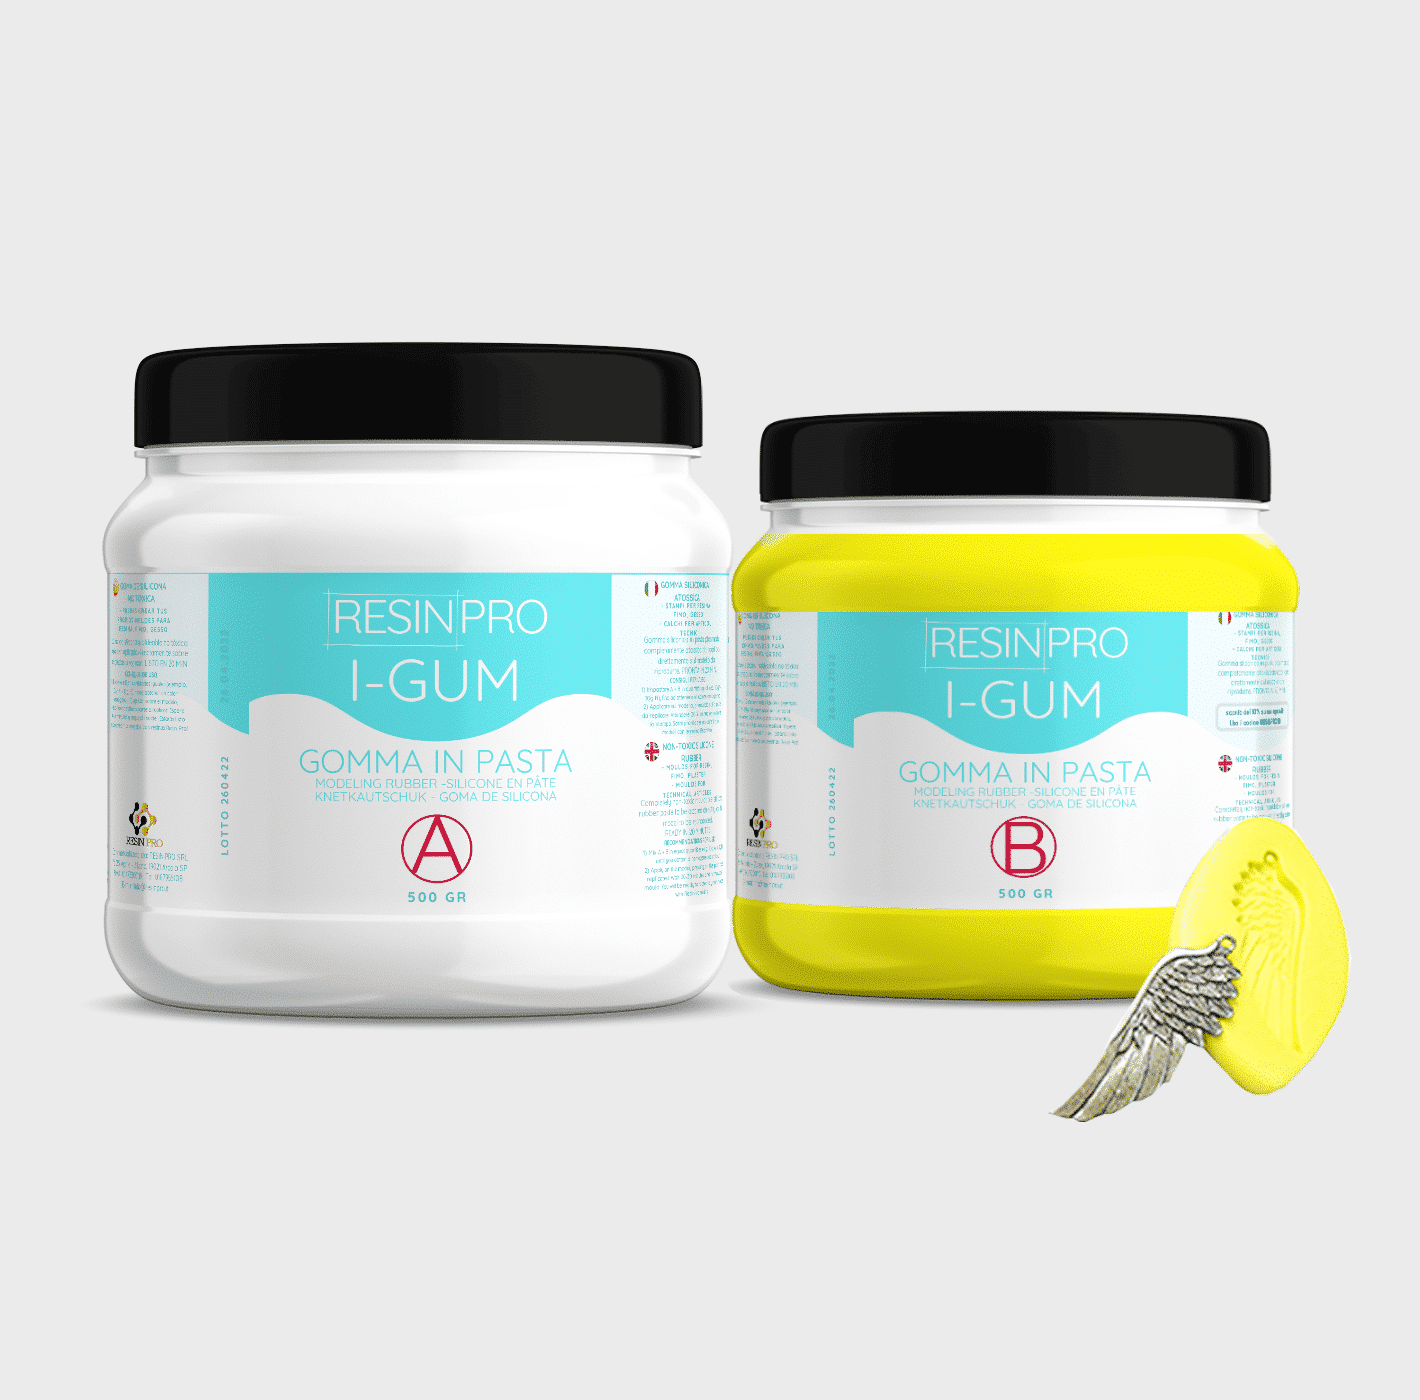
• "I-GUM" - Non-Toxic Silicone Rubber - Paste Form
Pasty silicone rubber "I-GUM" is a two–component product for creating moulds and forms for pouring with epoxy resin.
• Superior formula proven by years of experience:
✔️ Easy to use -> 1:1 mix ratio
✔️ Non-toxic -> You can work without gloves
✔️ Without smell
✔️ Long working time -> 20 minutes
✔️ European quality -> Directly from Italy
✔️ Ideal for creating moulds and frames for working with resin, polyurethanes, wax, cement and other materials
✔️ 🌿Cruelty Free, Vegan Friendly🐹
$22,00
ResinPro: one supplier for all your needs
15 years of experience at your complete disposal, supplying resins and accessories for creativity, industry, DIY, flooring and marine applications.
At your home, directly from the manufacturer!
ResinPro is the direct manufacturer of our resin range for companies and hobbyists, guaranteeing the lowest prices on the market.
Learn more
The widest range of resins in the US!
We offer resins for every need, from artistic creations to marine and construction applications, far beyond the “limited” selection typically found in local DIY stores.
Expert technical support!
Our technicians provide free remote consulting to help you avoid mistakes and ensure you achieve the result you want — unlike “generic retailers” who sell 1,000 different products.
get a free consultation
RESIN PRO is a leader in resin production and distribution!
24-hour delivery: We ship across the US on the same day. Enjoy convenient home delivery with our appointment service—our courier will contact you in advance and deliver the package to your preferred location, or leave it at an alternative address of your choice.

Full support!
We provide continuous support from preparation to final application, including remote technical assistance, ensuring a smooth experience.
Talk with a specialist and place a phone order without registration and without credit cards!
 Free shipping on orders over €199,00