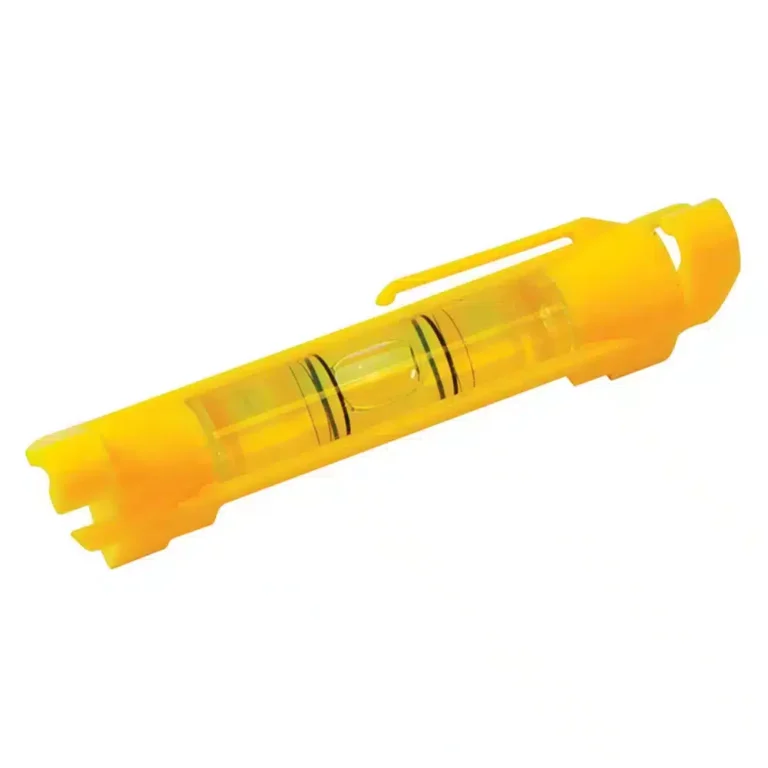
Moulded ABS plastic body. Lightweight structure reduces line sag and opposing hooks reduce drop-off. V-groove base for use on pipes. UV-resistant vial. The 75mm Line Level is an indispensable tool for achieving precise horizontal alignment in your epoxy resin projects. Designed for both accuracy and ease of use, this compact level features a clear, highly visible vial that allows you to quickly and easily check if your surfaces are perfectly level. When working with epoxy resins, ensuring a level surface is crucial to achieving a smooth, even finish without unsightly drips or uneven curing. This line level helps you accurately measure and adjust your workspace, whether you're setting up a table, leveling a countertop, or working on intricate resin artwork. Its durable construction ensures long-lasting performance, while its compact size makes it easy to handle and store. Ideal for both professional and DIY use, the 75mm Line Level is a reliable companion for any epoxy resin application, helping you to ensure that your projects meet the highest standards of quality and precision.
$1,65
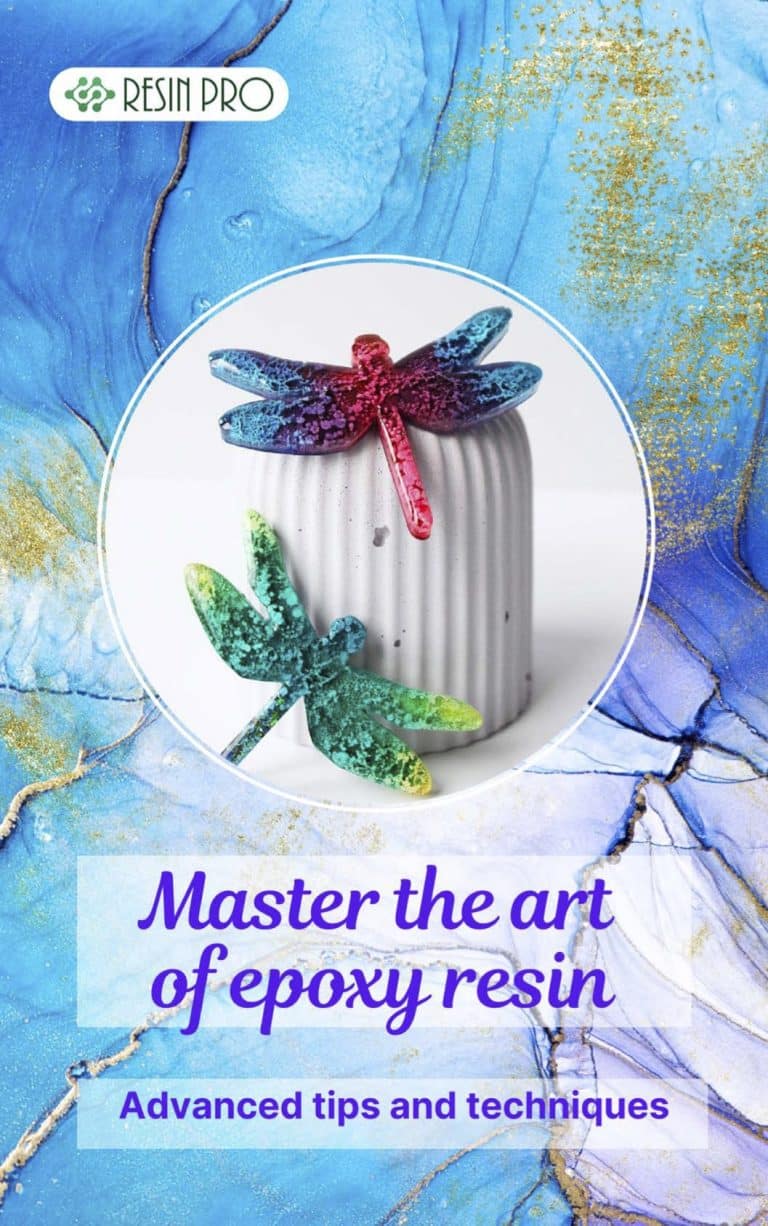
Discover the captivating world of epoxy resin with our e-book "Mastering the Art of Epoxy Resin: Tips and Advanced Techniques." Whether you're a passionate artist, an experienced DIYer, or looking to express your creativity, this book will guide you in learning and mastering this versatile technique. This comprehensive e-book offers an in-depth opportunity to learn advanced epoxy resin manipulation techniques. You'll uncover the secrets of harmonious blends, vibrant pigments, and flawless finishes to create unique works of art. Additionally, our practical tips will help you avoid common mistakes and overcome challenges encountered when working with this fascinating material. Whether you want to create epoxy resin jewelry, make stunning paintings, or design unique decorative objects, this e-book will be your essential companion. Unleash your creativity and master the art of epoxy resin with our expert advice and detailed instructions. Download "Mastering the Art of Epoxy Resin: Tips and Advanced Techniques" now to uncover the secrets of this versatile artistic method. Develop your artistic skills and create one-of-a-kind pieces that will captivate your friends and family. Don't miss this opportunity to become an epoxy resin expert and make your artistic mark
$21,95
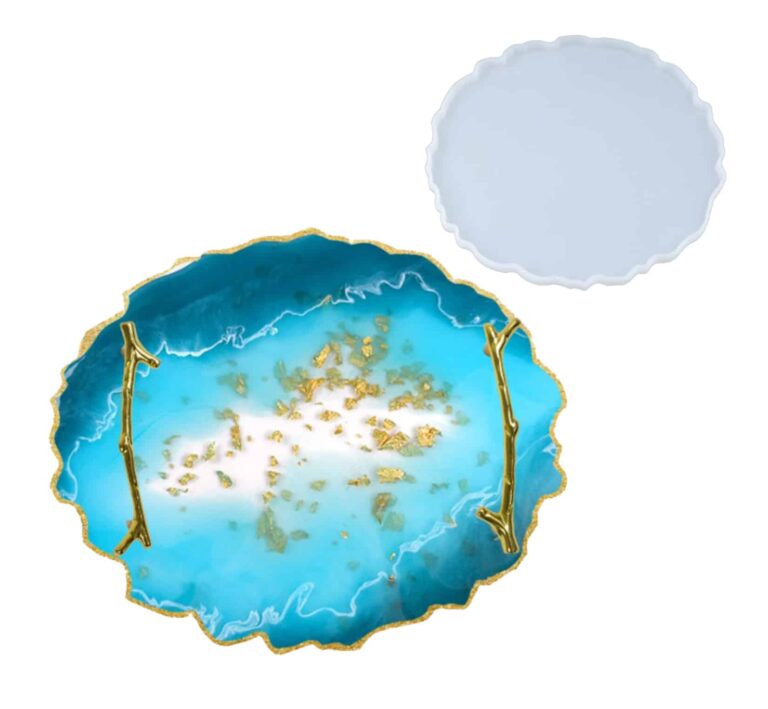
HIGH-QUALITY SILICONE MOULD FOR HANDCRAFTS This flat Coaster Mould has a smooth interior and produces a beautiful coaster with a professional finish. Use our heat-resistant resin to make something that is not only functional. Dimensions: D.26 cm Height: 1cm If you’re using these moulds to make coasters, we recommend that you add a 3mm thick clear layer of Heat-Resistant resin first in your mould. Let it set and then add more resin with colour, ink, glitter, flowers etc. Once turned out (after 3-4 days), what was the bottom will be the top and heat-resistant up to 20oC! Remember that our Heat-Resistant resin needs between 72 h to achieve full cure, so don’t place a hot cup on it too early. DO-IT-YOURSELF. Material: Silicone, Colour: Semi-transparent; Reusable, Non-stick, Easy to use and clean. Warning: do not use aggressive solvents, High-quality moulds, heat-resistant: -40°C to + 210°C [-104° F to +410° F]
$13,20
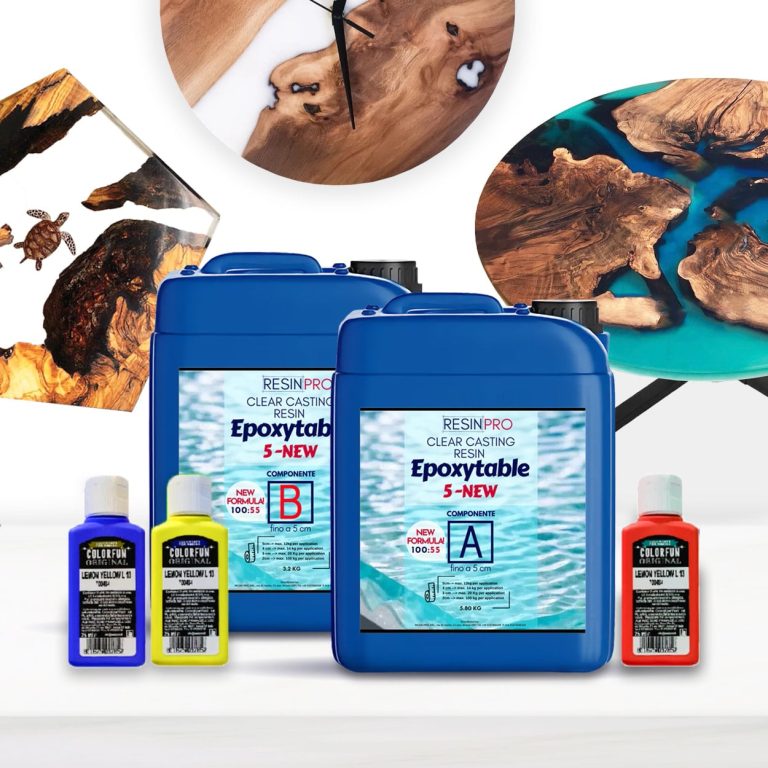
Bestseller for projects up to 5cm: –Tabletops & furniture: Ideal for creating & coating tabletops, including dining tables and countertops. –DIY & Home Decor: Use it for artistic projects and decorative elements. –Craft & Wood-working: A versatile choice for creative crafting projects, like dioramas and dynamic modelling. 💥About “EPOXYTABLE 5-FIVE” - deep pour epoxy resin for tables & large projects: Finally, the ultimate product that allows high-thickness castings, non-yellowing and scratch-resistant. Ultra-low exothermic reaction allows high-thickness castings WITHOUT OVERHEATING and DEFORMATIONS. Perfectly TRANSPARENT and BUBBLE-FREE. Specially designed to be used to create wooden and resin tables and for large castings for artistic works. 💥Key features: ⚙️ 【RIVERTABLE, COUNTERTOPS AND DEEP COATING RESIN】-Ideal for the wood and deep river tables, countertops or for the creation of objects that require high thickness casting. Special low exothermic reaction and its low viscosity are perfectly to deep thickness castings, guaranteeing stability and resistance to your creations. Detailed instruction and gloves for free. 🧪 【HIGH QUALITY】-Totally shiny, self-leveling and odourless epoxy resin. Easily polished. The added UV Anti-Yellowing Filters helps save transparency over time. The low density allows prevent the incorporation of air bubbles making it perfectly suitable for river tables and countertops. Compatible with silicone and wood, fabric, glass, paper or photographs. Complete catalysis ~ 5-7 days, but it will already be workable after about 72 hours. 🌿 【SAFE AND CERTIFIED】-All our resins are Certified Non-Toxic, Solvent-free, non-flammable, and totally safe. 💧 【EASY TO USE】-The 100:55 mixing ratio makes this product very easy to use. Being a two-component resin, simply mix RESIN A + HARDENER B in the ratio indicated above the package and let it harden without the need for further additives. Can be coloured as desired. 🇬🇧 【UK BASED TRUSTED COMPANY】 - RESIN-PRO team fulfils your order as fast as possible. We produce and realise epoxy resins since 2015. Just check our social media, where you will find thousands of projects made with our products around the world. THINGS TO KNOW: If one of the sides of the project is more than 100cm or the total weight of pouring epoxy is more than 8kg we insistently recommend to do a casting in two and more layers! (waiting 6- 8 hours between them). Please, pay extra attention mixing bulky amounts! 5cm–> max. 12kg per application 4cm –> max. 14 kg per application 3cm .–> max. 20 Kg per application 2cm –> max. 100 kg per application *Free colorant is just a sample. For getting a solid color you need the next quantity - 9kg - 3pcs of 25ml (75ml) 18kg - 6pcs of 25ml (150ml) You can add additional items here - RESIN COLOUR TRANSLUCENT EFFECT 25 ML
$21,49
Differences Between Compacted Gravel and Stabilized Gravel
The primary distinction between compacted gravel and stabilized gravel lies in the treatment process and resulting mechanical strength. Here's what differentiates the two types:
Compacted Gravel
Compacted gravel consists of natural rock fragments of varying sizes. It is laid and compacted using vibrating machinery to enhance density and strength. However, compacted gravel lacks treatment with binders or resins, making it susceptible to displacement and dispersion over time due to traffic or weather conditions.
Stabilized Gravel
On the other hand, stabilized gravel undergoes additional treatment to enhance its strength and durability. Typically, gravel is combined with stabilizing resins or polymers, acting as binders to create a more cohesive and resistant compound. This stabilization process reduces the risk of displacement, deformation, and erosion, ensuring enhanced durability and stability of the surface.
In summary, compacted gravel is simply compacted without additional treatments, while stabilized gravel is reinforced with resins or polymers to ensure greater strength and long-term durability.
Advantages of Compacted Gravel over Stabilized Gravel
Compacted gravel and stabilized gravel are popular choices for outdoor areas such as parking lots, pathways, and courtyards. Here are the advantages of compacted gravel over stabilized gravel:
- Cost: Compacted gravel tends to be more cost-effective as it requires less material and labor for installation.
- Ease of Installation: Compacted gravel can be laid more easily compared to stabilized gravel, which often necessitates the use of binders or resins for stabilization.
- Permeability: Both options allow water drainage, but compacted gravel offers slightly higher permeability as it is not obstructed by binders that may restrict water passage into the underlying soil.
- Maintenance: Compacted gravel generally requires less maintenance as there is no need to restore degraded binders over time.
- Aesthetics: Some prefer the natural appearance of compacted gravel over stabilized gravel, which can appear more artificial due to the binders used.
In conclusion, the choice between compacted gravel and stabilized gravel depends on specific project requirements and aesthetic preferences. Compacted gravel offers advantages in terms of cost, ease of installation, permeability, maintenance, and natural appearance.
Application of Compacted and Stabilized Gravel on a Construction Site
To properly apply compacted and stabilized gravel on a construction site, it is essential to follow some fundamental steps:
- Ground Preparation: Ensure the ground is well leveled and compacted before beginning gravel application. Remove any weeds, debris, or organic material that could compromise ground stability.
- Application of Compacted Gravel: Distribute an even layer of gravel of appropriate thickness on the prepared surface. Compact the gravel using a compactor roller or vibrating plate to ensure a solid and resistant surface.
- Application of Stabilized Gravel: Mix the gravel with a stabilizing binder such as resins or polymers following the manufacturer's instructions. Distribute the mixture on the prepared surface and compact it carefully to ensure good adhesion and greater resistance.
- Maintenance and Inspection: Regularly inspect the condition of the gravel to ensure it maintains its compactness and stability over time. Conduct any necessary repairs or maintenance to ensure the surface's durability.
By adhering to these guidelines and working diligently, you can correctly apply compacted and stabilized gravel to achieve a durable and long-lasting result on the construction site.
When to Use Compacted Gravel or Stabilized Gravel
The decision between compacted gravel and stabilized gravel depends on specific project requirements and environmental conditions. Here is an overview of situations where each type of gravel is preferable:
Compacted Gravel
- Parking Lots and Roads: Ideal for high-traffic areas like parking lots, roads, or access roads.
- Ground Stabilization: Offers greater strength and stability if soil stabilization is needed.
Stabilized Gravel
- Trails and Pedestrian Paths: Perfect for trails and pedestrian paths, providing a more uniform and resistant surface.
- Areas Prone to Erosion: Helps maintain its shape and structure over time in areas with high erosion levels.
In general, compacted gravel is more suitable for situations requiring greater strength and drainage, while stabilized gravel is ideal for areas needing a more uniform surface resistant to erosion. Consultation with a professional in the field is advised to determine the best choice based on specific project requirements.
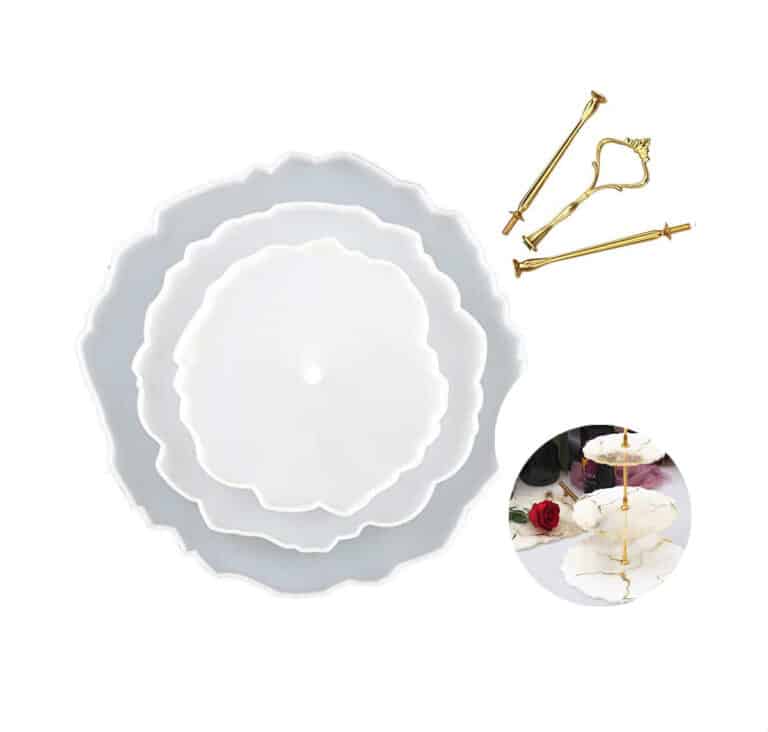
HIGH-QUALITY SILICONE MOULD FOR HANDCRAFTS This flat Coaster Mould has a smooth interior and produces a beautiful coaster with a professional finish. Use our heat-resistant resin to make something that is not only functional but also ideal for making three-tier fruit and dessert trays, coasters, decorative elements and home and office decorations. This product can be reused over the years. The Set includes: Silicone molds: D. 155 mm – 1 pcs → 6.1 in – 1 pc D. 205 mm – 1 pcs → 8.1 in – 1 pc D. 255 mm – 1 pcs → 10.0 in – 1 pc Support rod (by variation): 110 mm – 2 pcs → 4.3 in – 2 pcs 122 mm x P. 47 – 1 pcs → 4.8 in x P. 1.9 – 1 pc If you're using these moulds to make coasters, we recommend that you add a 3mm thick clear layer of Heat-Resistant resin first in your mould. Let it set and then add more resin with colour, ink, glitter, flowers etc. Once turned out (after 3-4 days), what was the bottom will be the top and heat-resistant up to 200C! Remember that our Heat-Resistant resin needs up to 72 hours to achieve full cure, so don't place a hot cup on it too early. DO-IT-YOURSELF. Material: Silicone, Colour: Semi-transparent; Reusable, Non-stick, Easy to use and clean. Warning: do not use aggressive solvents, High-quality moulds, heat-resistant: -40°C to + 210°C [-104° F to +410° F]
$17,49
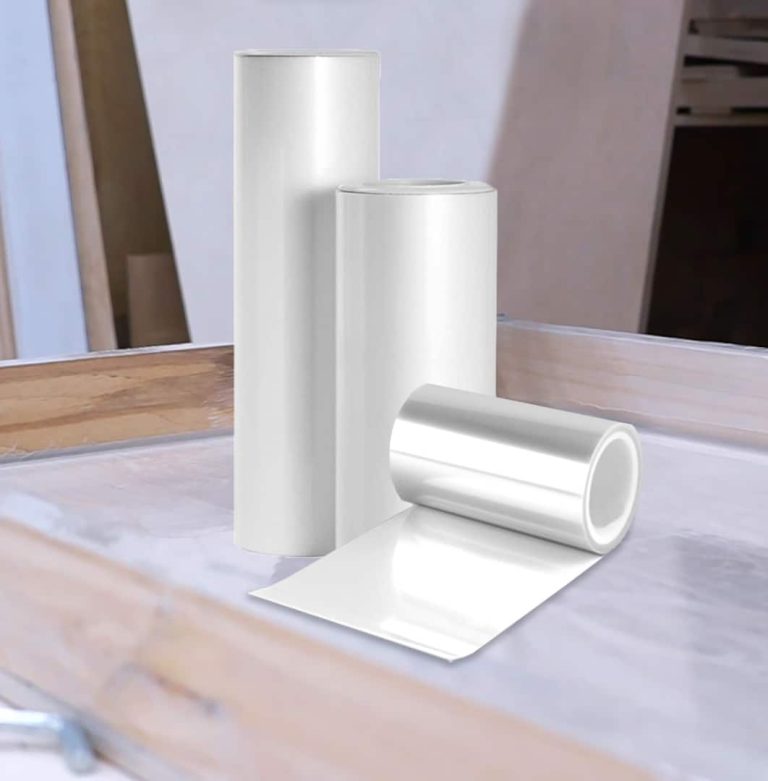
"SHINY SHIELD" - Glossy Release Film For Coasters & Table`s Frames Great tool for achieving the best results: ✔️ "Shiny Shield" release Film for Epoxy, Polyurethane and Acrylic Resins. ✔️ Transparent, adhesive and easily removable, it won’t leave any sticky traces on the workpiece; ✔️ Applicable on ALL SURFACES; ✔️ Specifically developed for CASTING FORMWORK EXTERNAL COATINGS. It is easy to apply without unevenness, creating a smooth, glossy and bubble-free surface, which will help easily release your epoxy project from the frame; ✔️ Once the resin has solidified, the "Shiny Shield" film can be easily removed, leaving a HIGHLY POLISHED even surface; ✔️ REUSABLE several times; ✔️ It does not require any kind of additional treatment and it is IMMEDIATELY READY to be poured. For any queries or if you may need some advice, please contact the ResinPro technical department!
$4,62
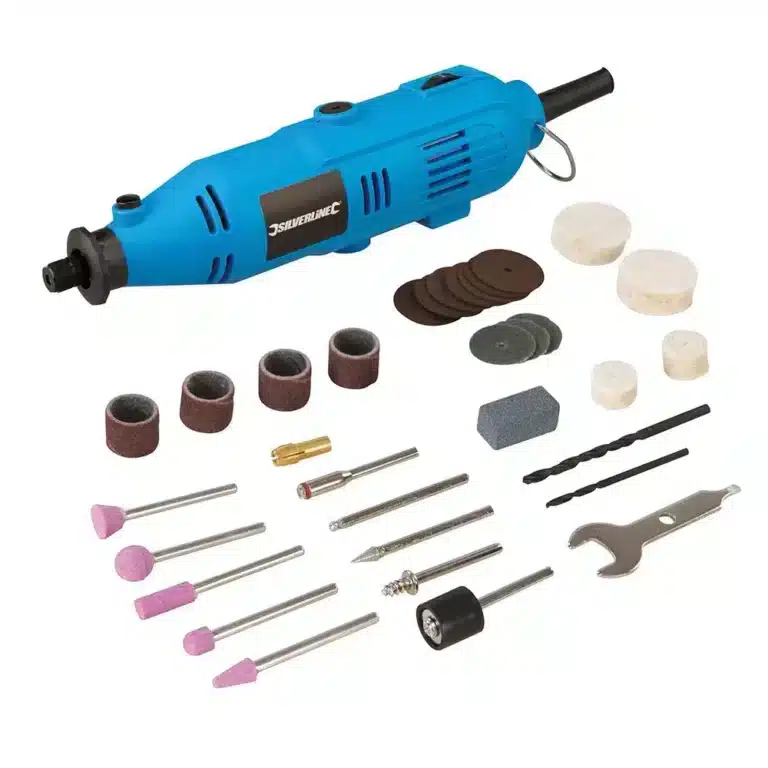
Multi-Function Rotary Tool Description: Versatile rotary tool designed for precise cutting, grinding, polishing, and carving. Features variable speed control (8,000-33,000 RPM) for optimal performance and a spindle lock for easy accessory changes. Includes two collets for mandrel sizes of 3/32" (2.4mm) and 1/8" (3.2mm). Comes with a convenient suspension loop and a comprehensive 43-piece accessory kit. Perfect for DIY enthusiasts and detailed craftwork. Key Features: Adjustable Speed & Spindle Lock: Allows you to tackle various projects with ease and switch accessories quickly. Comprehensive Accessories Kit: Includes sanding drums/discs, grinding stones, diamond bits, polishing wheels, and more. Precision Collets: Compatible with 3/32" (2.4mm) and 1/8" (3.2mm) mandrels. No-Load Speed Range: 8,000-33,000 RPM. Cable Length: 5.7 feet (1.75 meters). Compact & Portable: Comes with a durable blow-molded case for easy storage and transport. What’s in the Box: 1 x 135W Multi-Function Rotary Tool 1 x Drill Bit 3mm (Approx. 1/8") 1 x Drill Bit 2mm (Approx. 5/64") 1 x Ball Diamond Bit 1 x Coned Diamond Bit 1 x Disc Mandrel 1 x Felt Mandrel 1 x Steel Brush 1 x Nylon Brush 10 x Grinding Stones (Various Tips) 3 x Sanding Discs 8 x Cutting Discs 2 x Polishing Wheels (1" and 0.5") 1 x Drum Mandrel 4 x Sanding Drums 2 x Collets (3/32" and 1/8") 1 x Spanner 1 x Blow-Molded Case 1 x Instruction Manual Technical Specifications: Cable Length: 5.7 feet Power: 135W No-Load Speed: 8,000-33,000 RPM
$48,95

Resin Pro offers the possibility to achieve a perfect polishing by using different types of abrasive pastes. It can be used by hand or with an orbital polisher to make your resin creations shiny. Ebonite Abralon Sanding Pads Cosmetically appealing, consistent scratch pattern provides excellent traction. Combines the benefits of abrasive cloth and non-woven products. Opening in the fabric allows water to flow freely around the abrasive. Solid surface and foam backing provide even surface pressure. Last 5+ times longer than sandpaper. Use wet or dry (residual material can be removed by high pressure air). Now it's possible to get the most aggressive surface texture without that "cheese grater" look. Abralon sanding pads use silicon carbide particles that are precision sifted to a consistent grain size, then bonded evenly to a six-inch round fabric face for the most even scratch pattern available. WARNINGS: During processing, use protective masks, gloves, and other protective clothing. In case of contact with eyes, immediately rinse with cold water for 15 minutes and immediately consult a doctor. The kits may include by variations: EpoxyPolish Polishing cream – 250 ml [8,79 oz] - 1pc Ebonite Abralon Sanding Pads: - Ebonite Abralon Sanding Pad 150mm 360 grit - 1pc - Ebonite Abralon Sanding Pad 150mm 500 grit - 1pc - Ebonite Abralon Sanding Pad 150mm 1000 grit - 1pc - Ebonite Abralon Sanding Pad 150mm 2000 grit - 1pc - Ebonite Abralon Sanding Pad 150mm 3000 grit - 1pc - Ebonite Abralon Sanding Pad 150mm 4000 grit - 1pc EpoxyPolish Polishing cream How to Use: Step 1: Thoroughly clean the surface with a cloth. Step 2: Now you can polish by hand or with an orbital polisher. We recommend using the lowest possible speed to get the best result. Start Polishing with 360-500 grit. Note: Sand the entire surface evenly with circular movements and light pressure. Moisten the pad or the surface with water from time to time. Step 3: Now use the 1000 grit sandpaper. Note: Moisten the sandpaper or the surface with water from time to time. Step 4: Afterwards, use 2000 grit sandpaper. Note: Moisten the sandpaper or the surface with water from time to time. Lastly, use 4000 grit sandpaper to finish sanding. Step 5: Remove the sandpaper from the polishing disc and attach a soft sponge to it. Rinse the surface or wipe it with a damp cloth to remove any residual grain of the sanding. Step 6: Apply EpoxyPolish Polishing cream on the damp sponge. Use by hand or with an orbital polisher, using a large circular motion and exerting slight pressure. Step 7: Clean the surface with plenty of water to remove all the remaining residues. Step 8: Enjoy the result!!!
$21,49
 Free shipping on orders over €199,00