
💥 BESTSELLER FOR: -Wood-working: Coating, Countertops and Tables, Works of art; -Restoration or surface coating: Wood, Concrete, Ceramics, Canvas, Glass fiber); -DIY: Jewellery making, and Dynamic modelling. 💥About “iCrystal ” – Transparent Epoxy Resin: Our iCrystal Transparent Epoxy Resin is a premium quality, multipurpose resin that is a popular choice for customers looking to create stunning art pieces, jewellery, countertops, and DIY projects. The new formula is specifically designed to provide maximum transparency, allowing you to create unique and beautiful pieces that will last for a long time. It is easy to use and can be mixed with a variety of pigments to create an endless range of works. iCrystal Transparent Epoxy Resin is safe and non-toxic, making it a great option for artists who are environmentally conscious. It is odourless, VOC-free, making it comfortable to use indoors. Although our epoxy resin is safe to use, we recommend taking proper safety precautions when working with any type of resin. It is important to wear gloves and masks and work in a well-ventilated area to avoid any potential irritation or allergic reactions. This Epoxy Resin is self-levelling and has a high-gloss finish, providing a smooth and professional look to your creations. It is also extremely durable, providing a super solid and shiny surface after full curing time. iCrystal epoxy resin can be used on a variety of surfaces, including wood, stone, ceramics, and more. It is perfect for creating unique and stunning pieces that are sure to impress. We offer free shipping on this product, so you can start your project right away. Plus, with its long shelf life, you can store it for future projects. Choose iCrystal Transparent Epoxy Resin for a safe, high-quality, and versatile option for all your creative needs. 💥Key features: ⚙️ 【CRYSTAL CLEAR EPOXY RESIN】-The clear epoxy resin is suitable for both beginners and professionals. Start making jewellery, paintings, and any professional creation that involves the use of resin. 🧪 【HIGH QUALITY】 -Crystal clear, No bubbles, Odourless - because of unique formula for DIY, craft and artistic creations. Ideal for casting and embedding objects too. Compatible with silicone, wood, fabric, glass, paper or photographs. Fast completed curing time - 24 h, Demould time is only 10 hours. 💧 【EASY TO USE】-The 100:50 mixing ratio makes this product very easy to use. Being a two-component resin, simply mix RESIN A + HARDENER B in the ratio indicated above the package and let it harden without the need for further additives. Can be coloured as desired. 🌿 【SAFE AND CERTIFIED】 -All our resins are Certified Non-Toxic, Solvent-free, non-flammable, and totally safe. 📞 【FREE PROFESSIONAL ASSISTANCE SERVICE】-Since we are directly a manufacturer, we have access to a professional laboratory that will happily help you with any complex project. 🇬🇧 【UK BASED TRUSTED COMPANY】-RESIN-PRO team fulfils your order as fast as possible. We produce and realise epoxy resins since 2015. Just check our social media, where you will find thousands of projects made with our products around the world. 💥Suitable for: -Model making; -DIY and wood-working; -Coatings of furniture and surfaces; -Artistic creations (paintings, liquid art, petri dish); -Jewellery and fashion; -Glass Fiber Repair; -Outdoor Protective Coatings; -Boat construction; -Impregnation of technical fabrics (glass fiber, carbon fiber, etc); Check and tag our social media for inspiration! We are always happy to publish your art-work –
$10,67
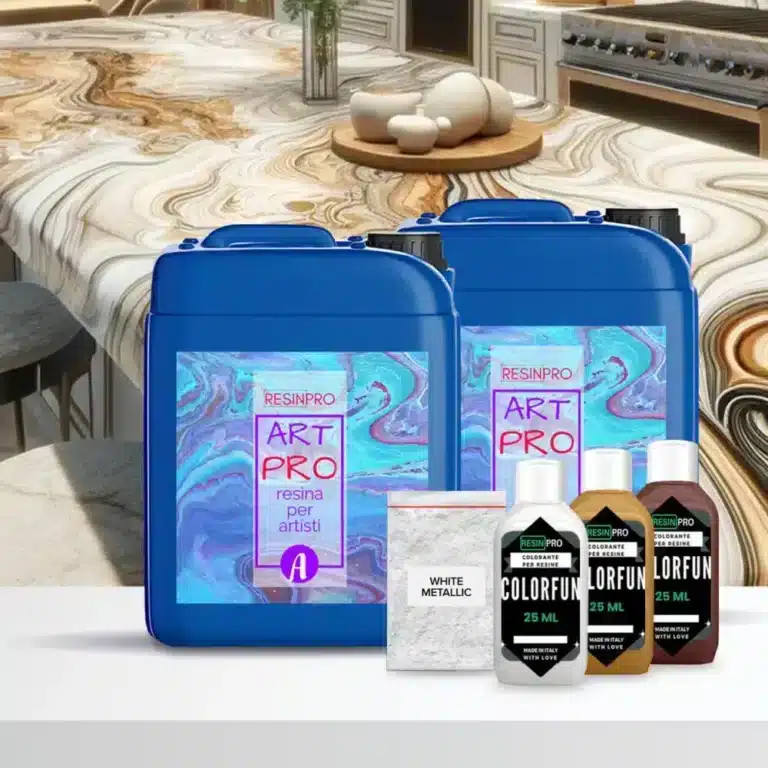
Amber Onyx Effect Kit with Epoxy resin: The 2.49 kg kit (1.66 + 0.83) covers 1 square meter (+ 10 g Sahara white pigment + 25 ml white dye + 25 ml brown dye + 25 ml OXIDE yellow dye) The 4.15 kg kit (2*1.66 + 0.83) covers 2 square meters (+ 2*10 g Sahara white pigment +2* 25 ml white dye +2* 25 ml brown dye +1*25 ml OXIDE yellow dye) The 8.33 kg kit covers 4 square meters (+ 4*10 g Sahara white pigment +4* 25 ml white dye +3* 25 ml brown dye+ 2*25 ml OXIDE yellow dye ) The 16.66kg kit covers 8 square meters (+8*10g Sahara white pigment +8*25ml white dye +4*25ml brown dye + 2 * 25 ml OXIDE Yellow dye) Kit Contents: 2.49 kg, 4.15 kg, 8.33 kg or 16.66 kg of Art Coat Epoxy "Art Pro" for a high quality base White Dye, Oxide Yellow Dye and Brown Dye from the "Colourful" Line for the perfect caramel stone shades - White Metallica Sahara pigment for that extra touch of sparkle Each kit includes dyes and pigment in sufficient quantity for the amount of resin required. Choose the Amber Onyx Effect Kit with Epoxy resin for an easy and elegant transformation of the worktop. Purchase your kit now and elevate your space with the warmth and beauty of caramel marble. Guide Instructions: Step N1: Primer Start by carefully measuring the amount needed to cover the surface based on the consumption of 150 g/m2, making sure to follow the proportions indicated to obtain a homogeneous mixture. Once the base has been prepared, proceed with adding the dye, choosing between white or black depending on your needs. The quantity of colourant to add to the mixture can be measured in a few drops (max 5% by volume). This step is crucial to achieve the desired colour and ensure uniformity of the application. Before applying the primer, it is essential that the surface intended for treatment is adequately prepared. Sand the surface with a coarse grit (40 or 60) before any operation. Make sure it's completely clean, using a soft cloth or brush to remove any pigment, dirt or debris. The surface must also be completely dry; residual humidity can compromise the adhesion of the primer and its effectiveness in sealing the surface. Once the surface is ready, apply the mixture evenly, using a suitable tool such as a brush, roller or spatula, depending on the size of the area to be treated and your personal preference. The key is to get a thin, even layer that can cover the entire area without leaving gaps or excessive product build-up.. After application, it is essential to allow the primer to dry completely before proceeding with further treatments or finishes on the surface. The recommended waiting time is 12 hours; this range may vary slightly depending on environmental conditions, such as humidity and temperature, but offers a good compromise to ensure the mixture has time to dry and adhere properly. During this period, avoid touching or stressing the treated surface to ensure optimal results. Don't worry if you notice any discrepancies on the surface, the next main pour will level everything perfectly. Step N2: application Start by applying masking tape around the perimeter of your countertop to contain the epoxy you're about to pour. This step is essential to ensure the resin stays where it is needed. After applying the resin, wait about 1.5 hours before gently removing the tape. To ensure coverage is even and complete, plan to use approximately 1.6kg of resin for every square meter of surface area. When you are ready to mix the resin, use a drill equipped with a paddle mixer for quick and even action (use at low speed), taking about 2 minutes for this operation. If you prefer to mix by hand, be prepared to take double the time. Don't forget to scrape the sides and bottom of the container halfway through the process with a stick to ensure all the material is mixed well. Next, separate the already mixed resin into different glasses and add the desired colours, mixing the different colours in the different glasses until you obtain an intense and uniform colour per single glass. To create a striking visual effect, pour the coloured resin in random layers into a larger bucket, being careful not to mix the colours together too much. After filling the bucket, spread the contents over the surface of the worktop, leaving a small amount of resin aside to finish the edges later. To remove trapped air bubbles, gently run a propane torch or heat gun over the surface. Once the adhesive tapes have been removed, approximately 1.5 hours after application, if there are any dry edges, moisten them slightly by wearing a protective glove to promote an even appearance. Use appropriate tools, such as spatulas or plastic scrapers, to spread and level the resin along the edges, making sure to cover the entire area well. After letting the resin cure for 24 hours, you can apply a clear top coat or PoliShield scratch-resistant paint to further protect the surface. Finally, for even more refined visual effects, spray 99.9% isopropyl alcohol onto the surface just before the resin begins to fully harden. This will create unique lacy textures. Remember that when you remove the tape, it is essential that the resin is partially hardened, neither too liquid nor completely solid, to avoid unwanted drips. Attention! Safety Guidelines for Using Isopropyl Alcohol (99.9%) Isopropyl alcohol (IPA) is a highly flammable substance. Improper use—especially near heat sources like torches or heat guns—can result in fire or explosion. To ensure safe use, follow these precautions: Primary Risks Highly flammable: IPA vapors can ignite from sparks, open flames, or hot surfaces. Forms explosive vapor-air mixtures, especially in enclosed or poorly ventilated spaces. Strictly Prohibited: Using gas torches or heat guns near areas treated with IPA. Spraying IPA near active heat sources. Storing IPA near flames, heaters, or hot tools. Recommended Safety Measures: 1. Ventilation: Always work in a well-ventilated area when using IPA. 2. Wait Time: After applying IPA, wait at least 5–10 minutes to allow complete evaporation before using any heat tools. 3. Safe Distance: Keep IPA containers at least 2 meters (6 feet) away from heat or flame sources. 4. Storage: Store IPA in a tightly sealed container, away from direct sunlight or high temperatures. 5. Fire Safety: Have a CO₂ or dry chemical fire extinguisher nearby when working with flammable substances and open flames. In Case of Fire: Do not use water to extinguish the fire. Use an appropriate extinguisher, cut off air supply if safe, and call emergency services if needed.
$83,49
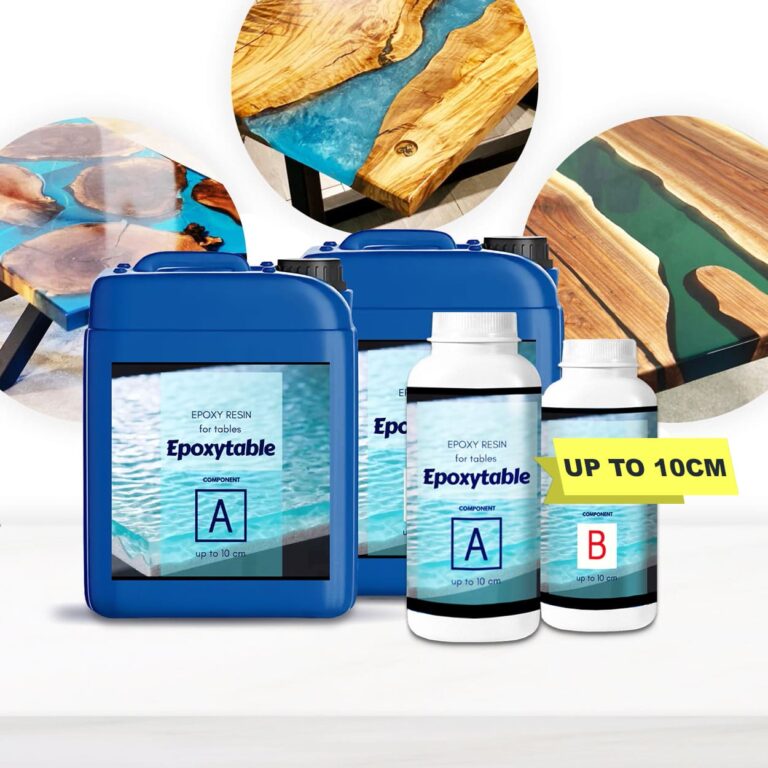
Specially designed for Deep pour applications including: –River tables: Suitable for creating thick, clear resin castings with a maximum thickness of up to 10 cm. –DIY & Artistic creations: Night lighs, flowers preserving and other projects, which requires super-deep casting up to 10cm. 💥 About "EPOXYTABLE 10-TEN" - Epoxy Resin For Large Projects - Casting up to 10cm: Introducing "EPOXYTABLE 10-TEN," the ultimate solution for your high-thickness casting needs. Crafted to perfection, this epoxy resin offers unparalleled qualities that make it ideal for tables and expansive artistic creations. "EPOXYTABLE 10-TEN" is not limited to just tables. It's designed for a wide range of large casting projects, including artistic works that demand exceptional clarity and depth. The possibilities are endless, allowing you to unleash your creativity without constraints. 💥Key features: ⚙️ 【HIGH-THICKNESS CASTING】-"EPOXYTABLE 10-TEN" is specially formulated to handle deep pour applications with ease. It allows you to create captivating castings that can reach thicknesses of up to 10 cm (4 inches). Whether you're crafting a one-of-a-kind tabletop or a large-scale artistic masterpiece, this epoxy resin is up to the task. 🧪 【NON-YELLOWING BRILLIANCE】-Say goodbye to worries about your creations turning yellow over time. "EPOXYTABLE 10-TEN" remains perfectly transparent and non-yellowing, preserving the beauty of your projects for years to come. Your creations will continue to shine with the same brilliance as when you first made them. 🌿 【SAFE AND CERTIFIED】-All our resins are Certified Non-Toxic, Solvent-free, non-flammable, and totally safe. 💧 【EASY TO USE】-The 4:1 mixing ratio makes this product very easy to use. Being a two-component resin, simply mix RESIN A + HARDENER B in the ratio indicated above the package and let it harden without the need for further additives. Can be coloured as desired. 🇬🇧 【UK BASED TRUSTED COMPANY】 - RESIN-PRO team fulfils your order as fast as possible. We produce and realise epoxy resins since 2015. Just check our social media, where you will find thousands of projects made with our products around the world. THINGS TO KNOW: If one of the sides of the project is more than 100cm or the total weight of pouring epoxy is more than 8kg we insistently recommend to do a casting in two and more layers! (waiting 6- 8 hours between them).
$46,99
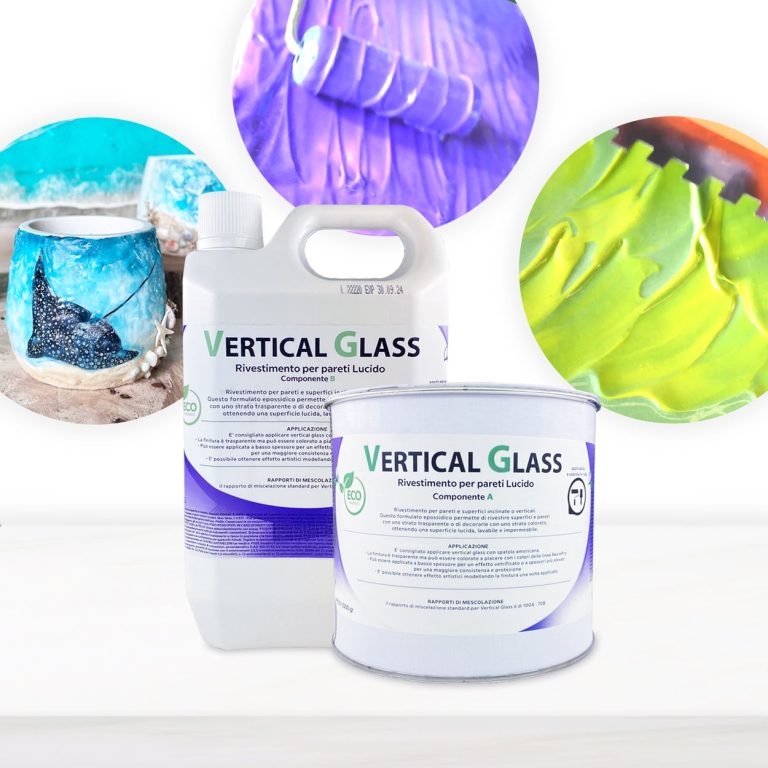
Coating for inclined or vertical walls and surfaces / This epoxy formulation allows you to coat surfaces and walls with a transparent layer or decorate them with a colored layer, resulting in a glossy, washable and waterproof surface. The Vertical Glass resin differs from normal resins allows creatives to create sharp shapes and designs on surfaces and canvases without the resin mixing unintentionally losing the original design! Transparent, UV-resistant epoxy system that creates a hard, glossy protective layer. Vertical Glass allows you to keep your initial design, faithfully respecting your creative idea! The surface will be perfectly smooth and resistant to moisture. Solvent-free and odorless epoxy resin. Applications: Floors and Walls (pre-existing) also vertical; Protection of material coatings and other artistic decorations; Coating, repair and decoration of shower trays and sanitary ware; Coating of surfaces, objects and furniture to give depth and brilliance to the color, even in Vertical! Features: For a smooth coating, it is applied with a spatula to the surface of any material: tile, concrete, wood, brick, etc. It has good hiding power, and completely covers the work surface in one application Creates a glossy, smooth and moisture-resistant layer To create a matte surface, it is easily sanded (48 hours after application, with a grain size of 1000-2000 P) Protects from moisture and gives a new life to surfaces It can be painted with dyes and pigments from our assortment Does not self-align: saves the drawing that you set for it 🙂 Please note that in the unpainted form, the material is not completely transparent, and there is a slight “milky” shade with almost imperceptible micro-particles, so we recommend painting it It is used for: Floor coverings, walls, furniture and other surfaces Protection of surfaces of materials Painting, repair and decoration of showers and bathrooms Creation of paintings, murals and other works of art
$109,49
Epoxy Resin Application
Applying epoxy resin is a precise process that demands attention to detail. To begin, prepare the surface where the resin will be applied, ensuring it is clean and dry. Next, mix the resin and its hardener following the recommended proportions provided by the manufacturer. Pour the resulting mixture onto the surface and spread it evenly with a spatula. Allow the resin to cure for the specified time, typically around 24 hours.
How to Use Epoxy Resin
Using epoxy resin can be broken down into four main phases: preparation, mixing, application, and curing. Start by preparing the surface, ensuring it is clean and dry. Then, mix the epoxy resin with the hardener following the manufacturer's instructions. Once the compound is ready, proceed with the application using a spatula or brush. Finally, allow for the necessary curing time, which varies depending on the product used.
Silicone Molds Tutorial for Resin
Creating silicone molds for resin is a meticulous process that requires attention to detail. Begin by selecting an object to replicate and preparing it for molding. Once ready, prepare the silicone and pour it over the object. After allowing the silicone to cure, remove the object to reveal the mold ready to be filled with resin. The resin curing process may vary depending on the type used. Once the resin is fully cured, remove the silicone mold to unveil the replicated resin object.
Best Pigments for Epoxy Resin
Mica powder pigments are considered the best pigments for epoxy resin due to their high temperature and humidity resistance. Available in a wide range of colors, they allow for iridescent and metallic effects. Other suitable pigments include organic options for intense and vibrant colors, and inorganic pigments appreciated for their stability and long-lasting properties, although they offer a more limited color range.
Application of the New Epoxy Resin
The new epoxy resin is widely utilized in coatings and DIY projects. Thanks to its resistance and durability, it is ideal for creating protective surfaces on various materials. This resin distinguishes itself for its ability to adhere to different surfaces, ensuring a uniform and long-lasting finish over time. Its versatility allows for the creation of artistic designs and personalized artifacts with high-quality outcomes.
Epoxy Resin Application
The application of epoxy resin is a crucial process to achieve optimal results in DIY and industrial projects. To attain a perfect and enduring finish, it is essential to meticulously follow the manufacturer's instructions and thoroughly prepare the surface. Accurately measure the components, mix them correctly, and apply the resin evenly. Utilize appropriate tools and work in a well-ventilated area to ensure proper catalyzation and excellent results.
DIY Epoxy Resin
DIY epoxy resin is a versatile and durable material suitable for creating jewelry, decorations, and coatings. Before use, carefully follow the manufacturer's instructions to achieve optimal results. Accurately measure the proportions of epoxy resin and hardener for correct curing. Remember to work in a well-ventilated environment and wear the necessary personal protective equipment.
Epoxy Resin Tutorial
Epoxy resin is a versatile and durable material used for artistic creations, coatings, and repairs. For an epoxy resin tutorial, begin by preparing the work area and wearing gloves and a mask. Thoroughly mix the epoxy resin with the hardener according to the indicated proportions. Pour the compound into molds and wait for the curing time. Finally, carefully remove the artifact and admire the glossy and durable final result.
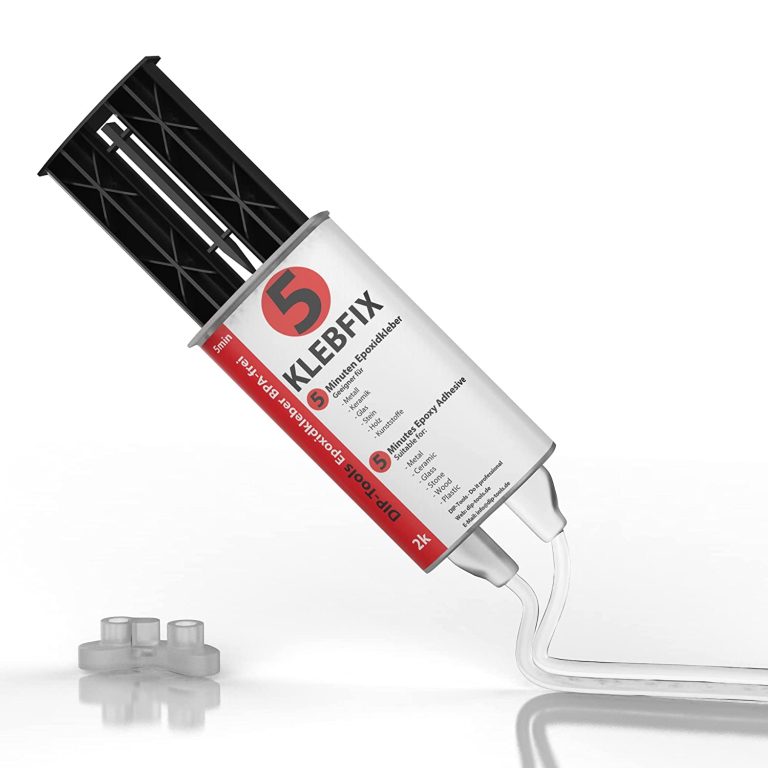
Advantages of Two-component Epoxy Resin Adhesive Extreme strength and resistance to thermal and mechanical influences Resistant to most aggressive substances and oils Available solvent free and BPA free It hardens even under water Compatible with a wide range of additives such as dyes and accelerators Expedited Potlife Application – BestPractice At room temperature (15-30 C The mixing ratio of the two components of 1: 1 is maintained automatically. Do not apply below 5 C outdoor temperature. The higher the ambient temperature, the more effectively the material polymerizes. This means that resistance increases at higher temperatures. It is recommended to have a cloth ready for cleaning. In addition, care must be taken that the work surface is protected and can be cleaned directly if necessary. The surface should be slightly roughened, because only then is the epoxy adhesive guaranteed to bond well with the material. To do this, you can sand or file the surface. To spread the sticker, a piece of cardboard or plastic is useful. After use, clean the tube so that the lid does not stick, and then close it tightly. The thickness of the adhesive should be thin enough (0.1-0.2 mm), but if necessary it can be thicker. The parts to be glued must be clean and free of oil and grease. Apply the adhesive on one side and join and press the parts to be glued. The potlife is about 5 minutes, good endurance is achieved after about 10-12 minutes, and total endurance after about 24 hours. Pot life is limited in time and describes the maximum working time of the uncured adhesive. Once the pot life has passed, the adhesive not yet applied must not be further processed, but must be disposed of! Until the manual force is reached, the binding must be additionally fixed, for example, with the help of a vice, adhesive tape or clamp. In the case of heat-assisted polymerisation, the temperature resistance of the joined parts must be guaranteed. In addition, the heating and cooling times of the parts to be joined must be respected. This time must be added to the curing time of the adhesive. Tension can occur in the glued joint during heating and cooling. With materials such as PP, PE, PTFE or silicone, the parts need to be pretreated with our primer. The need for a primer depends on the surface tension. If this is high enough it can be tested with water droplets on the surface. If the drops adhere well to the surface, a good bond is most likely. If the drops slip away, a primer is probably needed. Mixing There are several ways to mix the two components: - Mixing by hand - Use of a static mixing nozzle - Use of a dynamic mixing nozzle Hand mixing is sufficient in most cases. For this purpose, a toothpick or similar is used and the two components are mixed until a cloudy mass is formed. Make sure that no bubbles remain. When using a static mixing nozzle, the mixing of both components takes place inside the mixing nozzle so that the mixing is ideal. The first 2g should be discarded, given they are not yet mixed 1:1. However, the mixing nozzle can only be used until the adhesive in the mixing nozzle has dried. After that, you will need a new nozzle. W With a dynamic mixing nozzle, the speed of the mixer can be controlled electronically. This allows you to control the mixing intensity very precisely. However, this is intended for special industrial applications and is not necessary for everyday use. Harden The adhesive is chemically cured. This gives the advantage that gluing the surface is also possible, where adhesives that harden with moisture take a very long time. The bond is high strength and densely flexible. Thus, permanent resistance can be guaranteed in the event of shocks and vibrations. The use of the polymerised adhesive is also possible at high temperatures (up to about 120C), for a short time (30 min) up to 200C The polymerised adhesive has good resistance to physical (e.g. sunlight) or chemical (moisture, detergents, chemicals, etc.) influences. The great advantage of two-component epoxy adhesive is the fact that it hardens even under water and is robust. In addition, it is mouldable, so it can be inserted into any recess to fit. Technical data Epoxy Resin Hardener Base (amine mixture) Viscosity High Viscosity Transparent Color Density 1.1 g / ml Gap filling capacity 3mm Temperature resistance -40 up to +120 C Pot Life 5 min Hand resistance 10-12 min Final endurance 24 hours Shore hardness 60 Tensile shear strength 10 N / mm2 Module E 620 N / mm2
$32,95
![]()
Stones & Binder Calculator Area sqm (L*W*1m): Thickness (cm)*: Calculate Stones: 0 kg Resin binder: 0 kg *Recommended minimum thickness for driveway: 2 cm; Other areas: 1.5 cm. Certified Non-Toxic Transparent Epoxy Binder This resin has been specifically formulated to ensure an impeccable result in various applications. Thanks to its high gloss and transparency, and low viscosity, it offers a flawless, clear, and bubble-free result for your colored pebbles or aggregates. It is also certified non-toxic for skin contact post-cure. High Resistance and Durability Excellent resistance for your permeable floor: this binder ensures outstanding mechanical performance once cured. It also cures very quickly, making the floor walkable and fully usable in just 24 hours. Guaranteed Yellowing Resistance The cycloaliphatic amine-based hardener, along with the use of UV filters, guarantees high resistance to yellowing. Key Features High transparency Excellent mechanical resistance Good chemical resistance and carbonation resistance High impregnation and structural reinforcement for permeable floors Long working time Glossy surface High UV resistance for long-lasting creations (low yellowing) High mechanical resistance for scratch protection Low viscosity that reduces air bubbles after curing and facilitates aggregate impregnation Odorless and solvent-free perfectly transparent and bubble-free thanks to the specific formula for natural stones and colored marbles Curing Time Complete curing is achieved in about 24 hours, but the product can be walked on after just 10 hours. Ideal Applications The ideal applications for "ultra-transparent" epoxy resin include colored or dark-colored pebbles and aggregates. Consider these indicative data for epoxy resin for colored aggregates: 1-2 mm - for 20-25 kg of aggregate, add 800g of epoxy resin 3-5 mm - for 20-25 kg of aggregate, add 600g of epoxy resin 6-10 mm - for 20-25 kg of aggregate, add 600g of epoxy resin 10-20 mm - for 20-25 kg of aggregate, add 400g of epoxy resin Main Technical Data (Click the "TDS" icon for the full technical data sheet) Pot-life (150g at 30°C): 1h20' Complete cure after 24h Film cure (1mm at 30°C): 6h Supplied in plastic cans Maximum casting thickness: 2 cm (7 kg at 20°C) Epoxy Resins Epoxy resins are thermosetting polymers derived from monomers containing the three-atom epoxy ring. They are widely used in the production of advanced composite materials, obtained by combining the resin with fibers.
$45,95

💥About "UV-CREATION" - Fast Acrylic Resin - 3 Minutes: Introducing our UV Resin, a versatile and high-quality solution for all your hand crafting needs. UV resin is an acrylic gel that dries under the influence of the rays of a UV torch or UV lamp in a short time - 3-5 minutes. The difference between this resin and epoxy resin is in its one–component nature (it does not require mixing two different components; it is ready for use), in a small filling thickness (applied in thin layers 3 mm thick) and in a high curing rate (only 3-5 minutes under UV rays). 💥 Bestseller for: Artistic Creations: Ideal for creating stunning resin art pieces, jewellery, and decorative items. DIY Projects: Perfect for a wide range of DIY projects, including encapsulating objects, and crafting personalized gifts. Crafting and Modelling: Explore its versatility in crafting, modelling, and various creative pursuits. 💥Key features: ✔️ Fast curing time: No more waiting: Create instantly - UV-CREATION is your ultimate crafting companion for fast, hassle-free creations. Say goodbye to long catalysis times and welcome instant results! Only a couple of minutes under uv-lamp and your creation is ready! ✔️ Maximum hardness, maximum shine: Our new formula guarantees first-rate hardness and a clear, glossy finish that is second to none. ✔️ Time-efficient formula: UV-CREATION's innovative formula ensures surfaces are no longer sticky after curing, saving time and material. ✔️ Non toxic: Experience the joy of creating in freedom. Our acrylic and non-toxic materials ensure that your jewellery and decorative items are safe and spectacular. -The curing time depends on the thickness of the layer or the amount of dye added to the gel. You can use lamps with a power of 3w, 9w and 36w. The main thing is that the wavelength of the lamp is 365nm -405nm. -The recommended application layer is 3 mm. You can apply 2-3 layers of 3 mm, drying each layer well with UV light before applying the next one. It is not recommended to use the product for castings with a thickness of more than 3 mm in one approach. -UV resin can be painted with dry pigments and liquid pigments, glitter and other decorative elements can be added. Alcohol ink is not suitable for UV resin staining.
$12,65
Osmo Hard-Oil-Wax is a general-purpose resin and wood finish derived from natural plant oils and waxes. Resistant to water, dirt, beer, wine, cola and saliva, Osmo Hard-Oil-Wax is microporous and molecularly bonds with the wood, thereby it does not crack, flake or peel. The new advanced formula of Osmo Hard-Oil-Wax has been specially elaborated in Germany to be the first Osmo Hard-Oil-Wax on the European market that can be easily applied with a brush or a roller, no buffing is necessary! It can be used for spot repair and/or restoration/renovation without the need to sand, therefore resin or wood will no longer need complete sanding and refinishing. Clear glossy wood/epoxy finish, which uniquely combines all the advantages of oils and waxes in one product. Osmo-Polyx - Oil Original gloss is resistant to water, dirt and abrasion, and it smoothens any wood surface. Suitable for wood and epoxy resin; microporous surface does not crack, flack or peel. Resistant to wine, beer, cola, coffee, tea, fruit juice, milk and water according to DIN 68861-1A- no water spots. When dry, finish is safe for people, animals and plants and it is also suitable for toys as per EN 71-3 (European norm) and is saliva resistant and sweat-resistant according to DIN 53160 (German industry standard). Recommended use: Osmo Polyx - Oil Original is perfect for the protection of all surfaces and wooden floors, such as solid wood, planks, strips, OSB and cork flooring, as well as furniture surfaces. Ingredients: Based on natural plant oils and paraffin, desiccants and hydrophobing agent. Dearomatized turpentine (benzene-free). EU limit value for this product (cat.A/i): 500 g/l [0,03 lb/oz] VOC (2010). This product contains max. 500 g/l [0,03 lb/oz] VOC. Detailed declaration of ingredients available upon request. Storage: up to 5 years and longer if the can is stored in a dry place and hermetically sealed. Surface preparation: wood and epoxy resin surface must be clean, dry and frost-free (moisture content max. 18%). Osmo Polyx Oil Original is ready to use and should not be diluted. Stir well before use. Clean old microporous stains thoroughly. Old paints and lacquers must be completely removed. As a general rule, wear a dust mask during sanding. Sand wood or epoxy surfaces carefully. Begin with coarse sandpaper – for final sanding use P.120-150, for broom or vacuum. The final result may be influenced by several factors, including the natural features of the wood. Therefore, a trial application is always recommended, especially for unfamiliar timbers. ADVANTAGES Extremely long-lasting and hardwearing Highly resistant to water and dirt Enhances the natural wood characteristics Resistant to common liquids such as water, juice, tea, cola and wine Saliva resistant and sweat-resistant, suitable for toys Microporous breathable finish which does not crack, peel or flake No need to sand for spot repairs or future applications TECHNICAL DATA Approx. coverage: 24 m²/L [7,63 ft²/oz] with one coat No. of coats: 2 coats Application temperature: +5°C to 35°C [41 F to 95 F] Drying time: 8-10 hrs. Sizes: 0.375 L [13,19 oz] Viscosity 95-240 mPas Specific weight: 0.88-0.95 g/cm3 [0,03 lb/in3] Methods of Applications: with Osmo Flat Brush, Floor brush, Oil Finish Applicator Fleece (Hand Pad Holder) or Microfibre Roller, thinly apply to the clean and dry surface along the grain and distribute well. Let it dry for approx. 8-10 hours under good ventilation. Once dry, quickly apply a second thin coat. When renovating or recoating an already oiled surface, one coat applied to the clean and dry surface is usually enough. WARNINGS: During processing, use protective masks, gloves, and other protective clothing. In case of contact with eyes, immediately rinse with cold water for 15 minutes and immediately consult a doctor.
$35,99
 Free shipping on orders over €199,00


